
In this blog, I’ll be sharing how I got up and running using a green screen, OBS Studio and Microsoft Teams to give a more professional video in training sessions.
Credits first – thanks to @chriswebbtech for his session at TeamsFest from @EuroTeamsUG, which you can see here https://www.youtube.com/watch?v=JHf5iC1aaMY and @edbaker1965 for his advice.

And now the disclaimer – I’m new to OBS, so any suggestions, corrections or top tips you may are gratefully received in the comments or contact me on Twitter or LinkedIn.
The Why
After eagerly awaiting the background effect in Microsoft teams, I was a little disappointed in the fuzzy edge effect, especially when adding custom images (see https://office365itpros.com/2020/04/06/teams-meeting-background-image/ for how to). So decided I need a green screen to improve the effect, but to get the effect I was after I need something more.
Turns out it was a proper mixing studio/external encoder/virtual camera and on a variety of advice I went for OBS Studio and OBS Virtual Cam. You do need the Virtual Cam plug in.
After getting started with the tools, I quickly realised I could bring more visual interest into my training, combining my video image with a presentation or screenshare including reducing the size of the video image for more efficient combinations. Haven’t got as far a video backdrops yet, but that offers a whole host of other opportunities too.
The What
My set up is a Surface Book with external monitor, Blue Yeti Microphone with a foam windscreen, a standard set of in ear headphones, Logitech C270 webcam, perched on top of my monitor and a freestanding greenscreen, plus OBS Studio and OBS Virtual Cam and Microsoft Teams (of course).

The How – Set Up
Install and Configure OBS
- Download and install OBS Studio from https://obsproject.com/download
- Configure OBS. The instructions suggest you run a wizard. However if you don’t have a preferred live streaming service to log in to, you cant complete the wizard. I cancelled the auto set up and have the settings shown below, with everything else left as default.
- Download and install OBS Virtual Cam from https://obsproject.com/forum/resources/obs-virtualcam.539/ Go to Download button is towards the top right of the page. Register all 4 virtual cameras


Lastly, I suggest working in Studio Mode, so you only have one screen to work with.

Set up your first scene
With the software ready to go you can add your first scene. I started with one called Just Me which was only the webcam and this is the basis of my other scenes. (please excuse the messy Sunday me, in the images)

To create this scene:
- Click + at the bottom of the Scene pane (bottom far left), enter the scene name and click OK
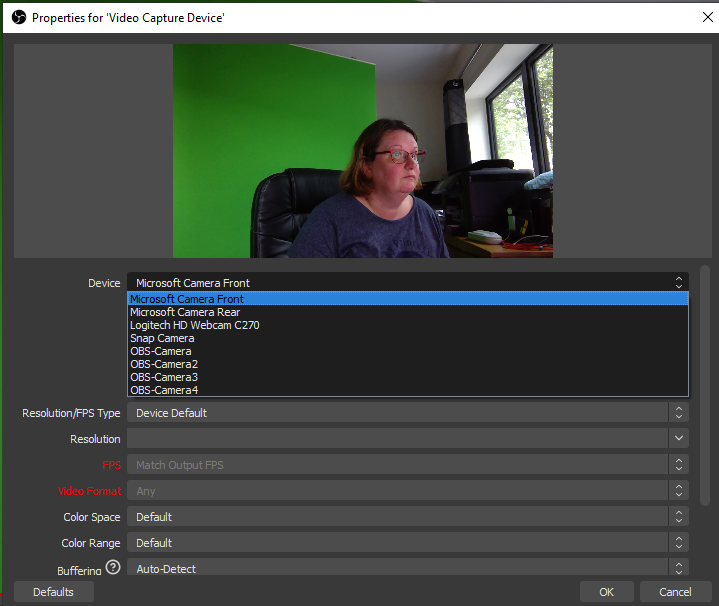
- Click + at the bottom of the Sources pane (bottom left), choose Video capture device, enter a name to refer to the webcam and click OK
- Choose your camera and click OK. You can change the setting, but I haven’t needed to.
- Add the green screen filter by right clicking on the video source and choosing Filters

- In Effect Filters click + and choose Chroma Key, give it a name a press OK
- In your preview window you should now see your camera minus the green screen, as green is the default Chroma Key.
- Adjust the settings so you green screen disappears and the image colour is to your liking

- Close the filters screen.
Now you can create other scenes using the same video source and the green screen filter will be applied.
Set up other scenes
My next scene included a logos background.

The background image is a PowerPoint slide saved as a picture. As far as OBS is concerned most images and image format seem to work fine.
To create this scene, I create a new scene, added the exisitng webcam as the first source then the image as the second source. It was then just a matter of resizing and repositioning the webcam feed to fit in with the background.
To resize/rearrange sources in the scene, click onto the source in the preview so it has a red outline, drag from the middle of the source to reposition and use the square resizing handles (corners and midway along each side) to resize.

Did you see the noise by my shoulder in the scene above – the grey flecks?

That’s due to a bit of light reflecting through the window on my green screen – closing the blinds/curtains gets rid of that.
Another favourite scene is the scrolling text with a background image or the webcam. The movement of the text feels reassuring that the image hasn’t frozen, when you are waiting for a meeting to start.

To add scrolling text, add a text source to your scene, give it a name and click OK. Enter the text and choose your font. The font size is determined automatically when you resize the text box within the scene preview.

To make the text scroll you need to right click on the text in the scene and choose filters. Add a Scroll filter and set the speed and other options as required.

Finally, I added two scenes for screen sharing, one with the webcam and one without. You need to be able to disappear if the webcam image is blocking information on screen, hence the two scenes.
I always share one screen rather than one application, window or presentation as invariably you get dragged into different apps or a pop up comes up. This technique also helps with resolution issues, as my external monitor is set to 3840×2160 and that doesn’t work for most meeting attendees. If possible set you sharing screen to 1920×1080 and 100% scale for the best effect.
Once your resolution is sorted add a Display Capture source and pick your sharing screen to your scene.

If you don’t have the luxury of two (or more) screens then you may be best advised to stick to standard screen sharing. Or when switching scenes you’ll end up in a rather distracting screen loop like the one below.

Using your scene in a Teams call or meeting
You have two options for sharing your scene to a Teams call or meeting
- Virtual Cam
- Fullscreen Projector
Either work well, if you don’t need to switch scene during a meeting. If you ant to switch scenes during a meeting without showing OBS studio in the process then to use the Virtual cam method you ideally want two screens and for the full screen projector method, at least 3 screens.
OBS Virtual Cam
Let’s start with the easy one. Using your OBS scene(s) in place of a web cam within Teams.
- Start the OBS Virtual Cam from Tools ->VirtualCam
- Pick your camera and choose Start

- In Teams, set you Camera to OBS Camera

- Join you meeting and turn on your video as normal, no need for background effects
Full Screen Projector
Full screen projector allows you to project your scene, onto any monitor or projector connected to your device. I recommend a minimum of 3 screens here.
- Screen 1 – The Working Screen to work with the content you want to share
- Screen 2 – The viewing screen to project onto from OBS and share into the meeting
- Screen 3 – The control screen for OBS Studio and anything else you need open, but don’t want to display in the meeting.
You could also use a scene switching piece of hardware for controlling the scenes. I tend to also open the meeting chat in the browser version of Teams on my control screen, though you could do that from a mobile phone or tablet rather than 3rd screen, if you went with the hardware based solution. Something for me to consider as a next step if the virtual training keeps going.
To use the full screen projector:
- Pick a scene
- Right click in the preview and choose Fullscreen Projector
- Pick monitor to share to

- In Teams share your screen choosing the monitor you have projected to
Tips
Two webcams are better than one. Things go awry sometimes, so I’ve set up OBS to work with one webcam and left the built in web alone. That way I can change my video source in Microsoft Teams to the built in web cam if I have issues. Not as pretty but keeps the training session going.
Have lots of scenes, rather than trying to change the sources in a scene during a training session.
Test it out with a friend or a ‘virtual friend’. As an independent trainer I often don’t have access to someone else to test with at the time I need it, so I use a second account to join the meeting from a different device to see what attendees will see, this is my ‘virtual friend’ 😉.
A couple of important tips on setting up your green screen:
- Keep it aligned with your webcam, if its offset and different distances away at each edge, you won’t get a neat effect
- You need consistent lighting across the whole screen to avoid get ‘sun glare’ effects on your background
- Test in natural and electric light to get the best setting for your filter – ideally you want to have consistent lighting whenever its in use, but I like daylight so it took a bit of tweaking to get a setting that worked during the day and in electric light. I’ve heard it would be better with video lights.
And in closing some more links for you – there are thousands of videos on using OBS Studio on YouTube and a recent article from Collab365 on using OBS Studio too.

Thanks for this tutorial! Super helpful
LikeLiked by 1 person