Have you ever tried to send a file to someone outside your organisation in a Teams chat, only to realise you couldn’t attach it directly? Good news: that’s changing! (If your admin enables it)
A long time source of confusion in Microsoft Teams has been the fact that “attaching” a file in a chat with an external user including a group chat or meeting chat did not work. This new feature means that attachments in chats including external users will see (almost) the same behaviour as chats with only internal users.
It is important to note that this feature is DISABLED by default and when enabled honours all file sharing settings, as it sends a link to the file, not a traditional attachment.
This feature started rolling out on 24th July 2025 and is the subject of Message Center Message ID MC1102790 and Roadmap item 492625.
Note: in place of AltText on the images, this blog describes what can be seen in the images in the standard text. If using a screen reader, do not expect additional image descriptions.
User Experience
Once enabled the Attach file option will be available under the + button in chats with external users. This experience is shown below. Prior to this change the Attach file option was not available.
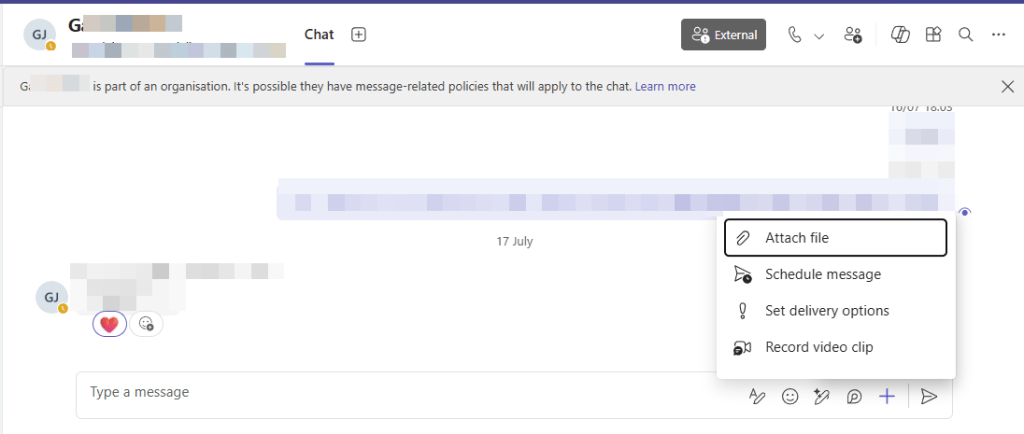
NOTE: If you don’t see the “Attach file” option, your admin has not enabled the feature.
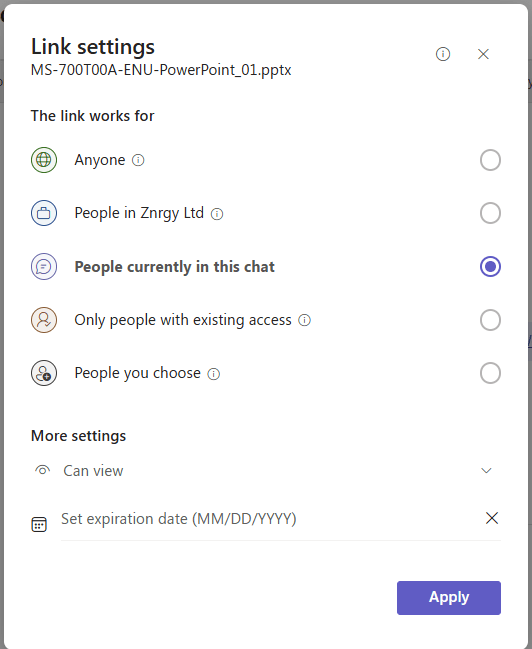
When you attach a file the default permissions are set to People in this chat with the link can view. As shown below, this file share experience looks no different than the file share experience in chats with internal people, with the file link showing a buttom shoing the file name and file type icon.

Tapping the permission option when writing the message to share the file, presents the options available based on the setting which apply to the file based in its location. In the image below the file is stored in a user’s OneDrive which is allowed to generate anonymous links and as such the user can choose Anyone (anonymous link), People in my organisation, people in this chat, people with existing access and people they choose (Specific people), as well as additional options such as view/edit and expiration date.
As always when sharing a file:
- Be mindful of what you share: Avoid sending sensitive or confidential files unless you’re sure it’s safe and allowed.
- Double-check access: Always tap the permissions information to make sure the link you are sharing gives the permissions you want, don’t blindly trust the defaults.
Remember:
The way a file behaves when shared depends on where it’s stored and who owns it.
This means:
- If you share a file from your organisation’s OneDrive or SharePoint, the sharing settings follow your organisation’s rules.
- If someone else shares a file from their organisation, it follows their organisation’s rules.
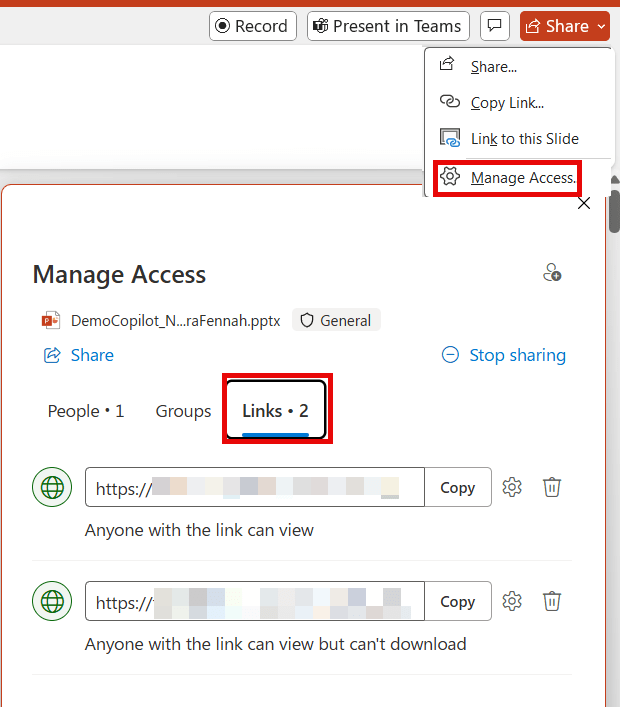
If someone can’t open a file, it is almost certainly because of the file’s permissions rather than a Teams issue. To check the permissions on the file after sending open the file and choose Share > Manage Permissions > Links
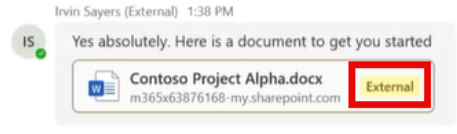
Chat particpants from a different organisation to the person sharing the file will see the file has an EXTERNAL tag on it, as shown in the image below, while internal participants in the chat will see the file without the external tag as normal.
Enable the Feature – Teams Administrator
To enable this feature the Teams Administrator needs to run the PowerShell command to which updates the Files policy to allow file sharing in chats including external people. The official documentation on the PowerShell cmdlet to be used in available on Microsoft Learn.
The following command will enable file sharing in chats for everyone assigned the default files policy. Note the message centre post refers to setting the value to True where as the value is actually Enabled.
Set-CSTeamsFilesPolicy -Identity “Global” -FileSharingInChatswithExternalUsers Enabled
THESE STEPS ARE PROVIDED WITHOUT WARRANTY. Always research any PowerShell commands you use before running them as errors can damage your Microsoft 365 environment. The steps below include reference links to help you verify them including checking to see if anything has changed since this article was written.
If you are new to Microsoft Teams PowerShell , please start with the Microsoft Learn guidance on using Teams PowerShell. Once you have your PowerShell application installed and open with admin rights, the process is:
- Install the Microsoft Teams PowerShell module using the command
Install-Module -Name MicrosoftTeams -Force -AllowClobber - Connect to the Module and sign in to Microsoft Teams with a Teams admin account run
Import-Module MicrosoftTeams
then
Connect-MicrosoftTeams
Sign in using the login dialog with your account that has Teams Admin rights - Check the current configuration of the Files Policies in your environment using
Get-CSTeamsFilesPolicy - Assuming you do now need to enable the external file sharing in the global policy set the value as follows. If you need to change a different policy change the policy name in “” before running this command
Set-CSTeamsFilesPolicy -Identity “Global” -FileSharingInChatswithExternalUsers Enabled
