Recently I was asked if I knew of any busy lights for Mcirosoft Teams. Remember those days when you would walk down the office to see a colleague rather then check their Teams presence? With hybrid working the presence indicator in Teams is still important but its needs extending into our physical spaces too.
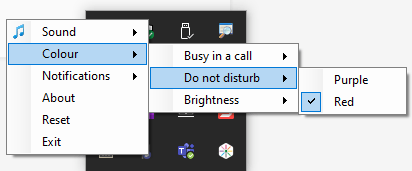
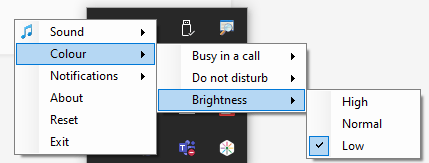
Personally I am still working from home full time and still using the manual Do Not Disturb light I created in my blog Using Flic and Hue to build a Do Not Disturb light – Sara Fennah’s Blog (m365train.co.uk) Though I now control it from my Stream Deck most of the time. I have buttons on my Stream deck that sets all my lighting, with different settings for attending or delivering and bright/dark environments. If I’m attending a course/meeting I set my Do Not Disturb light to yellow and my streaming lights low whilst for a training delivery the Do Not Disturb light goes to red and my streaming lights are brighter. If its dark then I also switch on the room lights which are also using Hue bulbs.
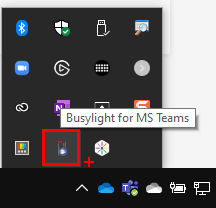
But my personal solution doesn’t work for the hybrid office scenario, plus for a largescale roll out, we want quick and simple. After a bit of research I decided to give the plenom Omega and Alpha busy lights a go and was fortunate enough to secure a sample of each to try. These are not new products and there was confusion around how they worked with Teams, and many vendor sites being unclear if you needed additional hardware etc.
Well, I can report that they work perfectly. I tested both lights with Windows and Mac and both were just as simple:
Plug light into a USB port on your computer
Download the driver
Change your status in Teams to watch the light change
My phone was not great for photographing the light, but I did manage to capture a video of the light changing with Teams.
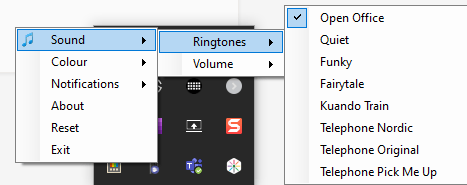
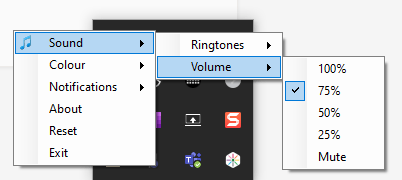
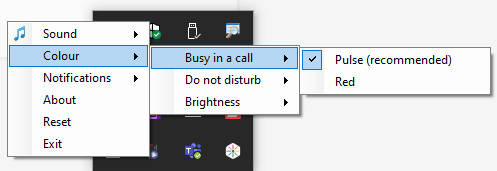
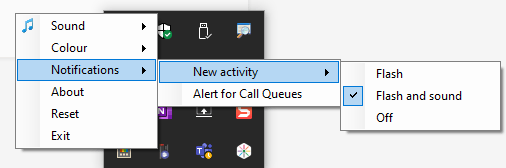
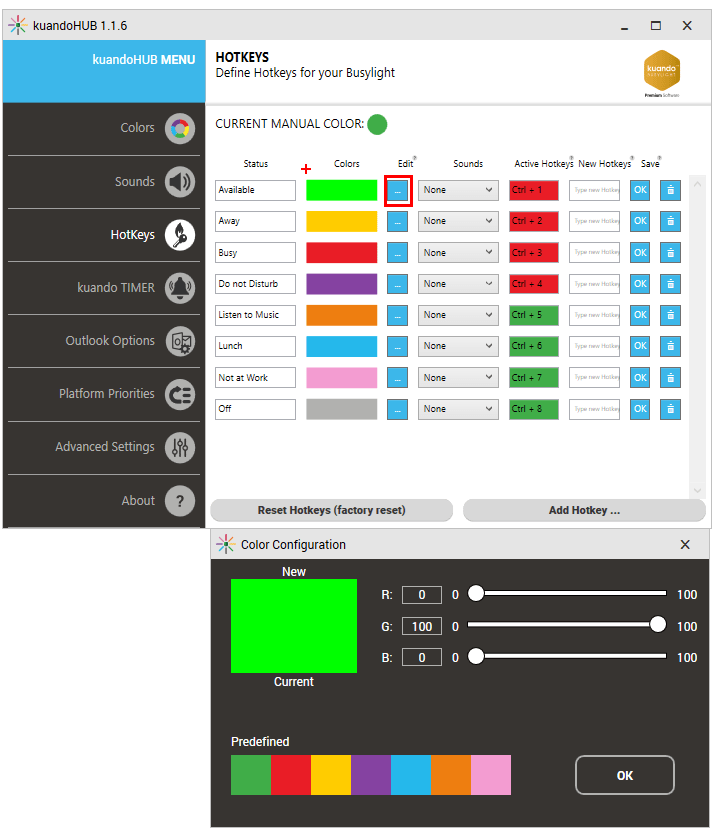
With just the driver software you still a fair amount of customisation:
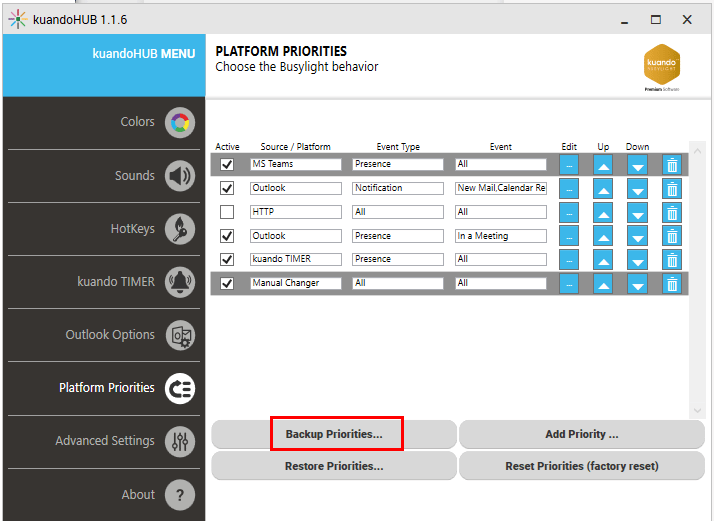
You can also control the way the light behaves and set additional features using the kuandoHUB software. If you do I can STRONGLY recommend first backing up your priorities before customising.
Troubleshooting
If you use the Duration option in Teams to set your status for a period then revert to automatic, I have had the light get stuck on the manual status once, but a quick reboot of Teams fixed that.
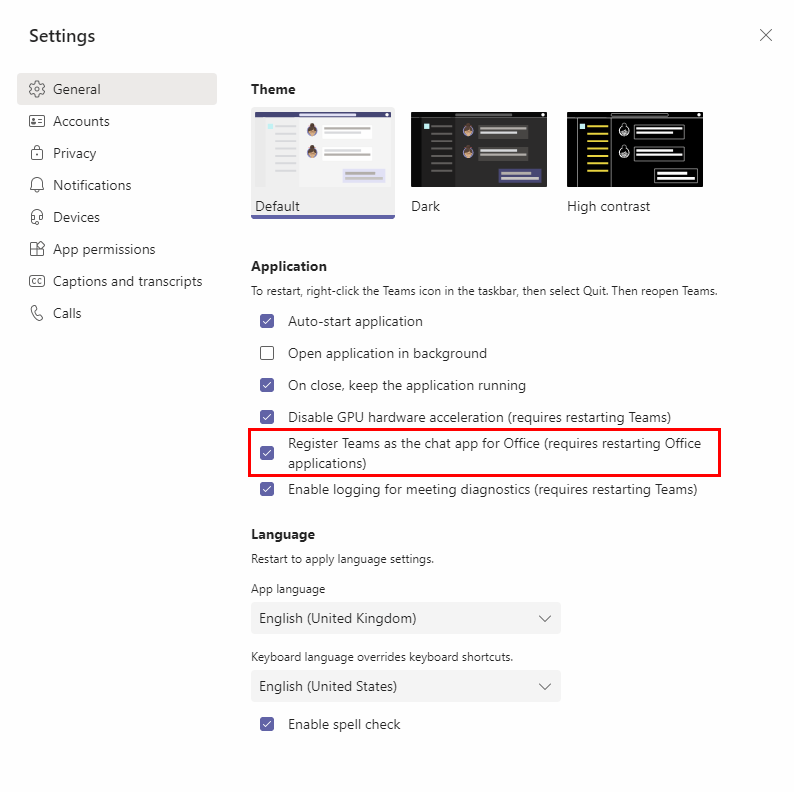
If your light does not pick up Teams status but another app, check that Teams is set to your default chat app. If its still not working then you need the kuandoHUB software to change the priorities and sources.
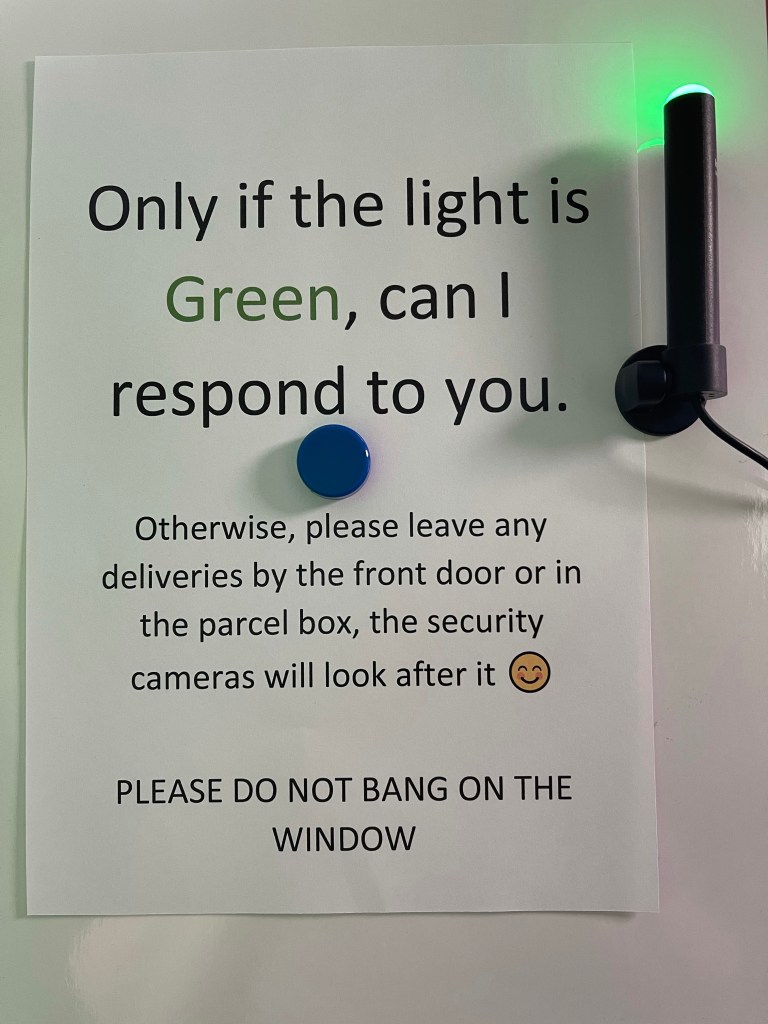
One of my biggest challenges working from home is that my office is downstairs and anyone coming to the house walks past the window I am sat next to, so they often try to engage me or even bang on the window. I can’t exactly jump up in the middle of a course delivery and answer them, it’s just not very professional. So I now have the perfect use for one of my busy lights:
Whilst the other has been adopted by my teenage son using the kuandoHUB software to indicate if his parents are allowed into his room! The light is pure red, the two tone effect is only in the photo
With background effects coming to Teams for the web, providing your users with organisation standardised backgrounds is going to be even more useful. If like me you’ve been looking in vain for the organisation wide backgrounds in Microsoft Teams, then you too have probably been looking in the wrong place.
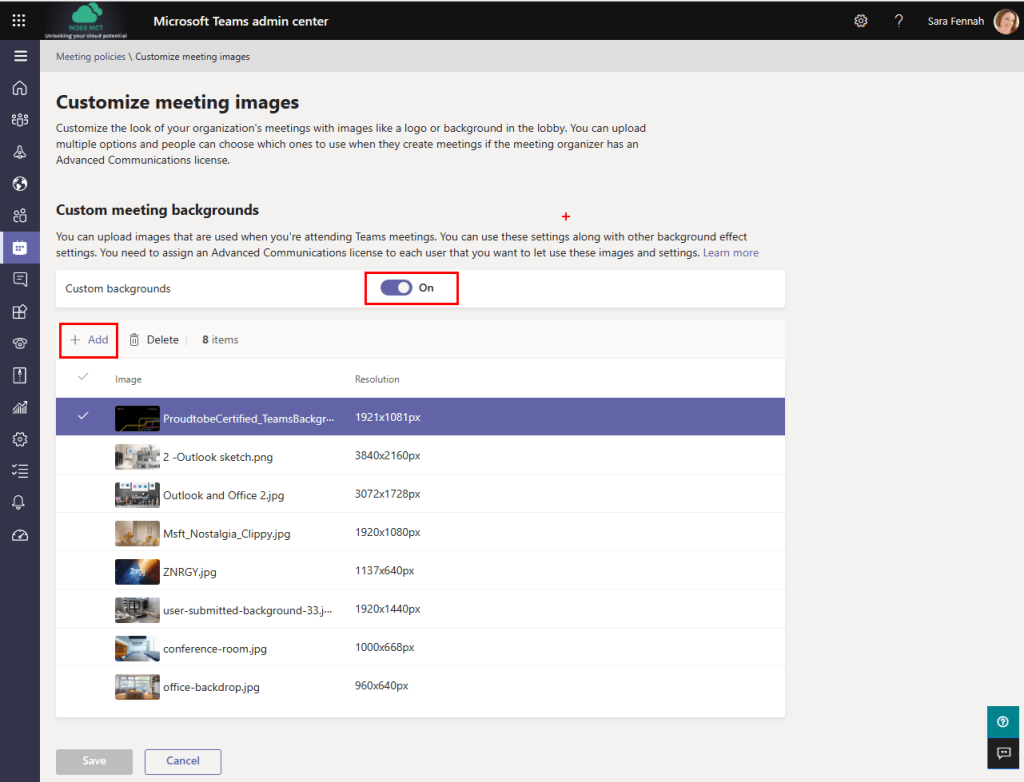
The articles I read all said to go to Meeting Policies and add your images, so I have been looking in the actual policies, but could see nowhere to add background images. Then today I spotted the Customize Meeting Images button on the top right of the screen!
Organisation wide background images require users to be assigned the Advanced Communications licence to benefit to view and apply.
To add images for use by your organisation, in the Teams Admin Center, expand Meetings and choose Meeting Policies, then at the top right click Customize Meeting Images button.
You now need to turn On the custom backgrounds and add your images
You can add up to 50 images in the Managing Backgrounds space. Images can be in JPG or PNG format and must be between 360x360px and 3840x2160px.
It can take up to 24 hours for them to appear, but your users will be able to use the organisational background just the same as any others, better yet, they appear at the top of the list of available backgrounds.
PowerShell is very powerful (no pun intended) but if you don’t know what you are doing it can be dangerous, making big changes to your environment without prompting for confirmation. If you run ANY PowerShell scripts against your Office 365 tenant you alone are fully responsible for the actions undertaken, so please ensure you are fully confident in the source of your information.
If you are looking at scripts for Microsoft Teams from a blog (like this one) I would recommend checking them against MicrosoftTeamsPowerShell Module | Microsoft Docs. This helps you learn more about the scripts but also lets you check the cmdlets (commands) you intend to use are still valid.
ALWAYS close your PowerShell Windows when you are not actively using them. This closes the connection and logs you out, helping to keep your environment secure. Or even better disconnect then close the window.
Finally remember that Teams runs on Microsoft 365 groups, includes SharePoint features and shares some configuration with Skype for Business Online. This means you may also need to use PowerShell cmdlets for Azure AD Power, Exchange Online, SharePoint and Skype for Business too, though the Skype for Business Online cmdlets are included in the Teams PowerShell module, they are still referenced separately in Docs.
This blog series is designed to support those studying for the MS-700 exam to appreciate how to do many of the tasks in the course using PowerShell. As such I have divided it down into the course modules, which also help other trainers when they are delivering.
In this blog I have used <aaa> to indicate where you should change parts of the script to apply to your requirements. Replace the <> as well as the words, but not any ” ” so <email> would become someone@email.com and “<email>” would become “someone@email.com”
REMEMBER: Any scripts here are run at your own risk, though I have tested them, I offer no guarantees or warrantees.
Import the newly installed module into the open PowerShell window
Import-Module MicrosoftTeams
Log in to Microsoft Teams
Connect-MicrosoftTeams
You are now ready to manage Teams using PowerShell
When you are installing PowerShell Modules, you will always be prompted to confirm download from the repository, as shown below. You should only confirm one repository at a time using Y response.
Once set up you can then log in future by:
Open Powershell in Windows with Admin – right click on your start button and choose Windows PowerShell (Admin)
Import the Teams module into the open PowerShell window
Import-Module MicrosoftTeams
Log in to Microsoft Teams
Connect-MicrosoftTeams
To Update Teams Powershell
Open Powershell in Windows with Admin – right click on your start button and choose Windows PowerShell (Admin)
Run the Update Script
Update-Module MicrosoftTeams
Import the Teams module into the open PowerShell window
Import-Module MicrosoftTeams
Log in to Microsoft Teams
Connect-MicrosoftTeams
Learn more about the Teams PowerShell Module
The commands in this section are not needed for the MS-700, but they do help to understand the Teams PowerShell module.
List Available Versions of Teams PowerShell Module
Get help about with the New-Team PowerShell cmdlet
Get-Help New-Team
You can replace the New-Team cmdlet in this script with any cmdlet. However this returns the help in the PowerShell window so you may prefer to open the help file in a separate window or even online using:
Get-Help New-Team -ShowWindow
Or
Get-Help New-Team -Online
Disconnect
You do not need to disconnect from Teams in PowerShell but it is a good idea to do so before closing your PowerShell window using:
This script creates a new private team, sets the owner of the team and disables the ability for members to create or update channels. It then goes on to add a user to the team and create a new channel.
Here is a text file with all the above scripts in that I used for testing purposes in preparing this blog. As always, please check before running as the responsibility is yours.
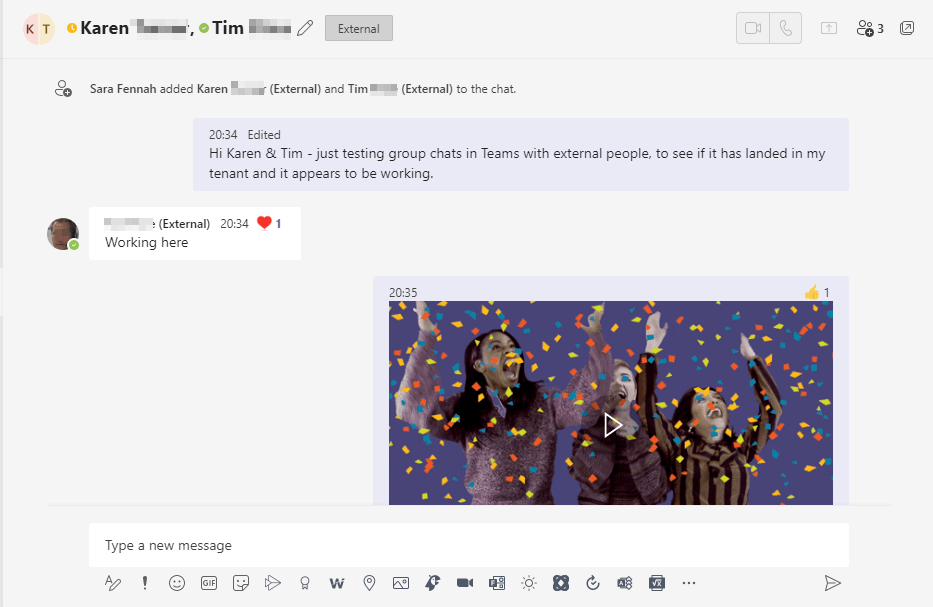
Group chats in Teams can now include external people. It’s as simple as creating any group chat in Teams. First, just make sure you can message the external people to be included in the group. In other words send them a Teams chat message. Then simply create a new group or add them to an existing group.
Start a New Chat
Click the new chat icon.
Enter the name of the person. To send a message to someone in a different organisation use their full email address rather than just their name.
Compose your message
Click Send
Start a New Group Chat
Click the new chat icon
Enter the name of the first person, enter names of other people
Compose your message, use
to send a longer message.
Click Send
Add People to Chat
In the chat, click
Enter the name or email of person to be added
Choose the amount of chat history to be shared with new members
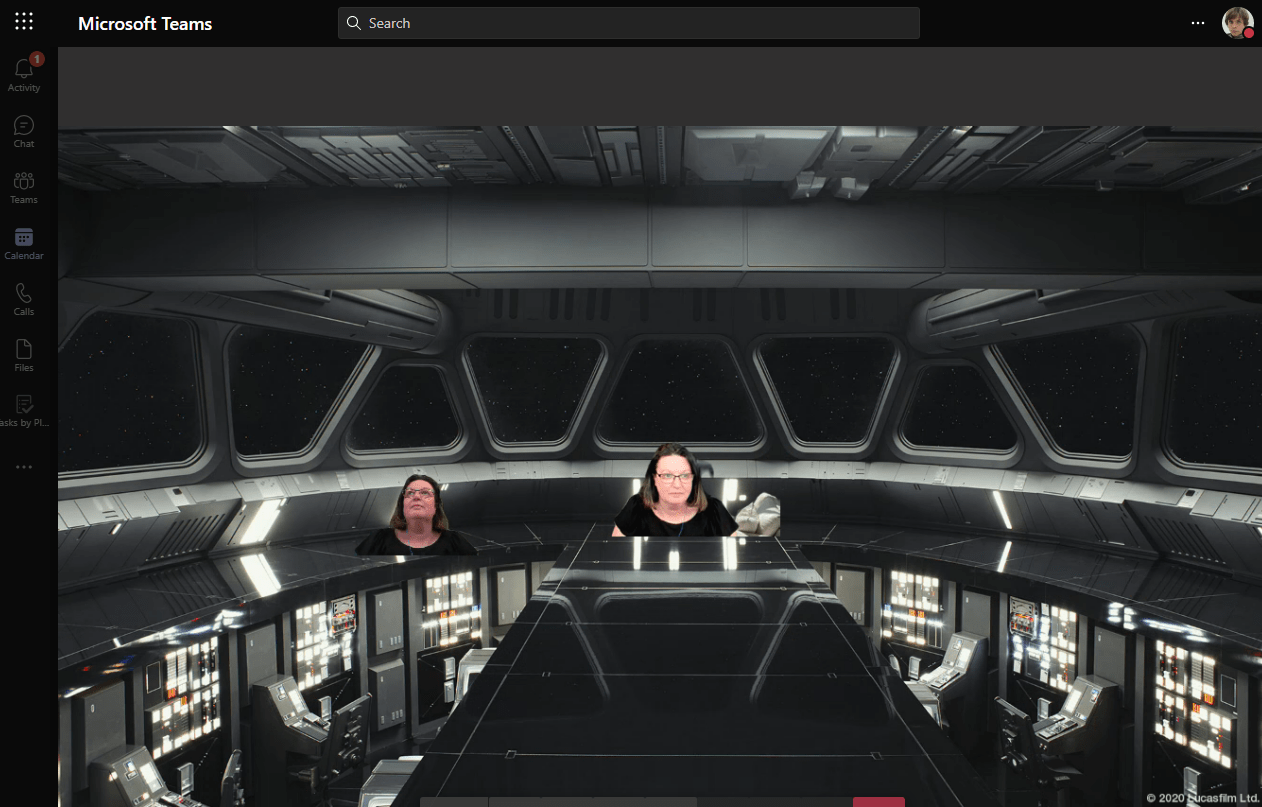
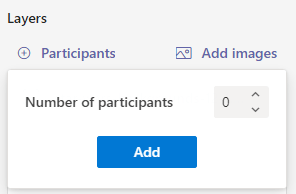
Add the number of participants, by clicking the + Participants button and change the scroll to the number of people to have and click the Add button.
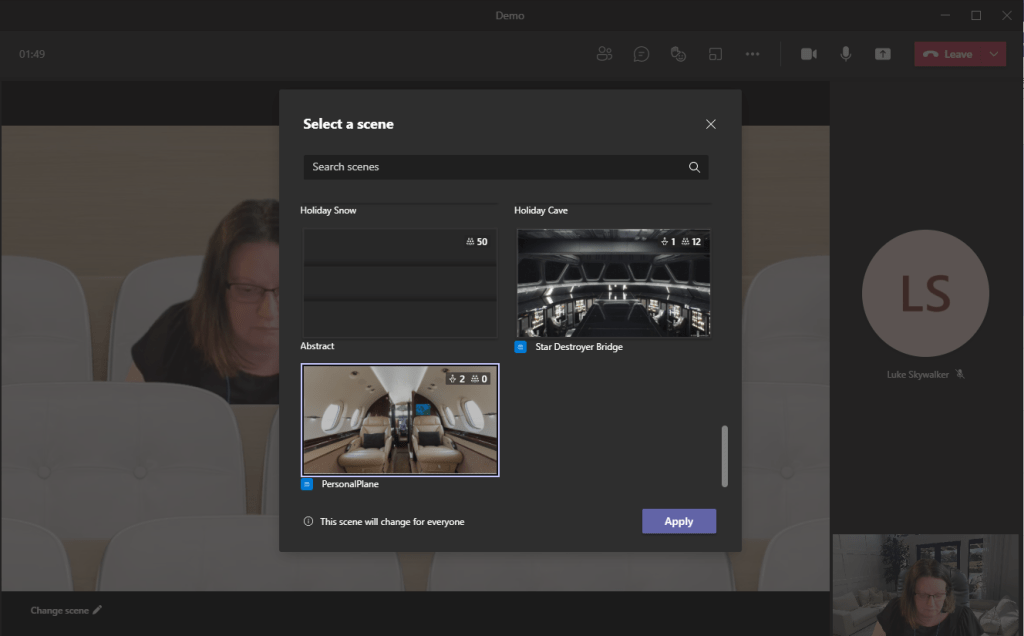
I added 10 here and you can see them all along the bottom of my image.
I can now drag the participants around my scene and position the placeholders. You can also resize the placeholders, align them and adjust the x/y position in the image, which can be useful to align participant placeholders with others in the scene.
Given my meeting organiser deserves pride of place in my scene, I decided to reserve one placeholder for the organiser by assigning the image.
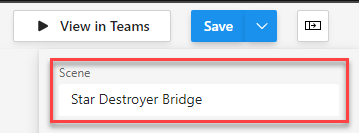
As you work, it’s probably a good idea to Save. Before you save you need to input a scene name.
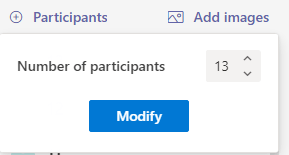
If you click on participants you can add/remove participant placeholders
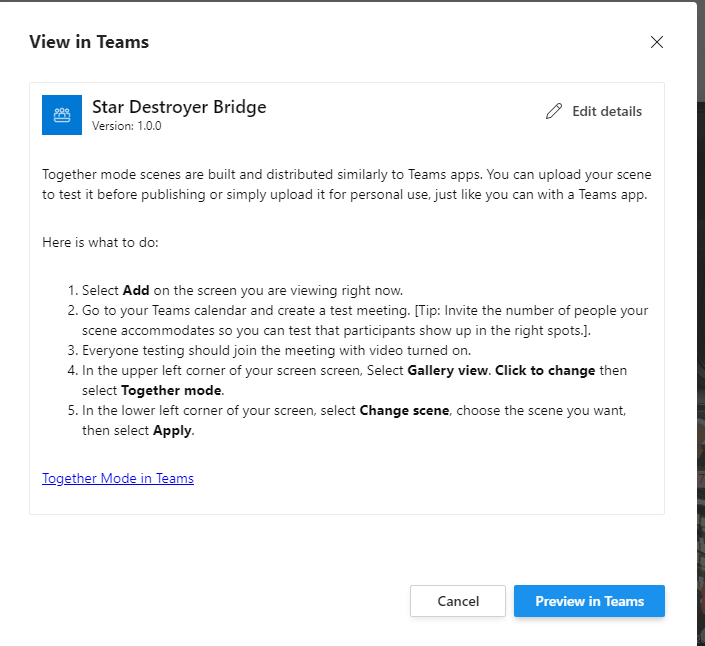
To try it out click the View in Teams button
Review the information and click Preview in Teams
Allow Teams to Open and then click Add to add your new app
To Test create a meeting and invite enough attendees to test your scene. Once they join, switch to together mode and change the scene
Select your scene and click Apply. I think I may need to adjust the image sizes in my scene, but it works for me and others in the same meeting, EVEN external people joining the meeting via the web.
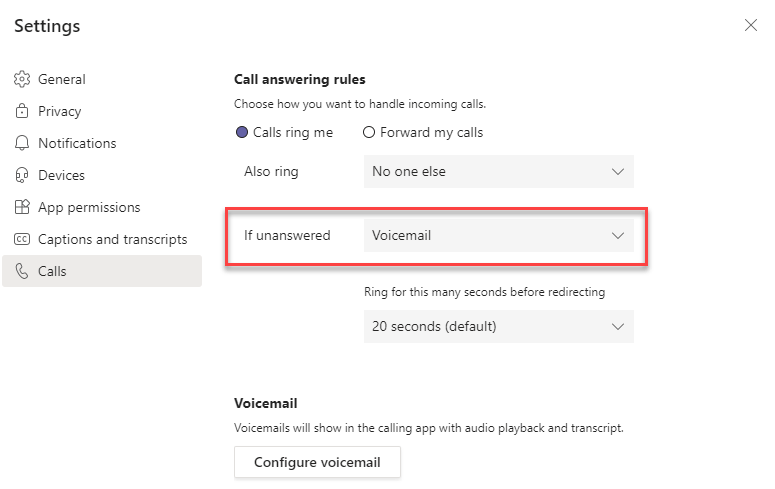
New options for call handling when a user is busy are availalbe and can be set now using PowerShell. The option will eventually also be availalbe via the Teams Admin Center in Calling Policy.
Call handling when a user is already in a call is called Busy on Busy and by default is off in the Global Calling policy.
Previously we could set this to on or off. When on callers got a busy signal and when off, the call just rang. Going forward we also have an Unanswered option which means when the user is busy the setting for unanswered calls is used.
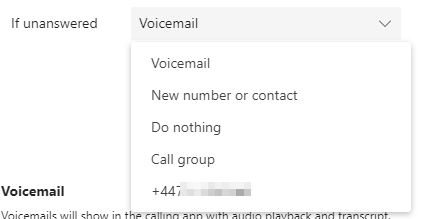
Users configure their unanswered call handling themselves from Settings within Teams.
Users have the option to direct their unanswered calls including to their voicemail or alternative contact, including their own mobile phone if stored in their profile.
To set busy on busy option in the Global calling policy to use the users unanswered calls setting run this script
Set-CsTeamsCallingPolicy -Identity Global -BusyOnBusyEnabledType "Unanswered"
Note that the Teams Admin Center will currently show busy on busy as off once you have done this until the updated control is available.
As with all PowerShell scripts, you run them at your own risk. So I’d always recommedn checking the official documentation before running any script you get from a blog (like this one). The cmdlet used here is Set-CsTeamsCallingPolicy (SkypeForBusiness) | Microsoft Docs
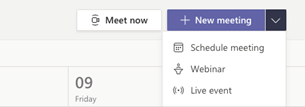
OK, so Microsoft don’t call them Stretchy Meetings. Officially they are meetings with view-only attendees but a meeting that can grow to accommodate more users to my mind is stretchy. But that’s enough about the title of this blog.
In two recent message center posts Microsoft announced the rollout of webinars and view only attendees in Teams Meetings when the meeting exceeds 300 attendees (aka stretchy Meetings). Both are included at the end of this article for reference.
As they offer two solutions to larger meetings, I wanted to address how you can enable these for your users.
Both posts include guidance for admins on configuring the features using the meeting policy. At the time of writing this article the settings are not available in the meeting policy via Teams Admin Center but is available to set via PowerShell.
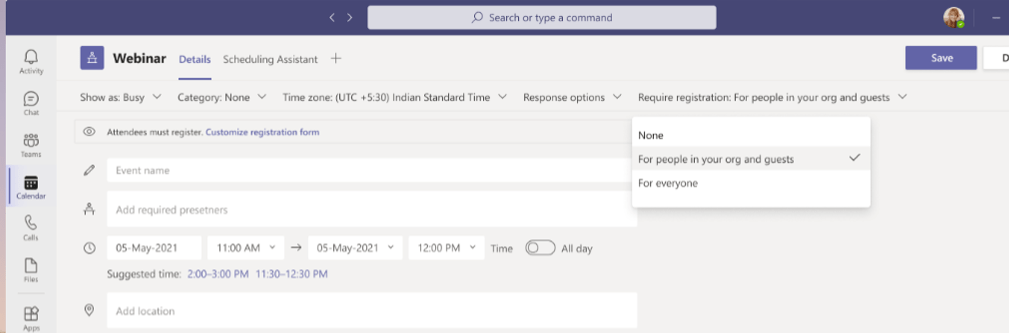
You should note that by default view-only attendee mode is disabled. Webinars are on and though the documentation says default is Everyone can register but in my test tenants the default was to allow only people in your organisation to register. So its worth checking.
As both of these features are policy controlled you can configure different settings for each meeting policy. In the examples here I’ve shown managing both settings in the global policy.
To check/change other policies replace the word Global in these scripts with the name of the policy you want to change/look at.
Steps 6 to 10 give you options on the different settings, you should run the step(s) for the settings you wish to change from the default.
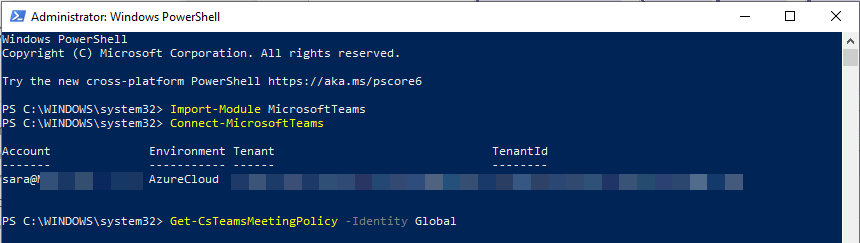
Open Powershell in Windows with Admin – right click on your start button and choose Windows PowerShell (Admin)
Import the Teams module into the open PowerShell window Import-Module MicrosoftTeams
Log in to Microsoft Teams Connect-MicrosoftTeams
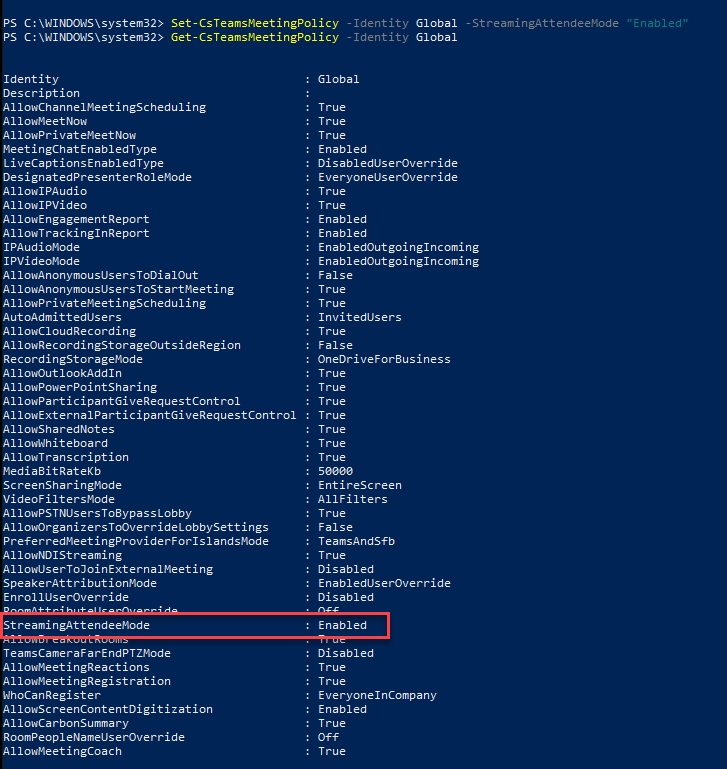
Confirm the features are available in your tenant by loading the current settings of the Global meeting policy and verifying that -StreamingAttendeeMode and -WhoCanRegister are available Get-CsTeamsMeetingPolicy -Identity Global
Check the default settings for these two features. You are looking for StreamingAttendeeMode for the view-only attendee options and AllowMeetingRegistration plus WhoCanRegister for the webinars. You should also check the setting for AllowEngagementReport if you want to see attendee data from webinars.
To allow view-only attendees when a meeting exceeds 300 attendees run Set-CsTeamsMeetingPolicy -Identity Global -StreamingAttendeeMode "Enabled"
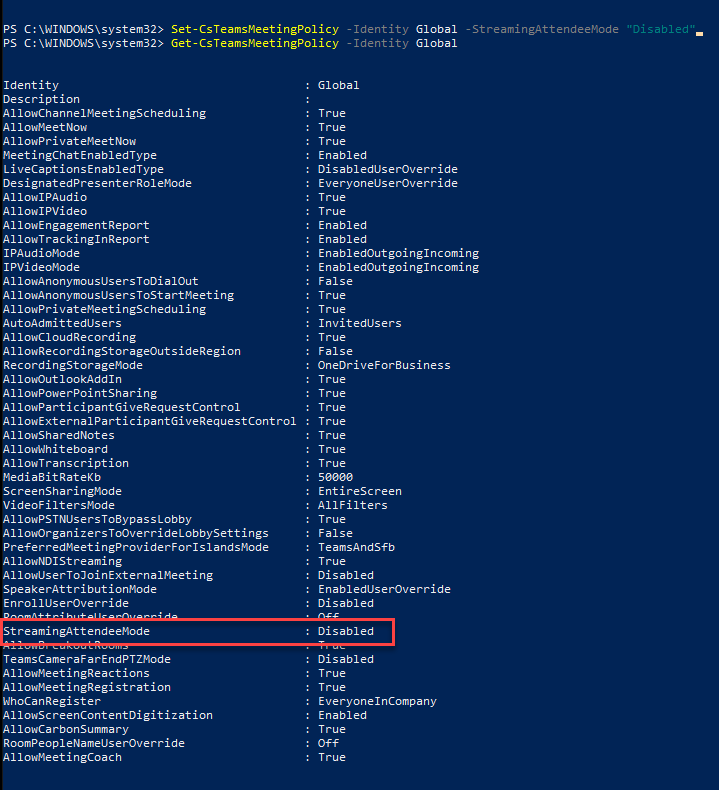
To disable view-only attendees and limit meetings to 300 active participants Set-CsTeamsMeetingPolicy -Identity Global -StreamingAttendeeMode "Disabled"
To disable webinars Set-CsTeamsMeetingPolicy -Identity Global -AllowMeetingRegistration $False
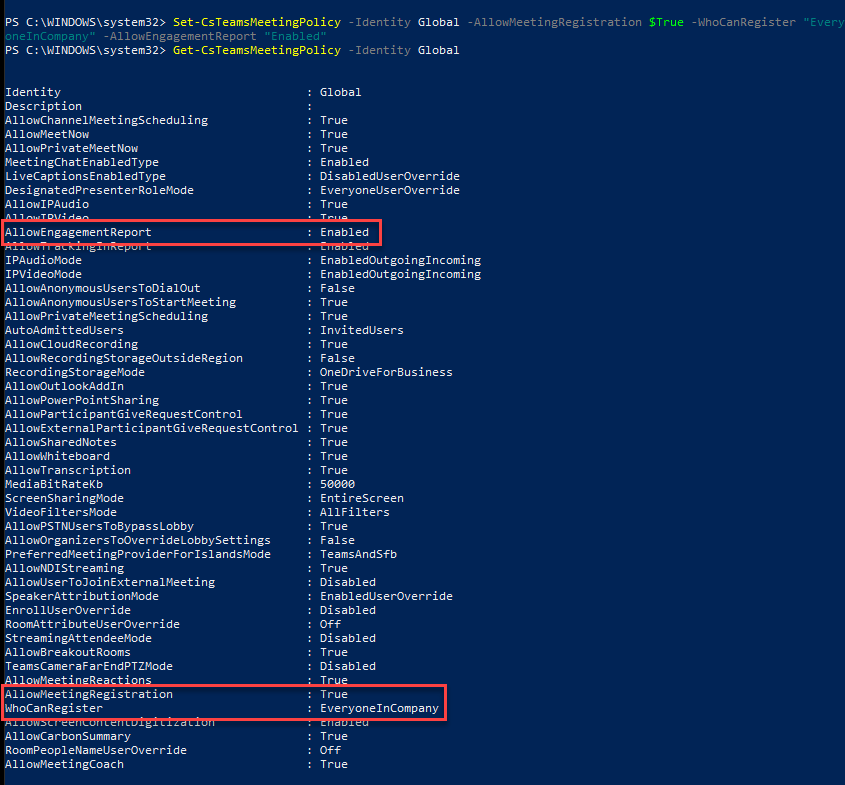
To enable webinars for internal attendees only Set-CsTeamsMeetingPolicy -Identity Global -AllowMeetingRegistration $True -WhoCanRegister "EveryoneInCompany" -AllowEngagementReport "Enabled"
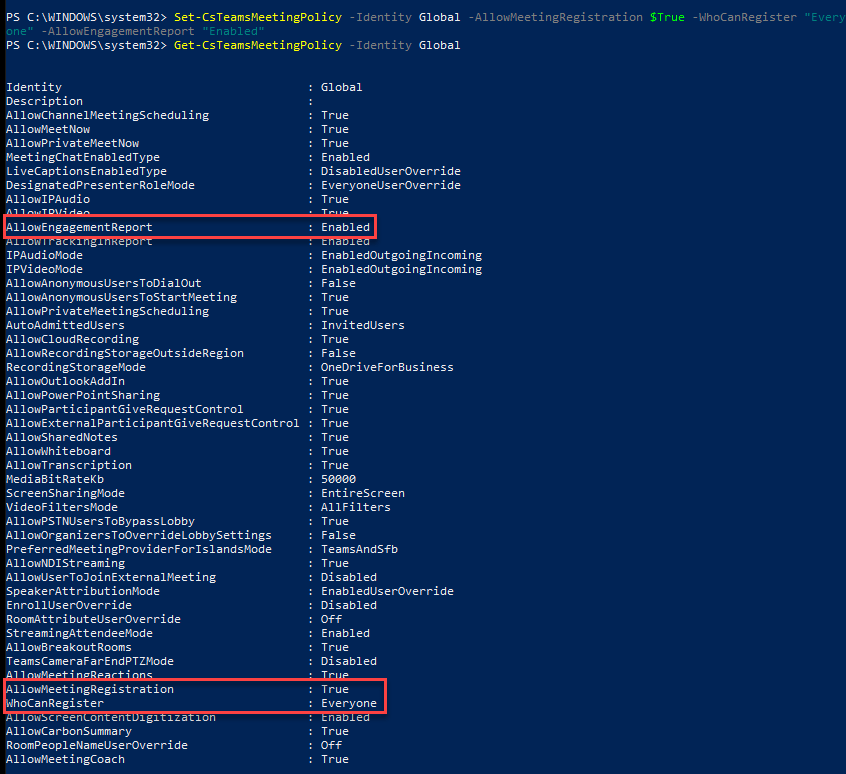
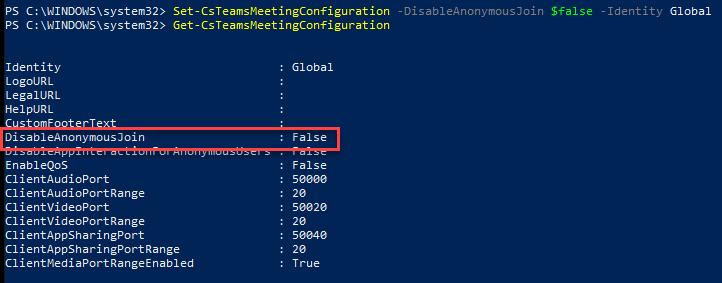
To enable webinars for external attendees Set-CsTeamsMeetingPolicy -Identity Global -AllowMeetingRegistration $True -WhoCanRegister "Everyone" -AllowEngagementReport "Enabled" You will also need to ensure AnonymousJoin is enabled to allow external users to join your webinars. This is a tenant wide setting which applies to ALL meetings not just webinars and can be set from the Team Admin Center under Meeting Settings or with this script Set-CsTeamsMeetingConfiguration -DisableAnonymousJoin $false -Identity Global
Picture for each step
Step 1: Open PowerShellStep 2: Import Teams ModuleStep 3: Connect & Sign InStep 3/4: Signed in Confirmation & running script to get current settingsStep 5: Check current setting on Global policyStep 6: allow view only attendeesStep 7: Block view only attendeesStep 8: Disable WebinarsStep 9: Enable Webinars with Internal Only AttendeesStep 10 Part 1: Allow Webinars with External AttendeesStep 10 Part 2: Allow Anonymous Users to Connect to Meetings & Webinars
Message Center Posts
Microsoft Teams: webinars plus new meeting registration options
MC250958
Plan for change
Published date: April 16, 2021
Affected services
Microsoft Teams
Tag
MAJOR UPDATE
ADMIN IMPACT
NEW FEATURE
USER IMPACT
We are excited to announce the forthcoming availability of Teams webinar capabilities, beginning rollout at the end of April 2021, completing in May 2021.
Associated features that apply to webinars and meetings, include:
Registration page creation with email confirmation for registrants.
Reporting for registration and attendance.
These capabilities will be available to users with the following licenses: Office 365 or Microsoft 365 E3/E5/A3/A5/Business Standard/Business Premium. For the rest of 2021, we are offering temporary availability to Teams users to try the features with their existing commercial subscription.
Note: We will honor any existing meeting settings enabled within your organization.
Control type: user control / admin control / admin UI
Action: review and assess
How this will affect your organization
When scheduling a meeting, your users will see the Webinar option on the Calendar drop down menu in Teams (desktop/web).
Additionally, users will be able to add registrations for meetings and webinars for people in your organization and outside of your organization.
The registration feature will be on by default For everyone. In order to view who attended the webinars, we recommended setting the “AllowEngagementReport” policy to true.
Note: We will honor any existing meeting policies enabled within your organization:
If allow scheduling private meetings is turned off, then users will not be able to schedule webinars.
When anonymous join is disabled for the tenant, users can schedule a public webinar but it will fail on join.
By default, all users within your tenant will be able to schedule webinars unless current policy configuration prohibits it.
Should you wish to restrict who who can host a webinar that requires registration for everyone, change the WhoCanRegister policy accessed in the Teams admin center.
You can disable this policy tenant-wide
You can enable this policy for specific users
You can manage the registration feature in the Teams admin center or with PowerShell commands. There are three options for admin management.
Turn off registration for the entire tenant
Turn off registration for external attendees, the For everyone option
Give select users the ability to create a registration page that supports external attendees. All other users would be able create a registration page for people inside the tenant.
Create a new Teams meeting policy by using the New-CsTeamsMeetingPolicy cmdlet and assign it to users.
You might want to notify your users about this new capability and update your training and documentation as appropriate.
Teams meetings to support view-only attendees
MC250956
Stay informed
Published date: April 16, 2021
Affected services
Microsoft Teams
Tag
ADMIN IMPACT
NEW FEATURE
USER IMPACT
We originally communicated this in MC240169 (Feb ’21). Currently, Teams meetings are limited to 300 users. If someone tries to join a meeting after it reaches capacity, they are unable to do so. With this update, meeting organizers who are assigned an appropriate license will be able to host a Teams meeting that has overflow capacity.
Up to 20,000 view-only attendees may join a meeting from late February through the end of June in order to accommodate heightened remote work scenarios. After July 1, 2021 we will support only 10,000 view only attendees.
Note: This capability will be available to users with the following licenses: Office 365 or Microsoft 365 E3/E5/A3/A5/Business Standard/Business Premium. For the rest of 2021, we are offering temporary availability to Teams users to try the features with their existing commercial subscription.
This message is associated with Microsoft 365 Roadmap ID: 65952.
When this will happen
We have started to roll this out and expect to complete by end of April.
How this will affect your organization
When a tenant enables this overflow feature:
After a meeting reaches capacity (300 users), people will be able to join as view-only attendees, with the maximum number limited by the phase.
Organizers cannot remove view-only attendees from a meeting.
View-only attendees will not impact the normal interaction available for regular attendees (those who joined before the meeting reached capacity).
Once the view-only attendee limit is reached, no additional view-only attendees will be able to join.
View-only attendees will follow all lobby and security policy mechanisms.
View-only attendees will have limited access to meeting features. For example, view-only attendees will be able to listen to all audio and view a screen or window shared during the meeting. However, they will be unable to share audio or video, and they will be unable to see chat or other applications that are shared during the meeting.
Meeting organizers will not see view-only participants in attendee counts or reports; this feature does not support the e-discovery of data
What you need to do to prepare
This feature is OFF by default for your users.
You may use PowerShell to enable this feature for your entire tenant while you prepare to assign the licenses.
Set-CsTeamsMeetingPolicy -Identity Global -StreamingAttendeeMode Enabled
Note: The view-only attendance feature is provided using Teams streaming services.
With the release of Out of Office settings for Microsoft Teams, I wanted to share a how to, but did you know there are many options for setting your out of office or automatic replies in Office 365 and they each offer slightly different functionality?
So here are all of the ways you can now set your automatic replies for Office 365.
You can set your Out of Office from
Outlook on Mobile Devices
Outlook on PC or Mac
Outlook on the Web
Microsoft Teams on PC or Mac (not available in Team web or mobile)
Comparison
My personal favourite is Outlook on the web as it offers me the most control, but here are all the different ways and what they look like. (Disclaimer: This article is written on 8th April 2021. Microsoft 365 apps and services continuously develop, so by the time you read this article things may have changed.)
WHERE
TURN ON/OFF
CUSTOMISE MESSAGE
DIFFERENT MESSAGE FOR EXTERNAL SENDERS
EXTERNAL RECIPEINT OPTIONS
SET DATES
ADD OUT OF OFFICE CALENDAR EVENT
DECLINE MEETING INVITES
CANCEL EXISTING MEETINGS
Outlook Mobile
Y
Y
Y
Outlook PC
Y
Y
Y
Y
Y
Outlook Mac
Y
Y
Y
Y
Y
Outlook Web
Y
Y
Y
Y
Y
Y
Y
Y
Teams PC
Y
Y
Y
Y
Y
Teams Mac
Y
Y
Y
Y
Y
Teams Mobile
Teams Web
Best Practice
However you set your out of office message for best practice please:
Include the date of return (tomorrow or next week only helps, if we know when you set the reply)
Include an alternative contact in your absence, if appropriate, ideally a shared mailbox.
Be careful not to disclose sensitive information such as holiday location or colleagues mobile phone numbers, especially to external recipients
Include your email signature as you would when writing an email normally and be aware that most companies do not add the normal footer to outgoing automatic replies as they do to normal emails.
If sending to ALL external senders be aware that your reply may go to junk and phishing email senders as well as legitimate senders. So keep signature to a minimum for replies to external senders when including all senders.
Here are some suggestions for you to consider.
Sample for Colleagues (Internal)
Thank you for your message, which has been received. I will not be able to respond as normal, as I am on leave and will be taking a break from all work communications until I return on 10th May 2021.
If you need a response to your message before my return, please forward your message to holidaycover@email.com and copy me in to the message so I know you are not waiting for my response. Your message has not been sent on automatically.
Kind Regards
Sara
Sample for External (Contacts Only)
The above message may also be used for contacts only as it is vague enough. However you may wish to be more vague, depending on your role, such as:
Thank you for your message, which has been received. I will not be able to respond as normal, as I am on leave and will return on 10th May 2021.
If you need a response to your message before my return, please forward your message to holidaycover@email.com and copy me in to the message so I know you are not waiting for my response. Your message has not been sent on automatically.
Kind Regards
Sara
Sample for External (Everyone)
In this case I am assuming legitimate business contacts have a phone number, alternative contact name or access to a website ‘contact us’. I do not want to give away additional contact details or names if the sender is not a legitimate business contact, and would send a generic message such as:
Thank you for your message, which has been received. I will have limited access until 10th May 2021, at which time I will action your message.
If your message needs a response before then, please make contact with a colleague or ring my work phone which a colleague will answer.
Kind Regards
Sara
How to (with Screenshots)
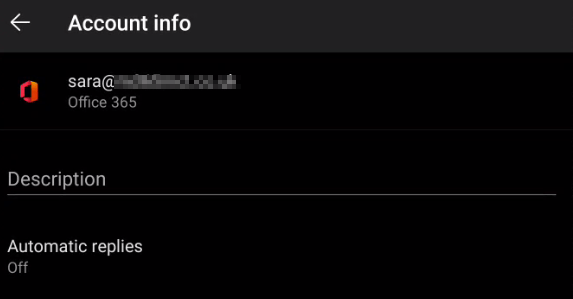
Outlook Mobile on an Android phone
(Screen shots from a Surface Duo running Android 10)
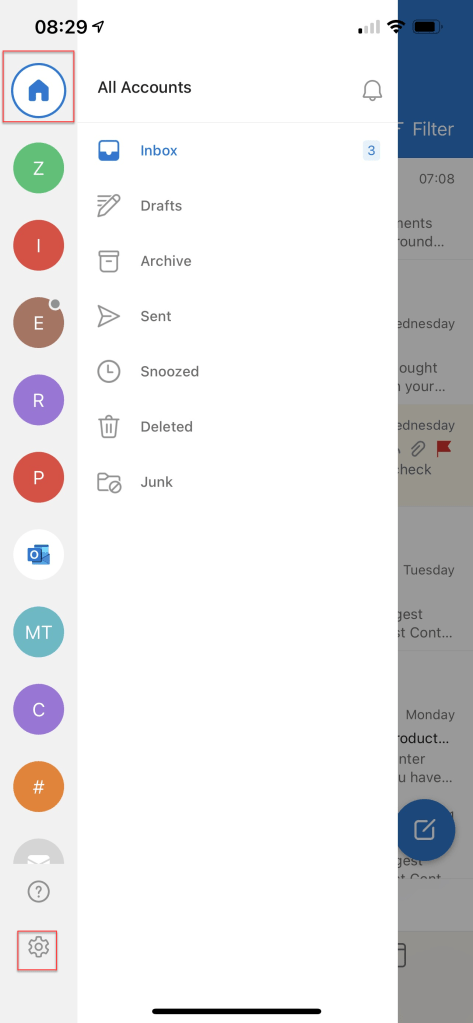
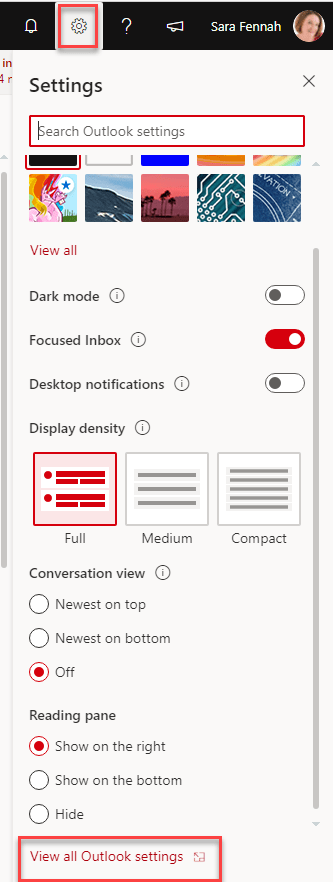
Tap Home, then Settings cog at the bottom of the screen
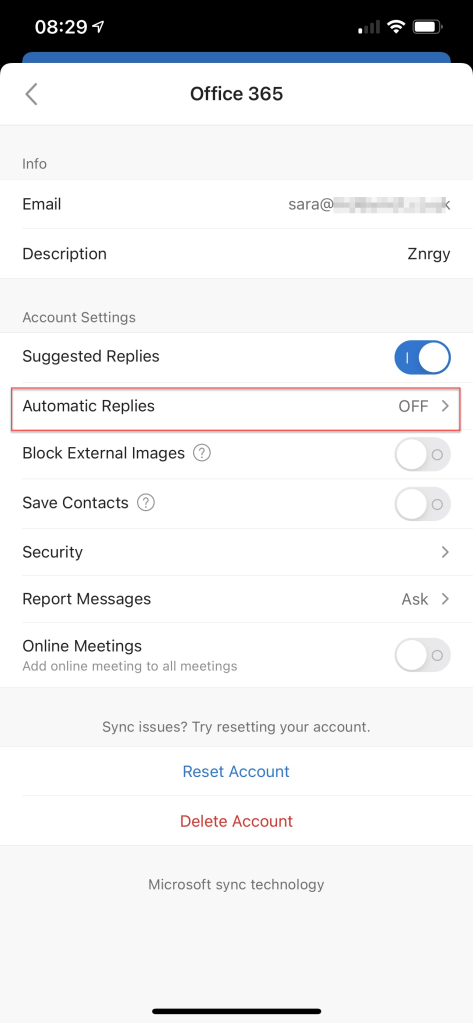
Tap the account you wish to set out of office replies for then select Automatic Replies
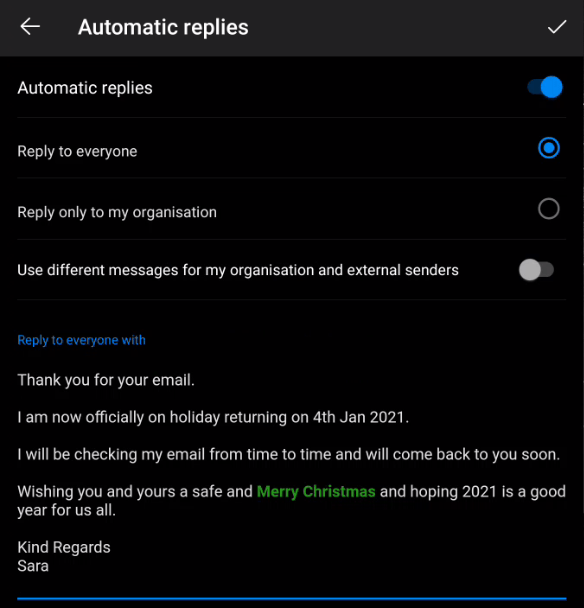
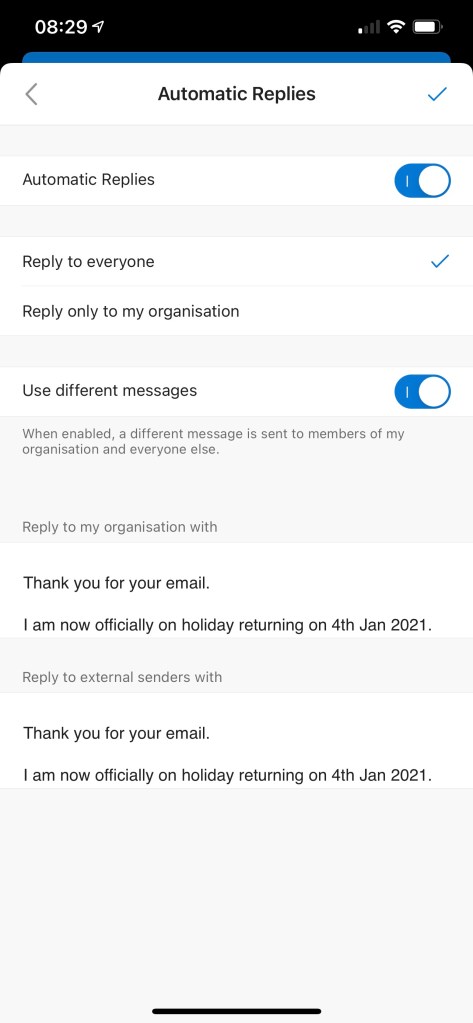
Choose the desired settings and write the message(s) required, then tap the tick at the top of the screen to confirm.
Outlook Mobile on iOS
(Screen shots from a iPhone12 running iOS14.4.2)
Tap Home, then Settings cog at the bottom of the screen
Tap the account you wish to set out of office replies for then select Automatic Replies
Choose the desired settings and write the message(s) required, then tap the tick at the top of the screen to confirm.
Outlook on Windows
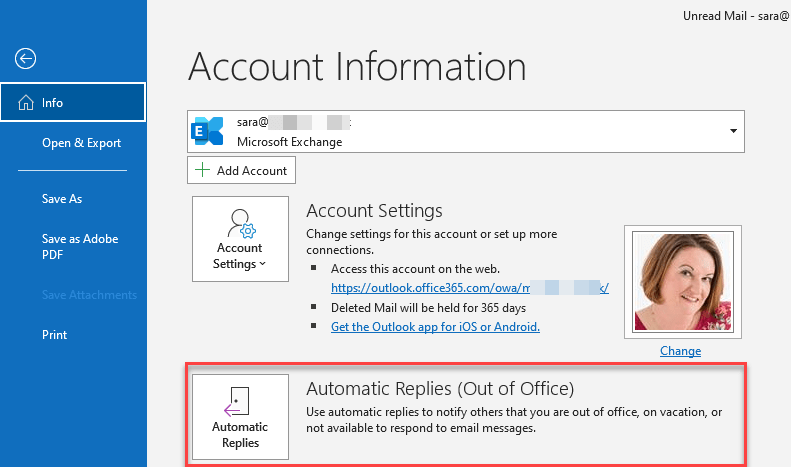
From the File menu choose the account you wish to set the out of office for if not the default one shown using the drop down at the top of the screen then Automatic Replies (Out of the Office)
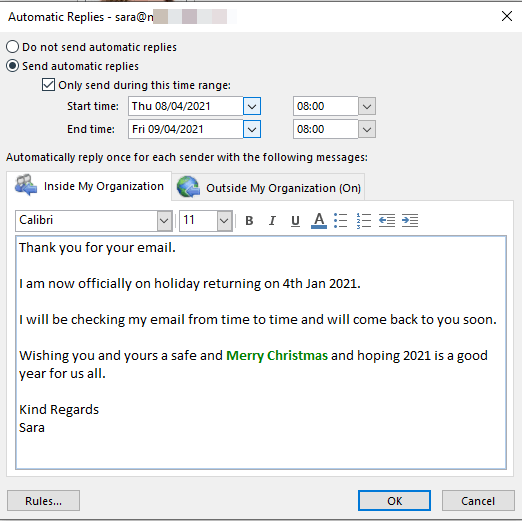
Select the options required incl Date/Times if required. Once set you can click OK to set.
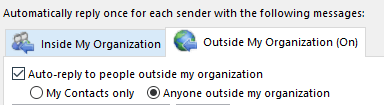
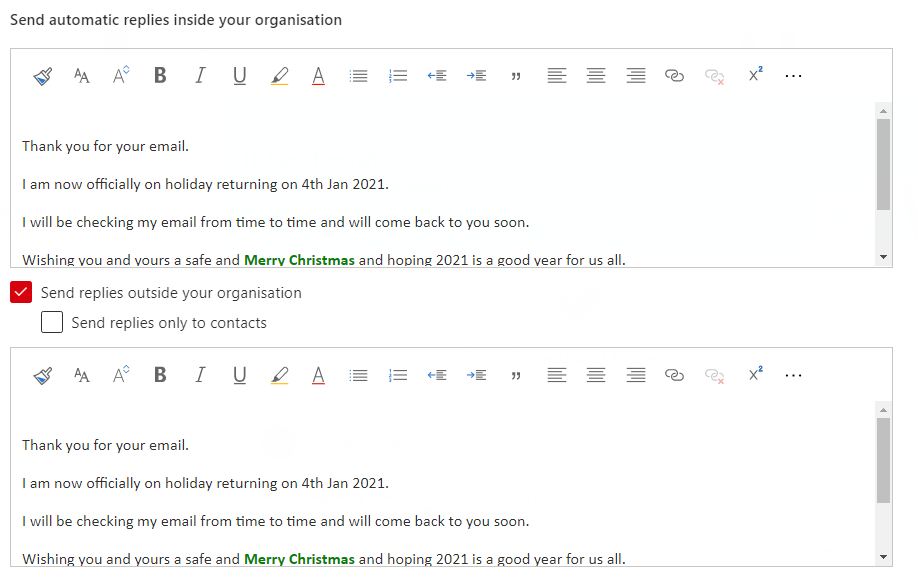
On the Outside My Organization tab, you can switch on/off sending the message to external recipients and choose to send to only contacts or any external senders.
Please note Anyone will include any mailing lists, newsletters etc so you may find that you receive replies about unmonitored email accounts or failed delivery for out of office replies with this option on.
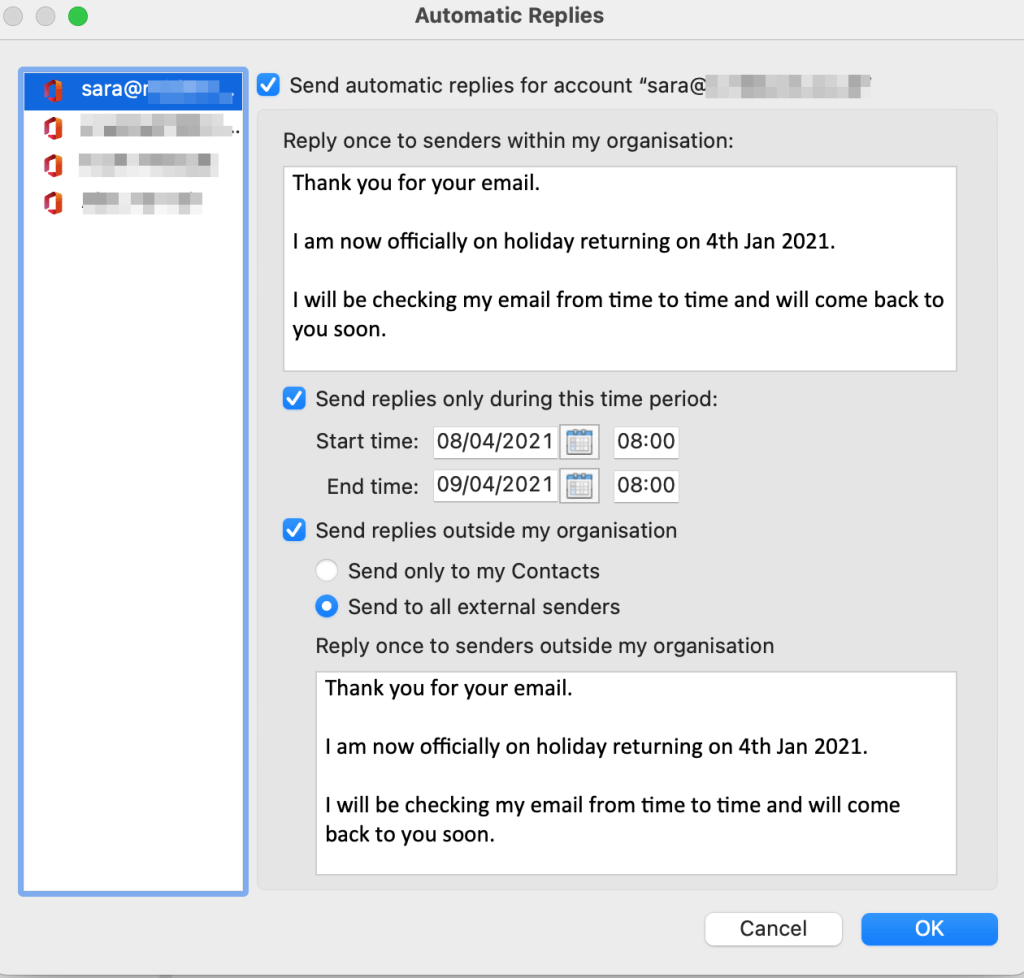
Outlook on Mac
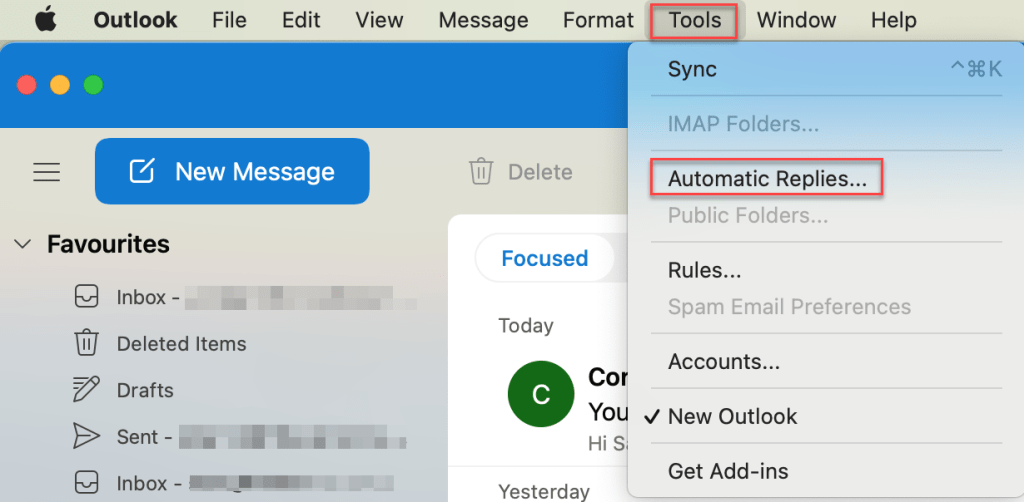
From the Tools menu choose Automatic Replies
Select the account and then the options required incl Date/Times if required. Once set you can click OK to set.
When setting your replies you can switch on/off sending the message to external recipients and choose to send to only contacts or any external senders.
Please note if you do not specify to send Only to my Contacts your reply will be sent to everyone including any mailing lists, newsletters etc so you may find that you receive replies about unmonitored email accounts or failed delivery for out of office replies with this option on.
The dialog box should open on Email settings tab, if not select Email then Automatic Replies. Configure the options required, filling in the message boxes as required then click Save.
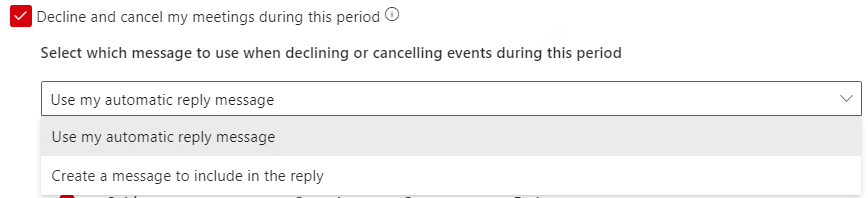
When picking the setting to decline meeting invites and cancel meetings already in your calendar during the Out of Office period, you can choose to send your standard out of office reply or enter a custom message for just the cancelled meetings.
It is recommended you add a message for declined meetings or include reference to that fact that meeting are being cancelled by the out of office reply function. Otherwise the meeting organiser may not realise you have declined the invite and just think they got a standard out of office reply.
When setting your replies you can switch on/off sending the message to external recipients and choose to send to only contacts or any external senders.
Please note if you do not specify to send to Only Contacts your reply will be sent to everyone including any mailing lists, newsletters etc so you may find that you receive replies about unmonitored email accounts or failed delivery for out of office replies with this option on.
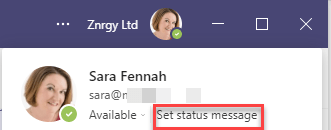
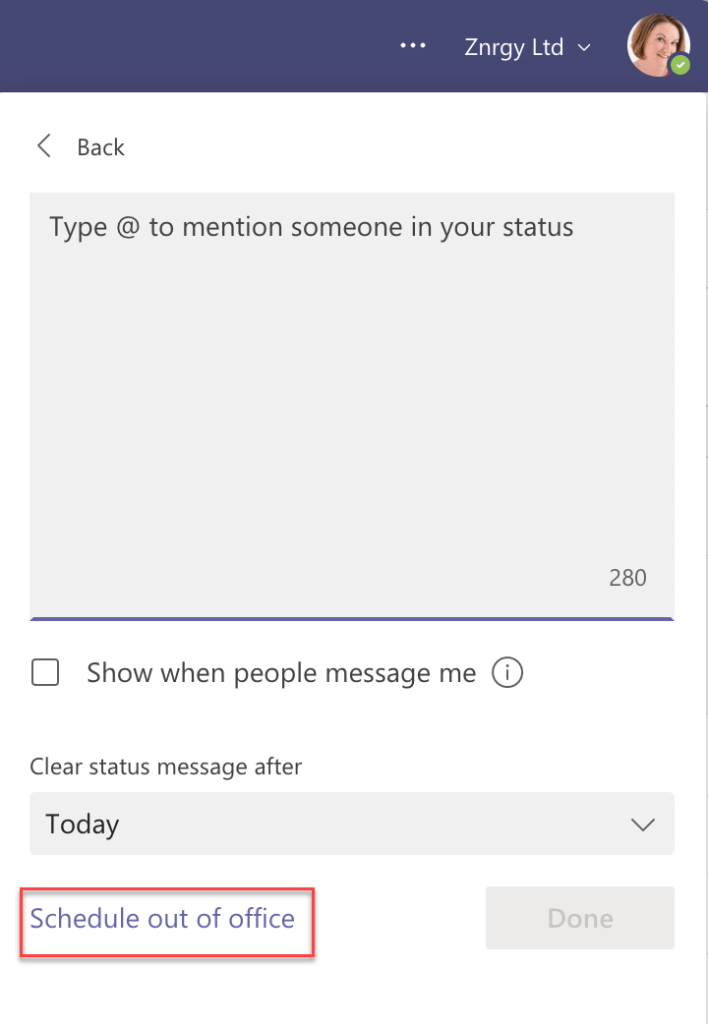
Teams on PC
From the person menu choose Set status Message
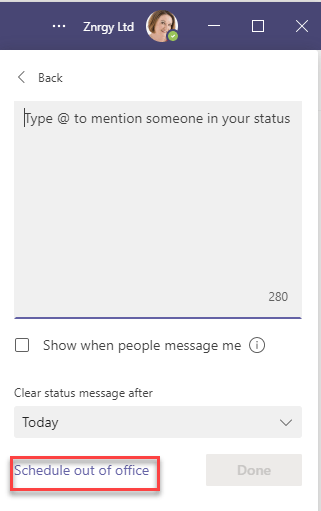
Click the Schedule out of office message
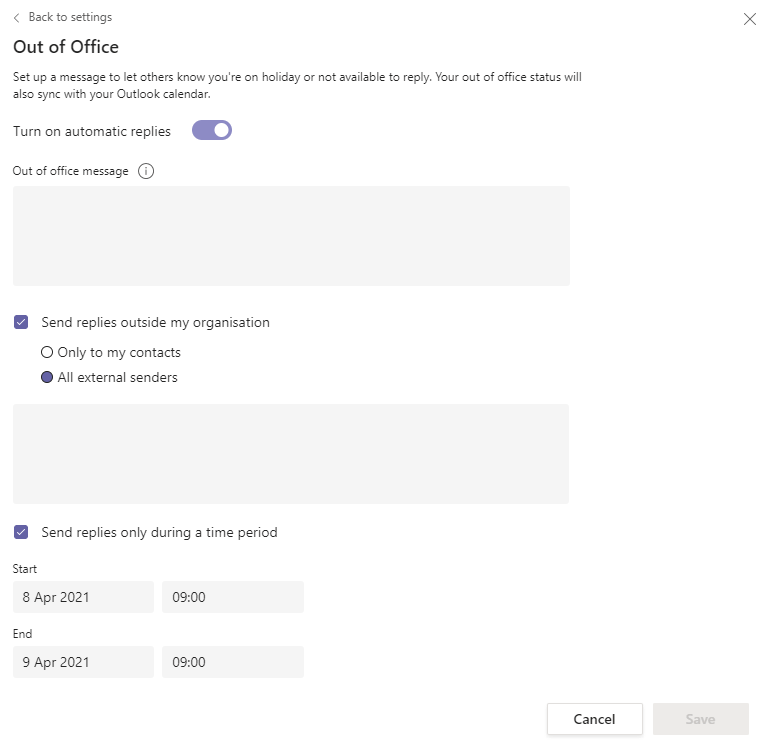
Turn on automatic replies and choose appropriate settings including entering your message(s) then click Save.
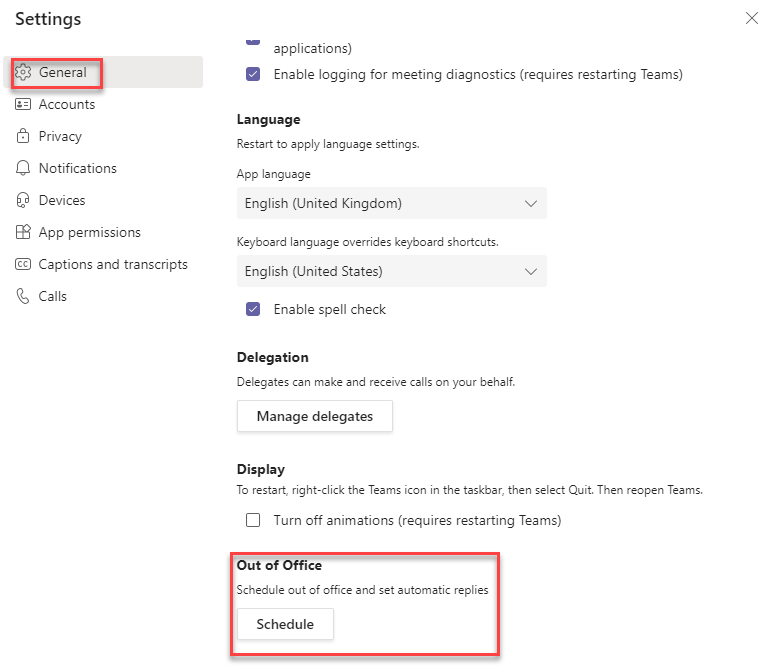
As an alternative you can also access the out of office via the settings menu, under General
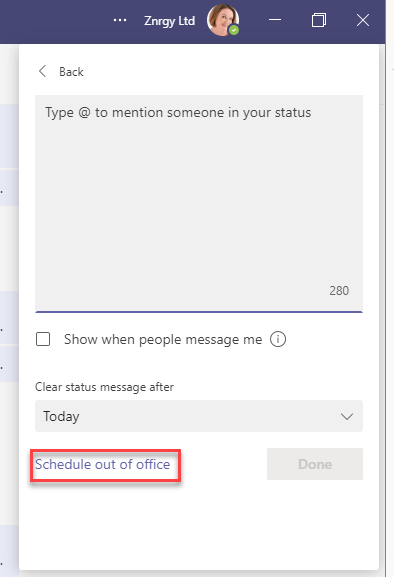
Teams on Mac
From the person menu choose Set status Message
Click the Schedule out of office message
Turn on automatic replies and choose appropriate settings including entering your message(s) then click Save.
As an alternative you can also access the out of office via the settings menu, under General
The updated menu and account switcher updated functionality has landed in my Teams client as at 7th April 2021 (at least when its set to preview build) and I wanted to share a few observations with you.
First up, note the message highlighting the changes
The … Menu has settings in it and nice little zoom control. Did you know you can also hold down CTRL key and use the wheel on your mouse to zoom in/out too?
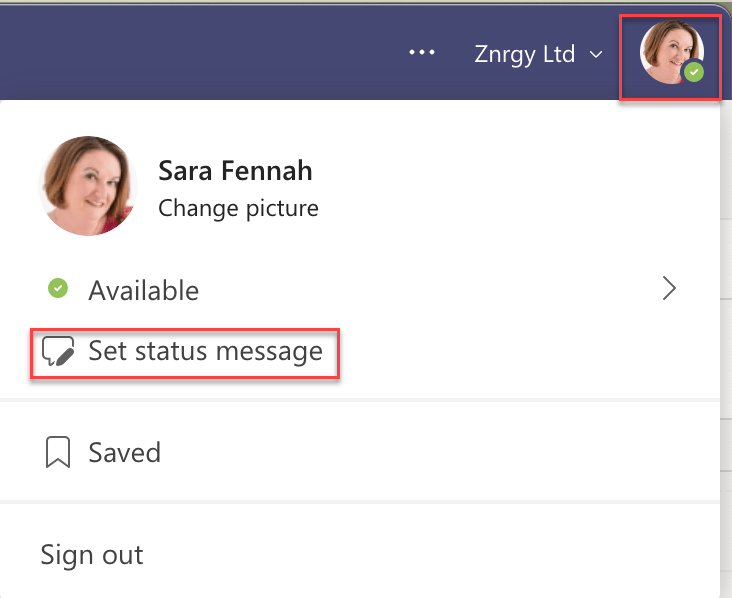
My name and picture link to the organisation switcher. It’s here you can also set your status message and presence
When you go to set your status message there is a new link to set up Out of Office from Teams.
In the main settings dialog, which you now access via … Menu there is a tab for accounts.
From here you can also turn on/off notifications as well as switch accounts .
Also new, under the App Settings tab you can control the access some app have to your camera, location, notifications etc as well as control what Teams generally has permission to use. NDI has also moved to the App Permissions tab.
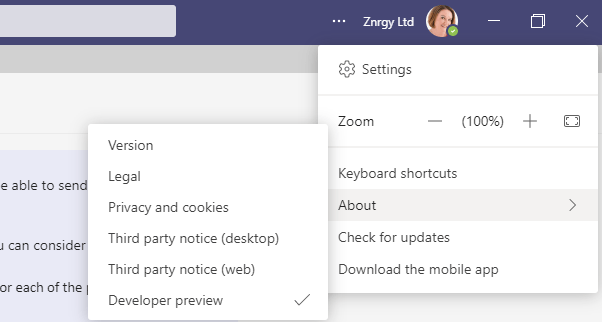
The final change I noticed is that Public Preview option has disappeared from the About menu, but I’m sure this is one of those little glitches that show up when you are running preview software.
PowerShell is very powerful (no pun intended) but if you don’t know what you are doing it can be dangerous, making big changes to your environment without prompting for confirmation. If you run ANY PowerShell scripts against your Office 365 tenant you alone are fully responsible for the actions undertaken, so please ensure you are fully confident in the source of your information.
If you are looking at scripts for Microsoft Teams from a blog (like this one) I would recommend checking them against MicrosoftTeamsPowerShell Module | Microsoft Docs. This helps you learn more about the scripts but also lets you check the cmdlets (commands) you intend to use are still valid.
Finally, ALWAYS close your PowerShell Windows when you are not actively using them. This closes the connection and logs you out, helping to keep your environment secure.
That said, here is how I would recommend setting up Teams PowerShell. Note I do not use a variable for the credential as the official blog suggests but wait for the log in prompt instead. In my opinion this works better with MFA.
Open Powershell in Windows with Admin – right click on your start button and choose Windows PowerShell (Admin)
Import the newly installed module into the open PowerShell window
Import-Module MicrosoftTeams
Log in to Microsoft Teams
Connect-MicrosoftTeams
You are now ready to manage Teams using PowerShell
When you are installing PowerShell Modules, you will always be prompted to confirm download from the repository, as shown below. You should only confirm one repository at a time using Y response.
Once set up you can then log in future by:
Open Powershell in Windows with Admin – right click on your start button and choose Windows PowerShell (Admin)
Import the Teams module into the open PowerShell window
Import-Module MicrosoftTeams
Log in to Microsoft Teams
Connect-MicrosoftTeams
To Update Teams Powershell
Open Powershell in Windows with Admin – right click on your start button and choose Windows PowerShell (Admin)
Run the Update Script
Update-Module MicrosoftTeams
Import the Teams module into the open PowerShell window