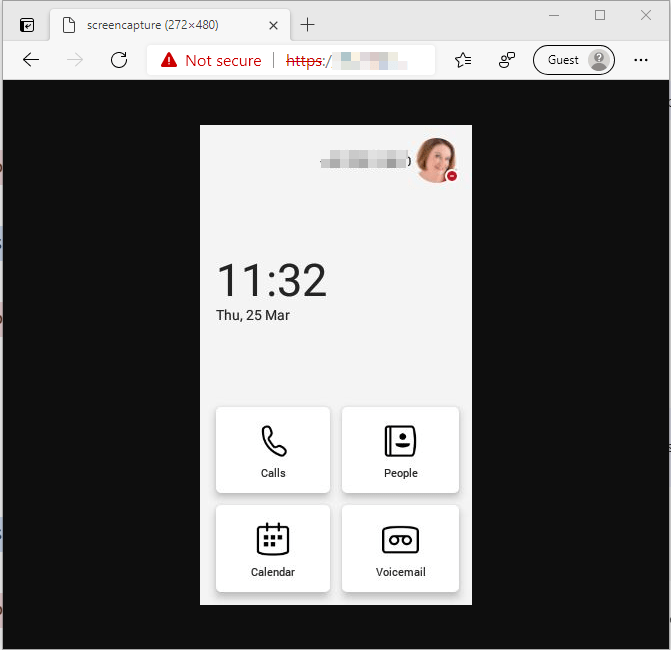
It is possible to capture screen images from a Teams phone using a web browser page. Please note you do need the phone admin login to use this.
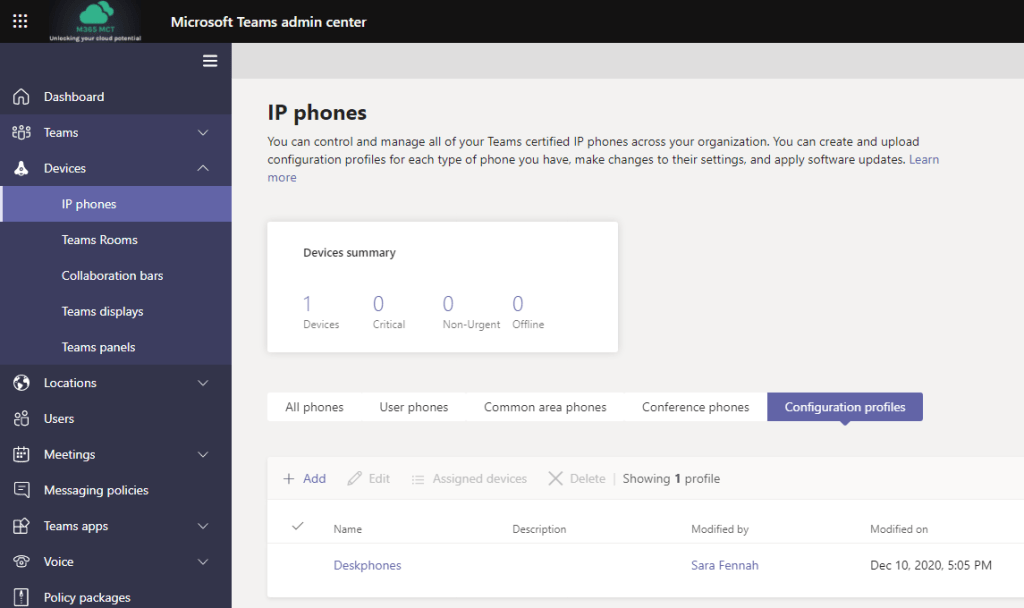
Firstly you need to ensure that the device configuration permits screen capture. To create and assign a device configuration profile, go to the Teams Admin Center and under Devices > IP phone choose Configuration profiles.
The setting you need to switch on is the Screen Capture setting
Once the config has been assigned you need the IP Address of the phone and put it into the link https://PhoneIP/screencapture
But how do you get the IP? Well you can get it from the phone itself. These screenshots are taken from Yealink TP55A.
Tap the profile picture on the home screen
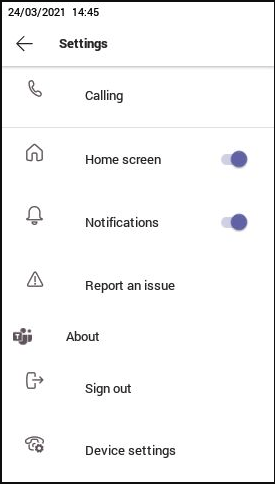
Choose Settings
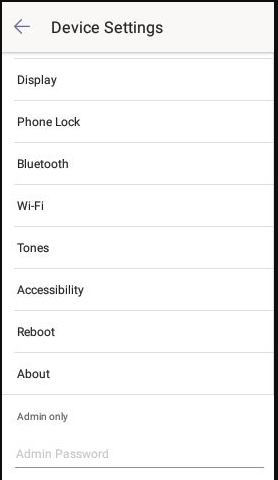
Select Device Settings
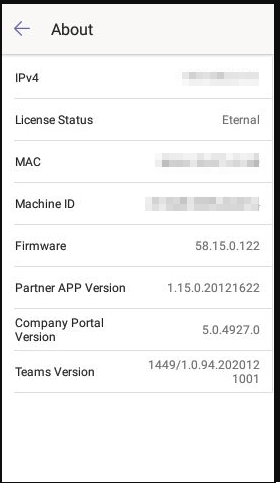
Choose About
Note the Device IP
Open your web browser and navigate to: https://PhoneIP/screencapture, replacing the words PhoneIP with the IP address of the phone. You may need to use the advanced options to continue to the page, depending on your network configuration.
Sign in using the device Admin account. The defaults are different by device and the password is controlled by the device configuration policy. For my phone the username is admin (all lower case)
Once signed in use your preferred screen clipping tool to take screen shots from the web browser
This article follows the articles for end users and super users in relation meeting transcription.
Transcription is available to all users with Microsoft 365 E3, Microsoft 365 E5, Microsoft 365 Business Standard, and Microsoft 365 Business Premium SKUs.
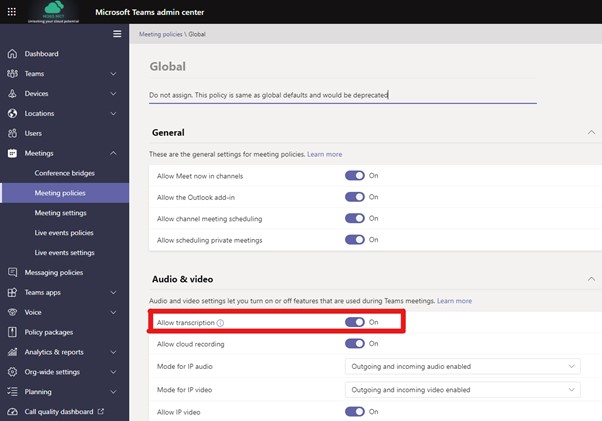
Transcription is off by default in the Global Meeting Policy and so your users will not see the feature unless you enable it.
As transcription is a feature which is policy controlled, it can be on for some users and off for others, by use of multiple policies.
Following on from the post for end users on transcriptions in Teams meetings, here is the extra you need to know as a Super User.
Privacy Concerns
Both close captions and transcripts can display the name of the speaker, though there is a setting to control this for privacy purposes if required. This is a per user setting and is found in the Teams settings on both desktop and web apps and travels with the user wherever they sign into Teams.
As with meeting recordings agreement from attendees should always be sought. Often, I will advise participants who do not want to be recorded or transcribed to use the meeting chat and keep their cameras off. Those messages can be read/summarised for the recording/transcription if needed.
When Can I Use Transcription?
Transcription is disabled by default and so organisations need to enable it. This setting is a policy setting and as such can be set on/off for different users or groups of users.
The availability of transcripts in a meeting depends on the meeting policy settings assigned to the user who set up the meeting. The transcription can be started by any user in the same tenant as the meeting organiser, if they too have transcription features enabled in the meeting policy they are assigned. Once started any meeting attendee can view the meeting if they too have transcription features enabled in the meeting policy they are assigned, including external users.
Prior to the release of the meeting Transcript in March 2021, the transcription setting only controlled whether meeting recordings would have live captions available on them, now this controls the transcript feature as well.
Transcription features are not available in Meet Now meetings at the time of writing, but it is a new feature so this may follow.
Transcription is a meeting only feature and not available for calls.
If your organisation uses a compliance call recording third party tool, then that tool may have different functionality. This article relates only to the standard Teams Meeting transcription features.
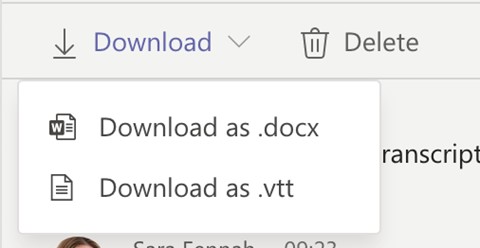
Downloading and Reviewing the Transcript
If you’ve used the transcript generated in classic Stream from meeting recordings, the actual transcript file will look very similar regardless of whether you download it in vtt or Word format.
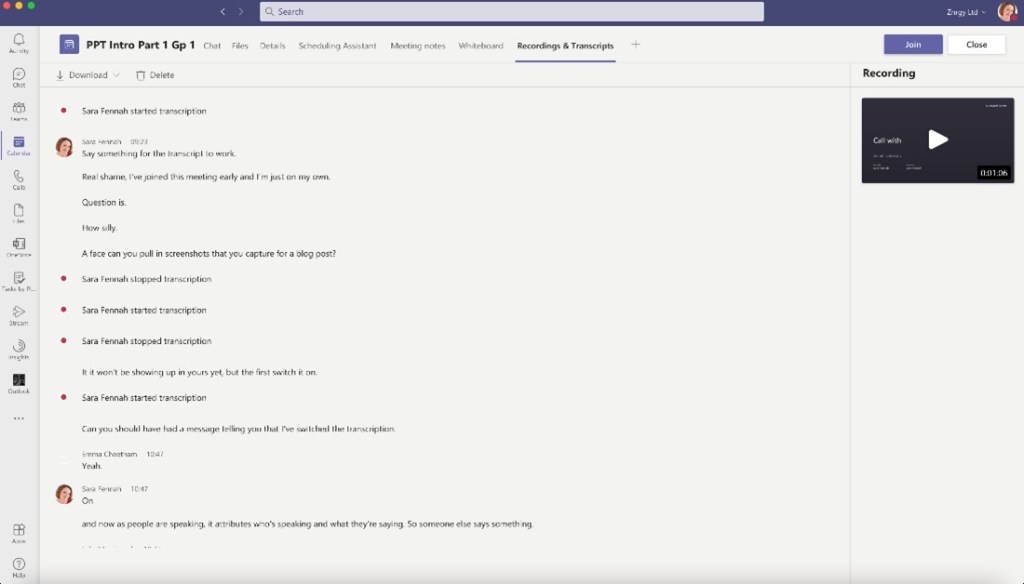
If you view the transcript via the Recording &Transcript tab in the meeting entry via the Teams calendar after the meeting you see the transcript in the same format as during the meeting, with user pictures and timestamps showing as time of day not meeting duration time.
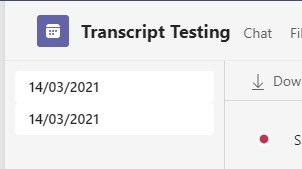
If there is more than one transcript, e.g. if the transcription is stopped and restarted during the meeting, then you will see multiple transcripts.
There are two ways of displaying in text format what is said during a Microsoft Teams Meeting; Live Captions and Transcript.
Live captions are shown on screen (usually at the bottom of the meeting screen) and disappear as new captions are generated. Live captions are visible only to users who switch them on. Live Captions can also be switched on when watching recordings, but only if transcription was enabled for the meeting organiser.
The transcript appears in the side pane (same as meeting chat) which users can scroll during the meeting and is saved for download after the meeting. Transcripts are visible to all meeting participants, including guests using the Teams app on PC or Mac. If accessing a meeting from the Teams web app you will only be able see the transcript after the meeting via the chat or meeting details.
Your Teams administrator can control if these features are available for you, so not everyone will have this functionality. If you do not have these options and you need them, please discuss with your Teams administrator.
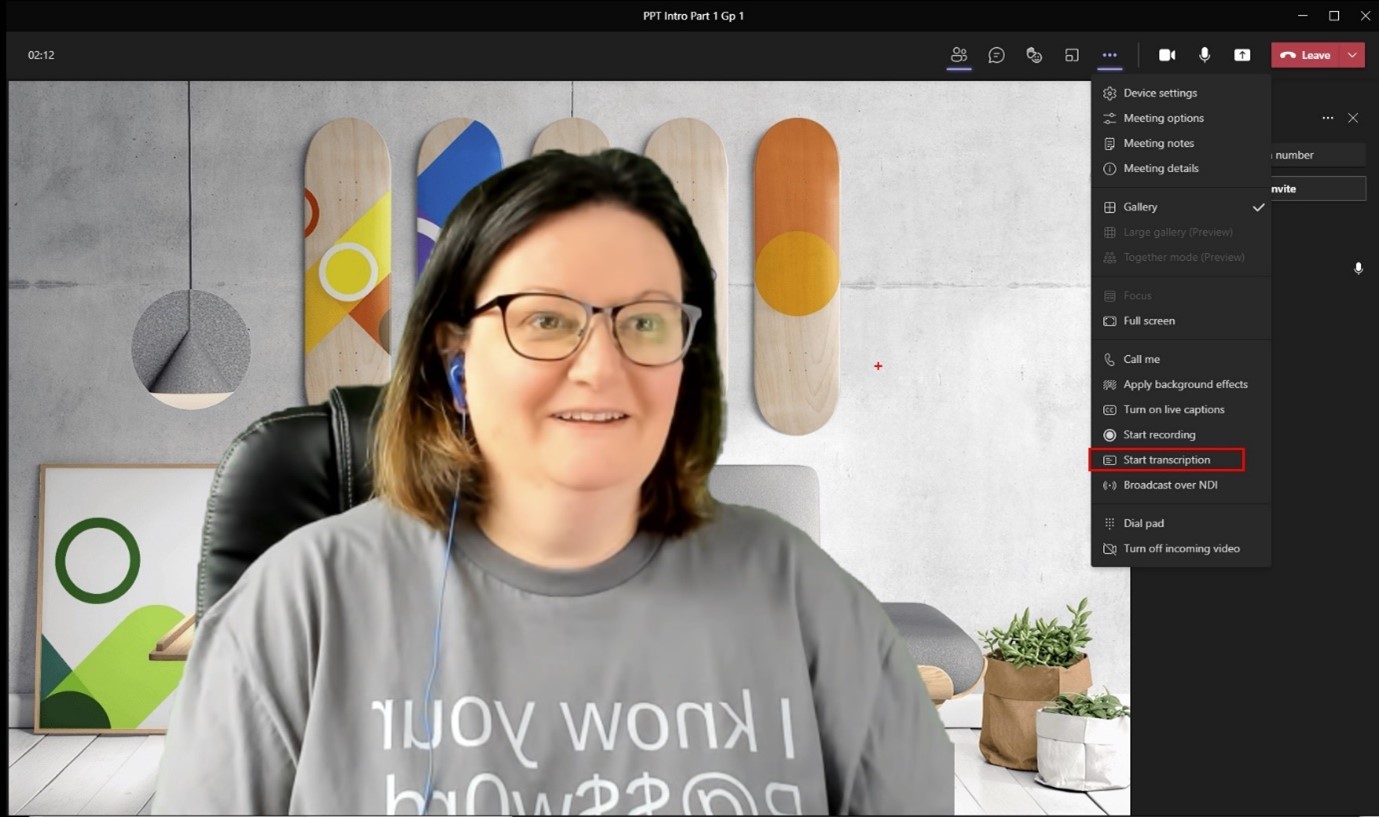
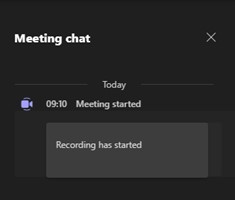
To start the transcript, from the … Menu choose Start transcription
You will see the banner confirming transcription has started.
Other participants will also get a notification.
The transcript is visible in the side box
and can be displayed, hidden or stopped from the … menu
If you then choose to record the meeting for sound & video as well as transcribe the meeting, the banner notification includes both transcript and recording information. Here the recording was started after the transcript
And you can still access the meeting recording from the chat, as normal.
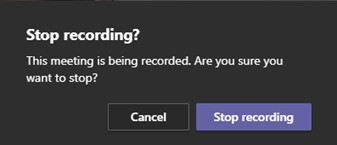
When stopping a recording yet still running the transcript you see the normal stop recording message
Followed by the banner indicating the meeting is still being transcribed
And this banner shows the transcription has stopped but the recording continues.
Once you stop transcribing the meeting you see a banner confirmation that it has stopped.
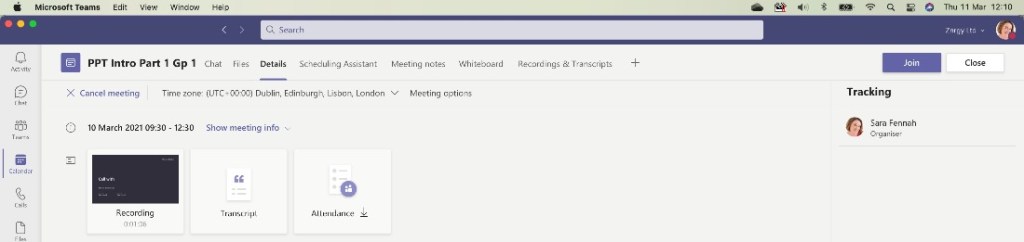
After the meeting is over, the recording and transcript are available from the meeting details in the Teams calendar
and also under the Recordings & Transcripts tab
where you can also download the transcript, as a Word document or video text transcript (vtt) file.
Using Transcripts with People from Other Organisations
If people have transcripts feature enabled then you can use transcripts with users from other organisations too. On the left in this image, you see the view for the meeting organiser and on the right the attendee from another organisation. Only people from the same organisation as the person who set up the meeting can start the transcript but people from other organisations can view it, both during and after the meeting.
As more and more of our working life is conducted virtually and we communicate more using Microsoft Teams with internal and external people, it can be a challenge to determine which features we can use with whom. As I write this it’s June 2020 and COVID-19 is still impacting many working practices, but this digital life isn’t new and isn’t going to go away either.
The official guidance on https://docs.microsoft.com just wasn’t giving me answers that matched what I was seeing in real life, so I set out on a mission to try and put together a more comprehensive guide to what works in which situations.
HOWEVER: it’s complicated and ever changing, so please do comment on this post if you find something that you disagree with or has changed.
First a few definitions of terms I’m going to use in this guide:
Internal User – A person in the same organisation as you, who has a 365 license. Normally has the same email suffix as you (the bit after the @ sign)
Guest User – A person in a different organisation, who has been added as a recognised user for your organisation. They may have been invited to join a team, had a document shared to them or have been manually added as a guest by an administrator. A more technical definition is that they have been added to Azure AD as a Guest/External User, do not have a license on your tenant and log in with an identity that is not managed by you (e.g. another organisations Office365, Gmail, Facebook or a Microsoft account)
External User – A person in a different organisation, with whom you communicate. Also known as a federated user
Chat – Messaging and calls from the Chat in Microsoft Teams. This can be 1:1 or small groups.
Meeting Chat – Chat which accompanies a Teams meeting. Unfortunately for these definitions once someone posts a message in the meeting chat, these chats are also available from Chat in Teams. These are different to 1:1 or group chats though.
Teams Posts – The chat which is part of a Team channel and only available to member of the team.
This guide looks at communication which is Teams to Teams, no Skype of any kind is covered. It is possible for administrators to restrict these features with different policies and settings in Teams and Azure AD, but to try and keep it simple I’ve assumed all communication is permitted at both ends of the conversation, which means:
No blocked domains at either end (called Open Federation) , or at least users at either end are permitted/not blocked
Azure AD Guest Access is permitted and guests can be invited by users not just admins
Policies and Teams settings permit communication with Guest and External Users including anonymous meeting join without restrictions
In Summary:
Action
In
External User
Guest User
Internal User
Send Chat Message
Chat
Yes
Yes
Yes
Make a Voice Call in Chat
Chat
Yes
Yes
Yes
Make a Video Call in Chat
Chat
Yes
Yes
Yes
Be Added to a Group Chat
Chat
No
Yes
Yes
Share Files in Chat using Paperclip
Chat
No
No2
Yes
Share Files in Meeting Chat using Paperclip
Meetings
No
Yes
Yes
Share Files in Teams Posts using Paperclip
Teams
N/A1
Yes
Yes
Share Screen in a Call or Meeting
Chat
Yes
Yes
Yes
Share Screen in a Call or Meeting
Meetings
Yes
Yes
Yes
Respond to a Poll in Meeting Chat
Meetings
No
Yes3
Yes
Respond to a Poll in Teams Posts
Teams
N/A1
Yes3
Yes
Use Meeting Notes
Meetings
No
Yes3
Yes
Start Recording
Meetings
No
No
Yes4
View Meeting Recording
Meetings
No
No
Yes
Contribute to Meeting Notes
Meetings
No
Yes3
Yes
View Meeting Whiteboard
Meetings
Via Shared Screen only
Yes3
Yes
Contribute to Meeting Whiteboard
Meetings
Only if given Control
Yes3
Yes
Use @ Mentions
Chat
Yes
Yes
Yes
Use @ Mentions
Meetings
Yes
Yes
Yes
Use @ Mentions
Teams
Yes
Yes
Yes
Use Fun Stuff – Emojis, Gifs & Stickers
Chat
Yes
Yes
Yes
Use Fun Stuff – Emojis, Gifs & Stickers
Meetings
Yes
Yes
Yes
Use Fun Stuff – Emojis, Gifs & Stickers
Teams
Yes
Yes
Yes
Send Audio Messages from Mobile App in Chat
Chat
Yes
Yes
Yes
Send Audio Message from Mobile App in Meeting Chat
Meetings
Yes
Yes
Yes
1 External users who are invited to a Team become guest users
2 it is partially possible to share files with guest users using the paperclip. If UserA is added as a guest in your tenant (either by being manually added or invited to a Team), and you message UserA(Guest) in your tenant, you can share files using the paperclip. However UserA(Guest) cannot share files to you. You also cannot share files in the chat from your own tenants using the paperclip. A workaround is to upload the file into your OneDrive and generate a link which you can share in the chat. Sharing a file to specific users automatically sends them an email, which is the simplest method, though this does not keep the conversation in Teams.
3 When joining meeting from the guest tenant. This means using Teams in the browser, switching to the guest tenant then pasting the join link into different tab and joining the meeting in the browser version of Teams. Whiteboard is only available to the guest during the meeting and when they join from the guest tenant.
4 if a presenter in the meeting.
This table is available as a spreadsheet for filtering and with pretty icons too – download from the link below
I started out with https://docs.microsoft.com/en-us/microsoftteams/communicate-with-users-from-other-organizations which compares the features external users and guest users can use in Chat. The table above is based on my testing of these features. However I’ve included the original here as it stood when I wrote this article and I’ve expanded the footnotes to the table from that article here.
Feature
External access users
Guest access users
User can chat with someone in another company
Yes
Yes
User can call someone in another company
Yes
Yes
User can see if someone from another company is available for call or chat
Yes
Yes1
User can search for users across external tenants
Yes2
No
User can share files
No
Yes
User can access Teams resources
No
Yes
User can be added to a group chat
No
Yes
User can be invited to a meeting
Yes
Yes
Additional users can be added to a chat with an external user
No3
N/A
User is identified as an external party
Yes
Yes
Presence is displayed
Yes
Yes
Out of office message is shown
No
Yes
Individual user can be blocked
No
Yes
@mentions are supported
Yes4
Yes
Make private calls
Yes
Yes
View the phone number for dial-in meeting participants
No5
Yes
Allow IP video
Yes
Yes
Screen sharing mode
Yes4
Yes
Allow meet now
No
Yes
Edit sent messages
Yes4
Yes
Can delete sent messages
Yes4
Yes
Use Giphy in conversation
Yes4
Yes
Use memes in conversation
Yes4
Yes
Use stickers in conversation
Yes4
Yes
1 Provided that the user has been added as a guest and is signed in as a guest to the guest tenant. 2 Only by email or chat address if a different address is used for Teams than email. (technically the chat address is the Session Initiation Protocol (SIP) address). 3 External (federated) chat is 1:1 only. 4 Supported for 1:1 chat for Teams Only to Teams Only users from two different organizations. This refers to the “coexistance” setting which controls how Skype for Business Online (SfBO) and Teams work side by side in the same organisation. As SfBO is retiring in July 2021 organisations are moving to Teams. Once moved they work in ‘Teams Only’ coexistence mode and don’t use SfBO. 5 By default, external users in a meeting can’t see the phone numbers of any participant who have dialed-in. If you want to maintain the privacy of these phone numbers, select Tones for Entry/exit announcement type (this prevents the numbers from being read out by Teams). As a Teams Administrator to change these setting see Turn on or off entry and exit announcements for meetings in Microsoft Teams.
Now if you are a Teams Admin, you need a little more info on making sure things are set up how you need for your organisation.
You need to consider policies and settings for Teams to control guest/external access and features. The sections in the Teams Admin Centre to look at are:
Meeting Policies – especially the Participants & Guests section
Below you will find the configuration used to write this guide for each of these. As a consultant and trainer working with a wide range of organisations these are the settings that work for me and are basically ‘Everything On’.
Lots of people don’t create the meeting invites for the meetings they run. There are several scenarios as to why this is the case:
Assistant creating meeting on behalf of a manager/executive
Learning team member creating a training session to be delivered by an external trainer
Centrally scheduled classroom sessions in a school/college/university
And many others. For ease lets call the person creating the meeting the scheduler and the person who needs to run the meeting the owner.
In this blog I will lay out what the issues are and then consider ways to avoid these when acting as a scheduler.
In Microsoft Teams there is only 1 meeting organiser, this is the scheduler. There is no functionality to assign an alternative meeting organiser. This presents some challenges when the scheduler isn’t attending the meeting. How much of an issue it presents depends on the meeting options and the features the meeting owner needs/wants to use.
Let’s start by considering the roles in a meeting. There are 3 roles, organiser, presenter and attendee. The following table summarises what you can do with each of the 3 roles.
Capability
Organizer
Presenter
Attendee
Speak and share video
Y
Y
Y
Participate in meeting chat
Y
Y
Y
Share content
Y
Y
N
Privately view a PowerPoint file shared by someone else
Y
Y
Y
Take control of someone else’s PowerPoint presentation
Each organisation can determine what meeting options default to and which settings within meeting options are available to users. I’ve assumed all options are available to you in this blog, but your defaults may be different to mine. Only the meeting scheduler can change the meeting options.
Outlook uses the Teams client when creating a Teams meeting. This means that when a meeting is created on behalf of the other user from Outlook desktop app, the meeting organiser is determined to be the user who is signed in to the Teams desktop app when the meeting is created, regardless of which calendar is used. So if we create a meeting on behalf of another user from their calendar in Outlook but are signed into Teams as ourselves, we are the organiser.
To truly create a meeting on behalf of another you would need to be signed in to Teams as the person you are delegating for, in order for the meeting person you are delegating for to be the meeting organiser with this method.
All is not lost, it is possible to create a meeting on behalf of another user IF you have access to open their mailbox. The scheduler should open the meeting owners mailbox via outlook for web and then create the meeting from their calendar.
I can’t do that – what now, you ask, well two options for you to consider.
Alternative 1: If the scheduler does not have permission to open the meeting owners calendar then you may want to consider the actual owner creating the meeting and inviting the scheduler so that the scheduler can forward the meeting to the attendees. The owner will then have full control of the meeting incl breakout rooms, attendance records, meeting options etc. To use this scenario, do check that you have meeting forwarding enabled on the meeting.
Alternative 2: If the scheduler has access to the meeting owners calendar but cannot open it in Outlook for the web as described above, then the meeting owner can still create the event as a Teams meeting from Outlook but not invite anyone, then the scheduler can open the event and edit it, inviting others.
What about External Meeting Owners?
As a trainer I often work across organisations where the meeting attendees are in a different Teams tenant to me. This means I need to be the meeting owner but the scheduler works from a different organisation to me, so no calendar sharing exists. However if I don’t need to control break out rooms or change meeting settings then I am happy to be a presenter and ask the scheduler to ensure I am a presenter and to ensure that someone will be able to let me into the meeting at the start.
Should I need to be the meeting owner or the scheduler is not comfortable changing the meeting settings then alternative 1 works well for me in that setting and I have full control of the meeting.
Another option I use is to create the Teams meeting myself and send the scheduler inside the customer organisation the link for the meeting. They then create a meeting invite for their staff and include the link or add it to an existing meeting invite. It’s not as neat a solution as forwarding the invite, but does avoid many issues when forwarding invites is blocked or dates have been scheduled well in advance of Teams meeting creation.
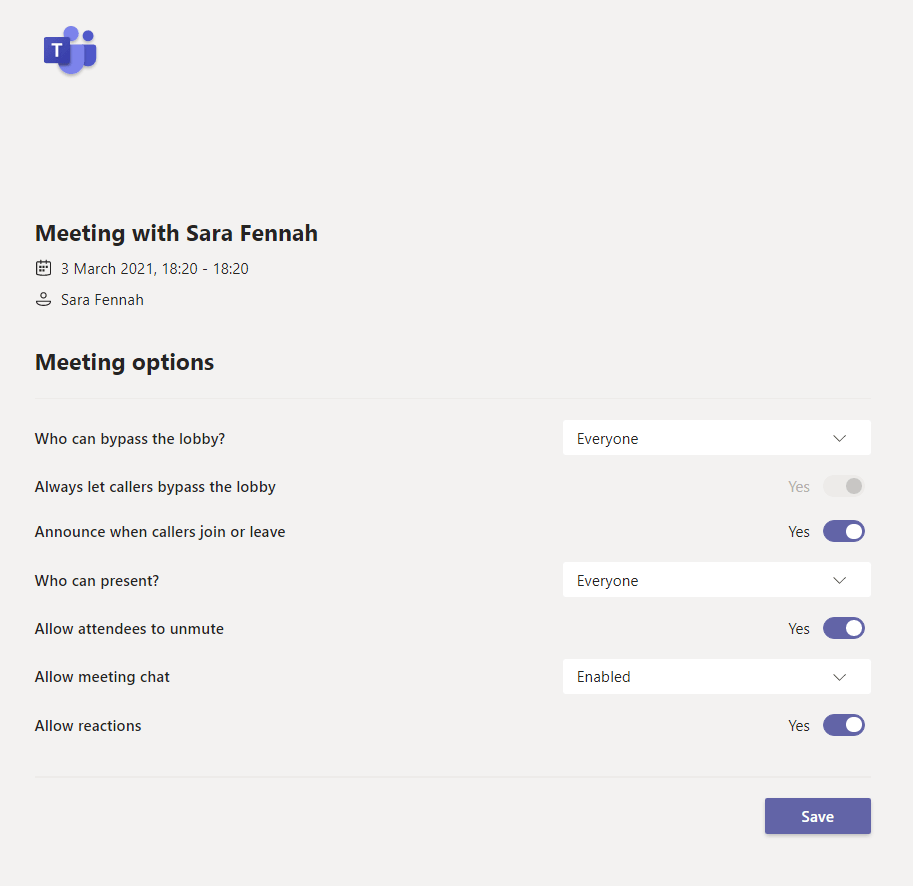
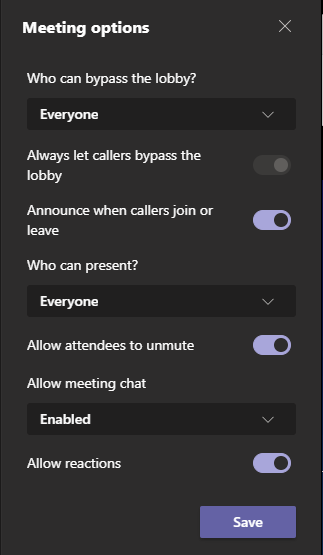
Teams meeting options are how you can control who can do what in your meeting. In the Education sphere this control is essential but they are also very useful in many other scenarios.
Once you are into the meetings option screen let’s look at what the settings mean and which you should choose.
Lobby
The lobby settings allow you to protect your meeting from uninvited guests. The Invited Users setting is probably the best in most scenarios, however at the time of writing this option is rolling out and not available to everyone yet, so the second best is people in my organisation or Just Me. After all you don’t want any ‘Zoom bombers’ invading your Teams meeting.
Callers are people who join via a phone call, if that feature is available to you, and you can also choose to put these dial-in users into the lobby too.
Presenters
Before diving into these options you do need to consider the 3 roles in a Teams Meeting (see https://bit.ly/3qgQ5Yj for full details). To simplify, when you create a meeting you are the organiser and have full control of the meeting and all features, presenters can share content, their video and mute/unmute while attendees only have the ability to unmute if the organiser allows.
Capability
Organizer
Presenter
Attendee
Speak and share video
Y
Y
Y
Participate in meeting chat
Y
Y
Y
Share content
Y
Y
N
Privately view a PowerPoint file shared by someone else
Y
Y
Y
Take control of someone else’s PowerPoint presentation
Y
Y
N
Mute other participants
Y
Y
N
Prevent attendees from unmuting themselves
Y
Y
N
Remove participants
Y
Y
N
Admit people from the lobby
Y
Y
N
Change the roles of other participants
Y
Y
N
Start or stop recording
Y
Y
N
Set Meeting Options
Y
N
N
View Attendance Report During Meeting
Y
N
N
Control Breakout Rooms
Y
N
N
Mute
Often attendees join with a lot of background noise. If you are running a training or briefing style meeting this can be very disruptive, so it may be appropriate to mute attendees and block them from unmuting. This option is also one that is often changed during a meeting.
Chat
Meeting chat is a useful addition to a meeting, but when it continues after a meeting or is abused by attendees then it can become a distractor. Like the allow to unmute setting, this can be changed during a meeting at need. Only allowing chat during the meeting, does not mean the chat disappears after the meeting, but that it becomes read only once the meeting ends.
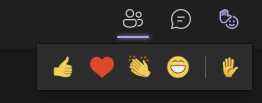
Reactions
Reactions are visible feedback which show on screen and can be used to engage with the presenter.
Coming Soon – Video Availability settings to block attendees switching on their video is due to start rolling out in April 2021 (see Microsoft 365 Roadmap | Microsoft 365)
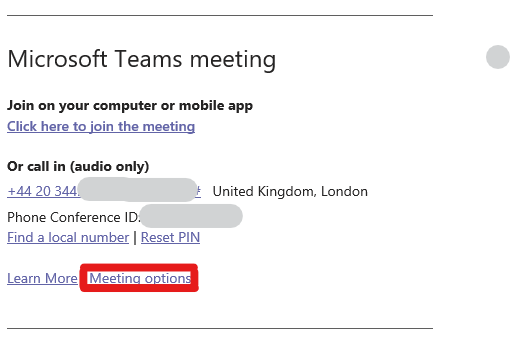
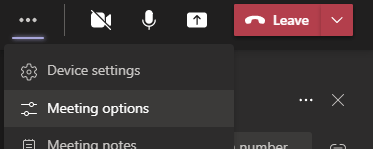
To access the meeting options before the meeting use option 1 or 2 below. To access the meeting options during the meeting I prefer option 4 below as you don’t leave the meeting, but option 3 will take you to the same page as options 1 & 2, if you prefer.
I’ve called my new blog Teams Queen, after friends in the community started calling me their “Teams Queen” in recognition of the help I’ve given them with Microsoft Teams.
With today being the day of the 2021 Scottish Summit, a great example of what the community can do and next week it’s Microsoft Ignite where we will be celebrating certificated professionals. It seemed a great time to put out launch my new blog with this post about the Microsoft Certified Trainer community.
I LOVE being an MCT and wanted to share with you all why if you are an MCT I strongly believe you should engage with the community. So this blog shares what being involved in the community has given me personally and professionally.
I am an independent trainer and have been working as a full time freelance professional since 2005, focussing mainly on training and more recently consultancy too. I’ve been in training and education in some form or other since gaining my PGCE in 1996 and have been an MCT since 2008, though I was a MOUS Master Instructor for nearly 2 years before I became an MCT, as in those days Office certifications had their own instructor program before it was merged with the MCT program.
Having left teaching after a fixed term contract and fallen into IT training by accident in 1998/9, the Office certifications and the ECDL were a gateway to knowledge and skills in my new profession and at the time were a HUGE step for me. Computers were not really my friend at this point, but by working for these certifications I learnt and was soon hooked on IT. But I passed the exams, applied to and was accepted into the MOUS Master Instructor program and my IT Training career was born.
Fast forward to 2017 and I was starting to wonder why I kept renewing my MCT. It was starting to feel like a useless badge. If I’m honest, I kept renewing mainly for pride but it wasn’t really worth the cost and if I’m honest, I didn’t see any other benefits being an MCT. Especially once the Office 365 licence benefit was withdrawn.
Then in 2017, I got an email from one of the UK regional leads about an event they were holding at the Microsoft Campus in Reading in the October. Now I didn’t even know such things happened and hadn’t ever received such a message before so had no idea what a regional lead was, let alone that there was a whole community of MCTs. I mainly went as I was interested in seeing the Reading offices and learning a bit more about this Azure thing that seemed to somehow link the Office 365 which I was now mainly training on. Oh how naïve I was!
I’d been training Office365 since about 2013 (Aug 2013 was the first course I have delivered focused on Office 365 as a whole) , but it was that event in 2017 when I first became aware of the MCT community and realised just how much was going on and what other trainers were doing, as well as how little I actually knew about some parts of 365 and cloud, but also how much I knew about others areas. That event was a catalyst for me to drive to the next level. I wanted to be a certified 365 administrator and train the official courses. I felt I was so close, though having no technical background it was a struggle.
After that UK event in 2017, and another in 2018 then the MCT Global Summit in Germany in Oct 2018 I gained the motivation (and confidence) to try for the Office 365 certifications. It took me a few more months after that to get my first Microsoft 365 certification, mainly as I ended up waiting for the role based certifications early in 2019.
By the time the European MCT Summit rolled around in September 2019, I had friends in the MCT community and even got up the courage to speak at the event to try and encourage others to follow in my footsteps. Now, no-one’s first conference speech is an amazing success, but mine was well received, plus I got a lot of helpful comments and constructive feedback. My biggest gain at that event though was that I really now understood what was going on.
After those two international events as well as friends in the community I had I had also gained a network of people who encouraged me, helped when I asked and referred work to me too. In the space of 18 months I’d gone from being disillusioned with being an MCT to gaining professionally and personally from being a part of a community I had been missing out on.
As a result of getting involved in the MCT community I’ve been to more community events and conferences (not just those for MCTs), gained many more professional contacts, met more MCTs, am now delivering the MOC courses, helped others get started with their MCT benefits and generally got more involved in the MCT Community. But the biggest thing this community has given me from a professional perspective was the support and motivation to take the steps I wanted to enhance my career. Without that one email in 2017 and that one event, none of that would have been possible.
You probably already know that you can add your own pictures into Microsoft Teams to use as a background. But just in case you didn’t, here’s how (only works on desktop, not bowser or mobile apps)
Save your picture somewhere sensible. (I created a folder in my OneDrive called TeamsBackgrounds, so if I move to a new PC, I still have my background images available).
In Teams go to the calendar and click Meet Now
On the join screen click the background effects button
Click the +Add new button and upload your picture
Once uploaded, check your image is showing (it’ll be at the bottom) and then you can close the meeting window. It’ll be available when you next join a meeting to select by clicking the background effects button as above.
If you don’t have a handy image to use you can create your own in PowerPoint.
Create your slide.
Lighter backgrounds are best, but not white
Remember Teams will sit you in the middle at the bottom of the screen so keep key details away from the middle third of the screen, though you can use the top section – use the areas shown in blue below and avoid the white bit where the person is
When you are happy save the file as an image (remember to save the PowerPoint too, so you can edit if required)
File ->Export – > Change File Type and choose jpeg
Save your picture somewhere sensible.
Follow steps above to add to Teams.
NOTE: If you have text on your image, it will appear backward for you in Teams, but the correct way round to the people you are meeting with!
In my template the blue blocks are all 11.25cm wide, splitting the slide into 1/3rds, the small one is 4cm tall. Its not an exact science, with some images takes a bit of trial and error to get it looking good. So the blue blocks are more illustrative than definitive.