Do you ever get a message telling you you can’t change the meeting options for a meeting you set up? It’s probably due to what you were doing the last time you used the Teams web app (aka Teams in your web browser).
These messages changed a little while ago to show you who is signed in. In the above I’m trying to change the meeting options for a meeting I just created in the Teams desktop app. The snag is it thinks I’m signed in to the Microsoft tenant as a guest user and that user can’t change my meeting.
Confused – you are not alone, but there is a simple fix. Sign into Teams in your browser (go to https://teams.microsoft.com/ and pick use in browser, if prompted to open the app), then switch back to your main tenant.
Try the meeting options again and hey presto, it works.
Meeting options are a great way to control the meeting and keep control by setting who can present. Presenters have almost as much control of the meeting as you. Presenters can’t access the meeting options, nor download the attendance list but otherwise they can do everything you can.
You access meeting options from the meeting invite or during the meeting from the participants pane
All open in your web browser. But if you are still having issues accessing the options then join the meeting early and use the new Meeting Options from the … menu
This opens the meeting options within the meeting, so no clashes with permissions at all.
Did you want to check your camera and background before a Teams meeting and ended up trying to join a meeting early to do so, or worse joining a meeting late as you needed to adjust your settings and it took too long, or worst still what about joining a meeting and bringing up a totally inappropriate camera/background left over from the last meeting?
As backgrounds are persistent between meetings, use the Meet Now button to bring up your meeting join screen.
Then select your background adjust device settings and then just close the join window. When you go to join your meeting now the camera is set to go.
With Teams meeting recordings moving to OneDrive and SharePoint from Stream users and admins need to understand what this change means. It’s not just the location a recording is stored that is changing but also who can records and the sharing options once the recording is done.
I’ve split the information into the different type of event that can be recorded from Teams.
Calls
Calls refers to a voice or video call between 2 participants which isn’t set up with a meeting invite. Calls are started from the Chat or Calls section of Teams.
Who clicked on Record?
Where does the recording save?
Who has access and what can they do with it?
Caller
Caller’s OneDrive for Business account
Caller is owner and has full rights.
Callee (if in the same tenant) has read only access. Cannot share with others. Callee (if in different tenant) has no access. Caller must share it to the Callee.
Callee
Callee’s OneDrive for Business account
Callee is owner and has full rights.
Caller (if in the same tenant) has read-only access. Cannot share with others. Caller (if in different tenant) has no access. Callee must share it to the Caller.
Group Calls
A group call refers to a voice or video call with 3 or more participants which isn’t set up with a meeting invite. Calls are started from the Chat or Calls section of Teams.
Who clicked on Record?
Where does the recording save?
Who has access and what can they do with it?
Any member of the call
The OneDrive for Business of the participant who clicked on Record
Recorder has full rights.
Others from the same tenant have read only access.
Others call members from different tenants have no access.
Meet Now Meetings – Internal Only Attendees
Meet Now Meetings (or AdHoc meetings) are ones started from the Meet Now button in the Calendar within Teams.
Who clicked on Record?
Where does the recording save?
Who has access and what can they do with it?
Organizer
Organizer’s OneDrive for Business account
Organizer has full rights to the recording.
All other members of the meeting have read access.
Other meeting member
Member who clicked on Record
Member who clicked on Record has full rights to the recording.
Organizer has edit rights and can share.
All other members have read access.
Meet Now Meetings – Incl External Attendees
Meet Now Meetings (or AdHoc meetings) are ones started from the Meet Now button in the Calendar within Teams.
Who clicked on Record?
Where does the recording save?
Who has access and what can they do with it?
Organizer
Organizer’s OneDrive for Business account
Organizer has full rights to the recording.
All other members of the meeting from the same tenant as the organizer have read access.
All other external members have no access, and the Organizer must share it to them.
Other meeting member
Member who clicked on Record
Member who clicked on Record has full rights to the recording. Organizer has edit rights and can share.
All other members of the meeting from the same tenant as the organizer have read access.
All other external members have no access, and the Organizer must share it to them.
Scheduled Meetings – Internal Only Attendees
Scheduled meetings are meetings set up in advance to which attendees are invited. Meetings can be scheduled from Outlook or Teams Calendar.
Who clicked on Record?
Where does the recording save?
Who has access and what can they do with it?
Organizer
Organizer’s OneDrive for Business account
Organizer has full rights to the recording.
All other members of the meeting have read access.
Other meeting member
Member who clicked on Record
Member who clicked on Record has full rights to the recording.
Organizer has edit rights and can share.
All other members have read access.
Scheduled Meetings – Incl External Attendees
Scheduled meetings are meetings set up in advance to which attendees are invited. Meetings can be scheduled from Outlook or Teams Calendar.
Who clicked on Record?
Where does the recording save?
Who has access and what can they do with it?
Organizer
Organizer’s OneDrive for Business account
Organizer has full rights to the recording.
All other members of the meeting from the same tenant as the organizer have read access.
All other external members have no access, and the Organizer must share it to them.
Other meeting member
Member who clicked on Record
Member who clicked on Record has full rights to the recording. Organizer has edit rights and can share.
All other members of the meeting from the same tenant as the organizer have read access.
All other external members have no access, and the Organizer must share it to them.
Channel Meetings
Channel meetings are scheduled meetings held in a Team Channel. They can only be set up from the Teams Calendar.
Who clicked on Record?
Where does the recording save?
Who has access and what can they do with it?
Channel Member
Teams’ SharePoint location for that channel
Member who clicked on Record has edit rights to the recording.
Every other member’s permissions are the same as their channel file access.
With the launch of breakout rooms for adhoc and scheduled Team meetings, many people are celebrating and it is a much requested feature, but how does it work.
Microsoft have released a couple of great articles so I’m not going to reinvent the wheel and write a full guide myself, but I would like to share my early observations.
Breakout rooms are working in scheduled and ad-hoc meetings and though I’ve not tested it, claim to work in channel meeting, though not Meet Now (adhoc) channel meetings.
You can only manage breakout rooms from the desktop app but can participate from web and mobile too.
Breakout room chat is only available once the breakout room is open, but remains available after the meeting from the Teams Chat app, if it was used. For all meetings incl breakout rooms there is no meeting chat link in Chat if no-one has posted anything in the meeting chat.
You need to start the meeting to set up breakout rooms, but once set up you can leave the meeting and rejoin later, the breakout rooms will still be set up.
When you open breakout rooms attendees get a warning that they are moving to a breakout room via a banner, then move automatically with no meeting lobby
Meeting attendees can choose to join a breakout room themselves.
If the room is closed they leave the main meeting and are disconnected.
If the room is open, they will join the breakout room. The breakout room honours the meeting lobby setting from the main meeting.
When you close a meeting room users are returned to the main meeting, with a notification and are subject to the meeting lobby settings
The main meeting is placed on hold when the organiser moves to a breakout room, leaving any meeting attendees not assigned to an open room on hold too
A couple of days ago I posted a blog on my using a green screen, OBS Studio and Microsoft Teams. In it I mentioned Stream deck from Elgato as a possible alternative to needing 3 screen to use full screen projection in OBS Studio. The paragraph went
You could also use a scene switching piece of hardware for controlling the scenes. I tend to also open the meeting chat in the browser version of Teams on my control screen, though you could do that from a mobile phone or tablet rather than 3rd screen, if you went with the hardware based solution. Something for me to consider as a next step if the virtual training keeps going.
Well it seems there is a software version which comes in much more cost effective.
Stream Deck Mobile is a mobile app that does the same thing as the hardware. Having found this I decided to test it out and this blog is what I found out and how you too can set it up. There is a subscription cost for the app but you can pay for 5+ years subscription for less than the physical device and you get the first month free to test it out. Or use both if you want to.
Getting Set up
Install the app on your mobile device – search or app store or go to https://www.elgato.com/en/gaming/stream-deck-mobile on your mobile device and follow the links. You will need to sign up for a subscription which will give you a one month trial.
The mobile app will prompt for a QR code, but you when activated, which you get from the desktop app, so you also need to install desktop software from https://www.elgato.com/en/gaming/downloads
Once installed, open Stream Deck on your PC & Phone and connect using a QR code. Follow the steps in the images below.
On the PC , pick Add Mobile Device… to display QR codeSwitch to mobile device when you see the codeScan QR code displayed in your PC from this screen. If the QR scan screen is not showing see next image to continue
IF QR scan code is not showing, tap the gear icon (bottom right)
Then tap Add Connection. You can also use Add Connection to connect to a different device.
You can now start customising the buttons on your deck. To do this find the item in the action list and drag to a button position. Rotate your phone to landscape to use otherwise the layout between PC and phone doesn’t line up!
The first thing I added was a scene from OBS Studio. I decided to keep the scenes in the same order I had them in OBS Studio and keep the same names. Enter the title, then adjust display and font options on the title from the T buttonChoose the scene you requireTo customise the icon, you can upload an image or click Create New File to open the Key Creator website.Create your own button using a web based tool by adding icons, text, images and then, click save key to download the compiled image. I recommend that you save the images in a folder just for these icons so they are all in the same place. This will make for easier backup/alteration etc.
Repeat until all the required scenes or other buttons are added to your Stream Deck.
Another great feature is the ability to launch a website or application on your PC from the deck. I regularly open the same set of web pages during training courses, so I created multi action button to open multiple web pages.
Add a multi action button, give it a name, then drag the required actions into the action.Set the properties on each action in the group
First click on More Actions button at the bottom of the list of actions, search for and install Hue connectionsI then created a muti action button which let me switch on and set the colour on my dedicated Do not Disturb light.
My Strem Deck as it stands, but I think it will evolve as I start using it.
I did leave the Welcome key in place for now, to access the welcome blog again if needed. The blog is:
In this blog, I’ll be sharing how I got up and running using a green screen, OBS Studio and Microsoft Teams to give a more professional video in training sessions.
And now the disclaimer – I’m new to OBS, so any suggestions, corrections or top tips you may are gratefully received in the comments or contact me on Twitter or LinkedIn.
The Why
After eagerly awaiting the background effect in Microsoft teams, I was a little disappointed in the fuzzy edge effect, especially when adding custom images (see https://office365itpros.com/2020/04/06/teams-meeting-background-image/ for how to). So decided I need a green screen to improve the effect, but to get the effect I was after I need something more.
Turns out it was a proper mixing studio/external encoder/virtual camera and on a variety of advice I went for OBS Studio and OBS Virtual Cam. You do need the Virtual Cam plug in.
After getting started with the tools, I quickly realised I could bring more visual interest into my training, combining my video image with a presentation or screenshare including reducing the size of the video image for more efficient combinations. Haven’t got as far a video backdrops yet, but that offers a whole host of other opportunities too.
The What
My set up is a Surface Book with external monitor, Blue Yeti Microphone with a foam windscreen, a standard set of in ear headphones, Logitech C270 webcam, perched on top of my monitor and a freestanding greenscreen, plus OBS Studio and OBS Virtual Cam and Microsoft Teams (of course).
Configure OBS. The instructions suggest you run a wizard. However if you don’t have a preferred live streaming service to log in to, you cant complete the wizard. I cancelled the auto set up and have the settings shown below, with everything else left as default.
Lastly, I suggest working in Studio Mode, so you only have one screen to work with.
Set up your first scene
With the software ready to go you can add your first scene. I started with one called Just Me which was only the webcam and this is the basis of my other scenes. (please excuse the messy Sunday me, in the images)
To create this scene:
Click + at the bottom of the Scene pane (bottom far left), enter the scene name and click OK
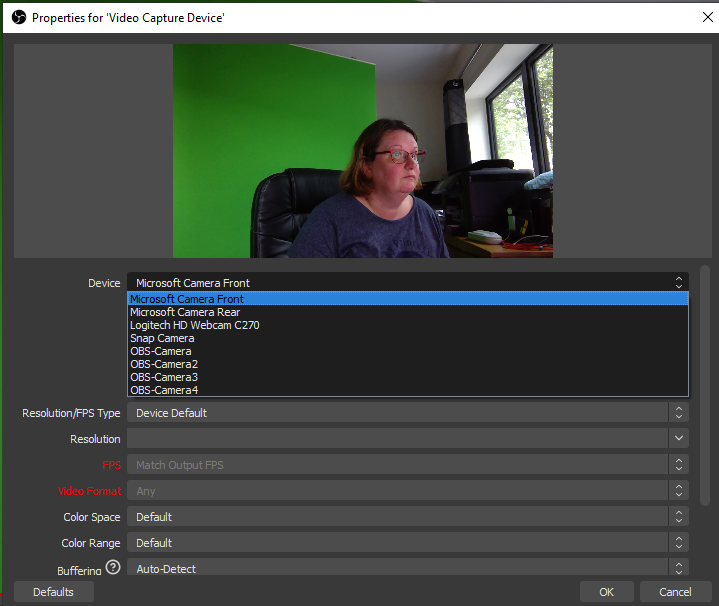
Click + at the bottom of the Sources pane (bottom left), choose Video capture device, enter a name to refer to the webcam and click OK
Choose your camera and click OK. You can change the setting, but I haven’t needed to.
Add the green screen filter by right clicking on the video source and choosing Filters
In Effect Filters click + and choose Chroma Key, give it a name a press OK
In your preview window you should now see your camera minus the green screen, as green is the default Chroma Key.
Adjust the settings so you green screen disappears and the image colour is to your liking
Close the filters screen.
Now you can create other scenes using the same video source and the green screen filter will be applied.
Set up other scenes
My next scene included a logos background.
The background image is a PowerPoint slide saved as a picture. As far as OBS is concerned most images and image format seem to work fine.
To create this scene, I create a new scene, added the exisitng webcam as the first source then the image as the second source. It was then just a matter of resizing and repositioning the webcam feed to fit in with the background.
To resize/rearrange sources in the scene, click onto the source in the preview so it has a red outline, drag from the middle of the source to reposition and use the square resizing handles (corners and midway along each side) to resize.
Did you see the noise by my shoulder in the scene above – the grey flecks?
That’s due to a bit of light reflecting through the window on my green screen – closing the blinds/curtains gets rid of that.
Another favourite scene is the scrolling text with a background image or the webcam. The movement of the text feels reassuring that the image hasn’t frozen, when you are waiting for a meeting to start.
To add scrolling text, add a text source to your scene, give it a name and click OK. Enter the text and choose your font. The font size is determined automatically when you resize the text box within the scene preview.
To make the text scroll you need to right click on the text in the scene and choose filters. Add a Scroll filter and set the speed and other options as required.
Finally, I added two scenes for screen sharing, one with the webcam and one without. You need to be able to disappear if the webcam image is blocking information on screen, hence the two scenes.
I always share one screen rather than one application, window or presentation as invariably you get dragged into different apps or a pop up comes up. This technique also helps with resolution issues, as my external monitor is set to 3840×2160 and that doesn’t work for most meeting attendees. If possible set you sharing screen to 1920×1080 and 100% scale for the best effect.
Once your resolution is sorted add a Display Capture source and pick your sharing screen to your scene.
If you don’t have the luxury of two (or more) screens then you may be best advised to stick to standard screen sharing. Or when switching scenes you’ll end up in a rather distracting screen loop like the one below.
Using your scene in a Teams call or meeting
You have two options for sharing your scene to a Teams call or meeting
Virtual Cam
Fullscreen Projector
Either work well, if you don’t need to switch scene during a meeting. If you ant to switch scenes during a meeting without showing OBS studio in the process then to use the Virtual cam method you ideally want two screens and for the full screen projector method, at least 3 screens.
OBS Virtual Cam
Let’s start with the easy one. Using your OBS scene(s) in place of a web cam within Teams.
Start the OBS Virtual Cam from Tools ->VirtualCam
Pick your camera and choose Start
I’m using just the default settings, though I’ve dropped buffered Frames to 0 as it seems to give better performance
In Teams, set you Camera to OBS Camera
Join you meeting and turn on your video as normal, no need for background effects
Full Screen Projector
Full screen projector allows you to project your scene, onto any monitor or projector connected to your device. I recommend a minimum of 3 screens here.
Screen 1 – The Working Screen to work with the content you want to share
Screen 2 – The viewing screen to project onto from OBS and share into the meeting
Screen 3 – The control screen for OBS Studio and anything else you need open, but don’t want to display in the meeting.
You could also use a scene switching piece of hardware for controlling the scenes. I tend to also open the meeting chat in the browser version of Teams on my control screen, though you could do that from a mobile phone or tablet rather than 3rd screen, if you went with the hardware based solution. Something for me to consider as a next step if the virtual training keeps going.
To use the full screen projector:
Pick a scene
Right click in the preview and choose Fullscreen Projector
Pick monitor to share to
In Teams share your screen choosing the monitor you have projected to
Tips
Two webcams are better than one. Things go awry sometimes, so I’ve set up OBS to work with one webcam and left the built in web alone. That way I can change my video source in Microsoft Teams to the built in web cam if I have issues. Not as pretty but keeps the training session going.
Have lots of scenes, rather than trying to change the sources in a scene during a training session.
Test it out with a friend or a ‘virtual friend’. As an independent trainer I often don’t have access to someone else to test with at the time I need it, so I use a second account to join the meeting from a different device to see what attendees will see, this is my ‘virtual friend’ 😉.
A couple of important tips on setting up your green screen:
Keep it aligned with your webcam, if its offset and different distances away at each edge, you won’t get a neat effect
You need consistent lighting across the whole screen to avoid get ‘sun glare’ effects on your background
Test in natural and electric light to get the best setting for your filter – ideally you want to have consistent lighting whenever its in use, but I like daylight so it took a bit of tweaking to get a setting that worked during the day and in electric light. I’ve heard it would be better with video lights.
Its April 2020 and due to Covid-19 a lot of us are working from home, trying to find quiet nooks to hold conference calls without inappropriate interruption from family members.
There are some great articles out there on building your own automated “Do not Disturb” lights and also some great products, but I decided that I needed one that was a little more manual, but still a bit geeky.
Why?
I like technology so it needed to be a little geeky
I’m not a developer – firmly no code here if I can possibly get away with it
I’m working across 5 different Microsoft Teams Logins as a member of teams in 11 organisations – so which log in would I automate from? (One of the downsides to being a consultant)
We have multiple people in the same house who need to indicate their Do Not Disturb Status and not all of that is triggered by Teams
The solution I chose was to program a Flic button for each of us and set up a Hue light near the entrance to each persons work are to let each other know if we were available or not.
Our system now works like this. We are lucky enough to be able to each use a different room to work in, so we close the door to the room to indicate we are working and then set the light to red/green to indicate if we can be disturbed.
Closed door & red light = Do not enter, send me a text if its urgent
Closed door & green light = Busy, but you can come in
Open door (regardless of light status) = I’m happy to see you 🙂
Each Flic is programmed the same and we have them linked to a Flic hub, so they work even if our phones are out of range/off. (See https://flic.io/) The flic buttons are programmed from the mobile app. You also need a Philips Hue hub and colour change light. But Flic does integrate with other smart bulbs and IFTTT too, so there are quite a few options to recreate this. These are the steps assuming you already have a Philips Hue bridge and lights but are new to Flic.
Buy your button
Download the app
Follow the instructions in the app to add your hub and/or button.
Give the button a name once you have added it
Tap the + beside the action and pick Philips Hue
Follow the instructions to connect your Philips Hue bridge – you’ll need to be close to the bridge to do this as you’ll have to press the button on the top of the bridge.
Pick the light and setting you require. Below is my button and the ‘Click’ setting to switch on the red light:
Are you a member of a Team across more than 1 organisation/Office 365 Tenant? I use Channel Notifications to help me keep on top of the less well used teams.
NOTE: A Tenant used to refer to the part of the whole of Microsoft365 which you as an organisation rent. Many organisations have only 1 tenant but larger or more complex organisations may have more than one.
Switching Tenants – Teams Desktop App
Currently (April 2020) the experience of being a member of a Team in another companies tenant can be challenging, especially if you are a member of quite a few teams across multiple organisations. Switching between tenants is much smoother than it used to be but can still be a challenge.
Keeping on top of what is going on can be a challenge. The are:
Have the other tenant open in different web browser profiles
Use a different device for each tenant (not practical/feasible for most people)
Use Notifications
In this blog I’ll concentrate on using notifications.
First – in you main tenant, check your general notification settings. If you have a very busy Teams environment make sure you are not going to be inundated with notifications with the settings you choose. My main tenant is quite light in Teams usage but any posts where I am tagged typically need my attention quickly, hence the once every 10 minutes setting on missed activity emails.
Teams Desktop Notifications
Secondly – if you use Teams on a mobile check those notification settings too. But remember the notification settings here are per device not per organisation.
Thirdly – In the tenants you dont normally work in check the tenant wide settings for notifications as per step 1.
Finally – In the tenant/org you are not normally working in, go to the important channel(s) and click …. next to channel name then choose channel notifications. Set it as appropriate for you.
At this time the world is struggling to cope with COVID-19 and the movement restrictions needed to fight the rapid spread of the virus. As more organisations turn to Microsoft Teams to help keep business and education going we all need to ensure we can see what is happening across our teams.
Yet when we go back to normal, these skills will still be useful. Just remember, you are an individual. What works for you may not work for others – if the settings I suggest don’t work for you, pick different ones, but at least now you know where to find them.