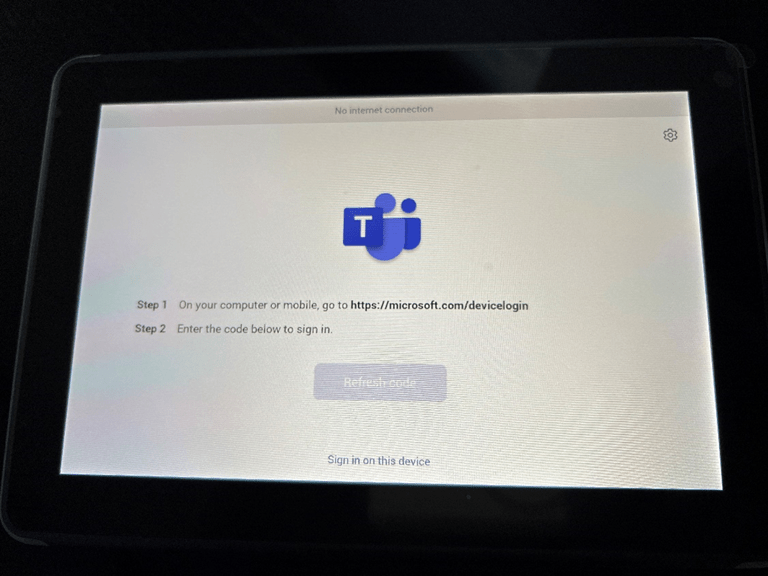
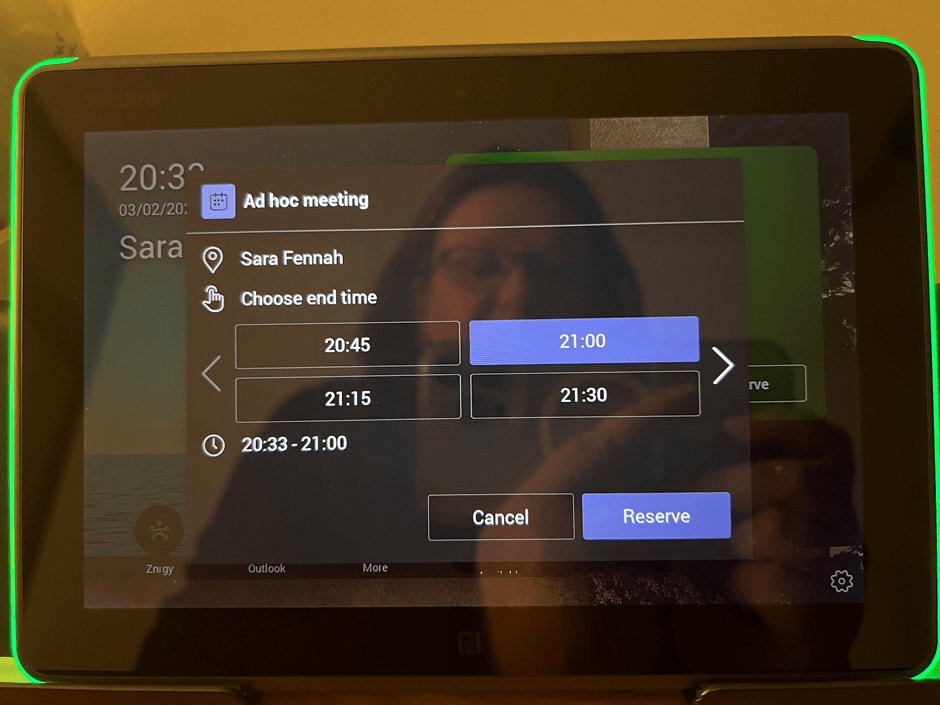
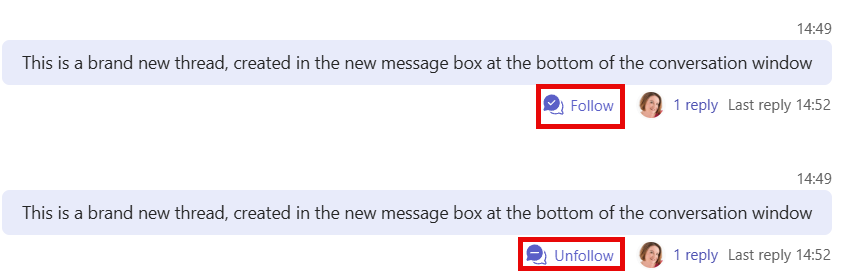
With Mesh Immersive spaces coming to public preview as announced on Sept 26th 2023, you may wish to prepare your tenant.
Immersive spaces will only be supported in the classic client initially. To use immersive spaces in meetings users will need to be able to switch to the Teams public preview (see Microsoft Learn for guidance on enabling public previewif you are not familiar with this).
EDIT: More details for admins have been release and I will be updating this post with additional steps. For now you should aslo read the technical guidance
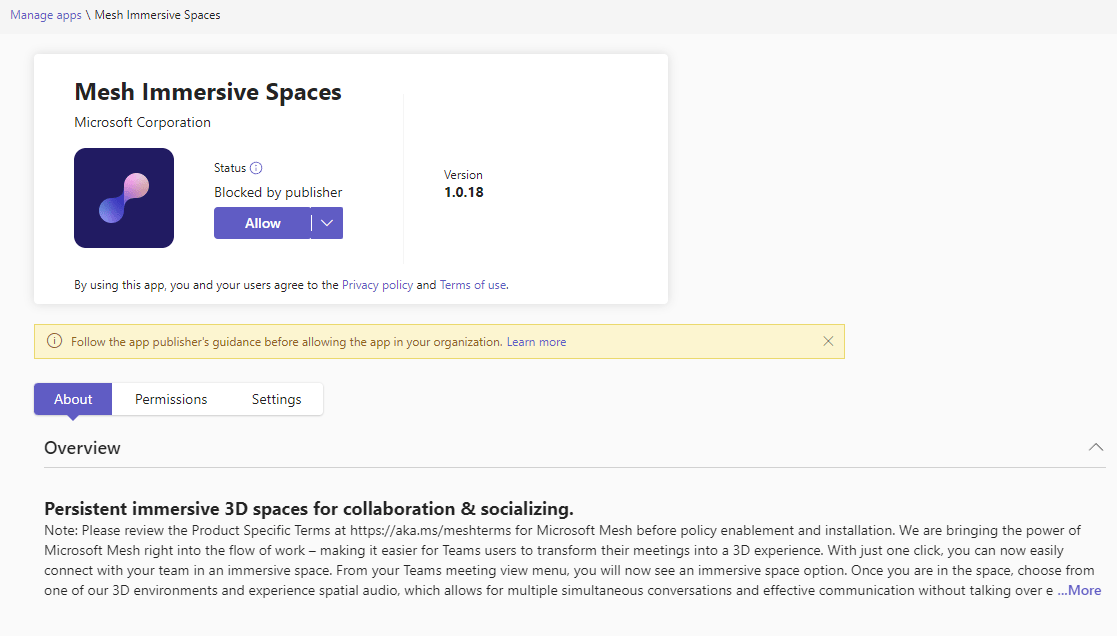
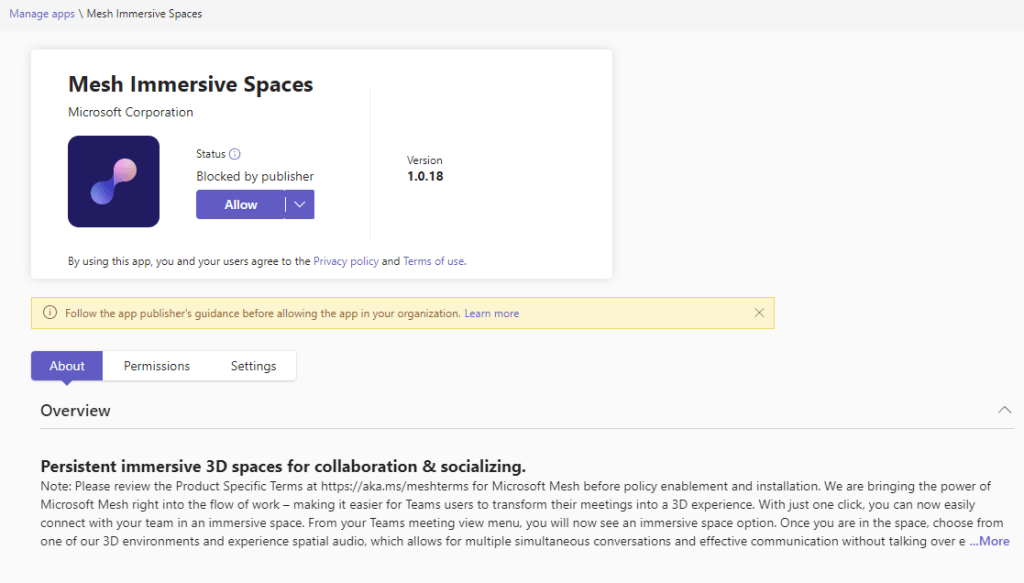
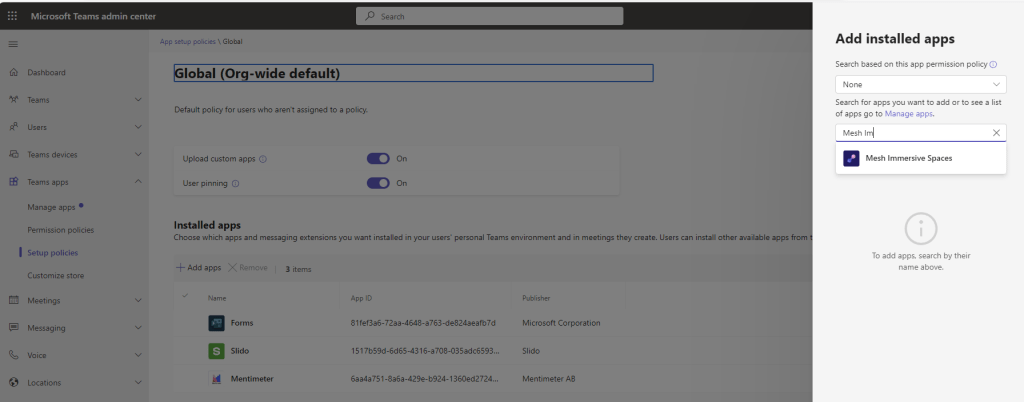
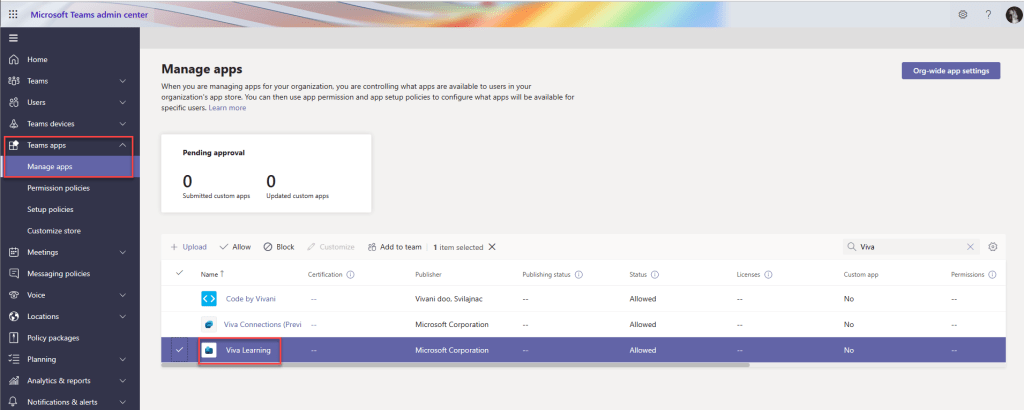
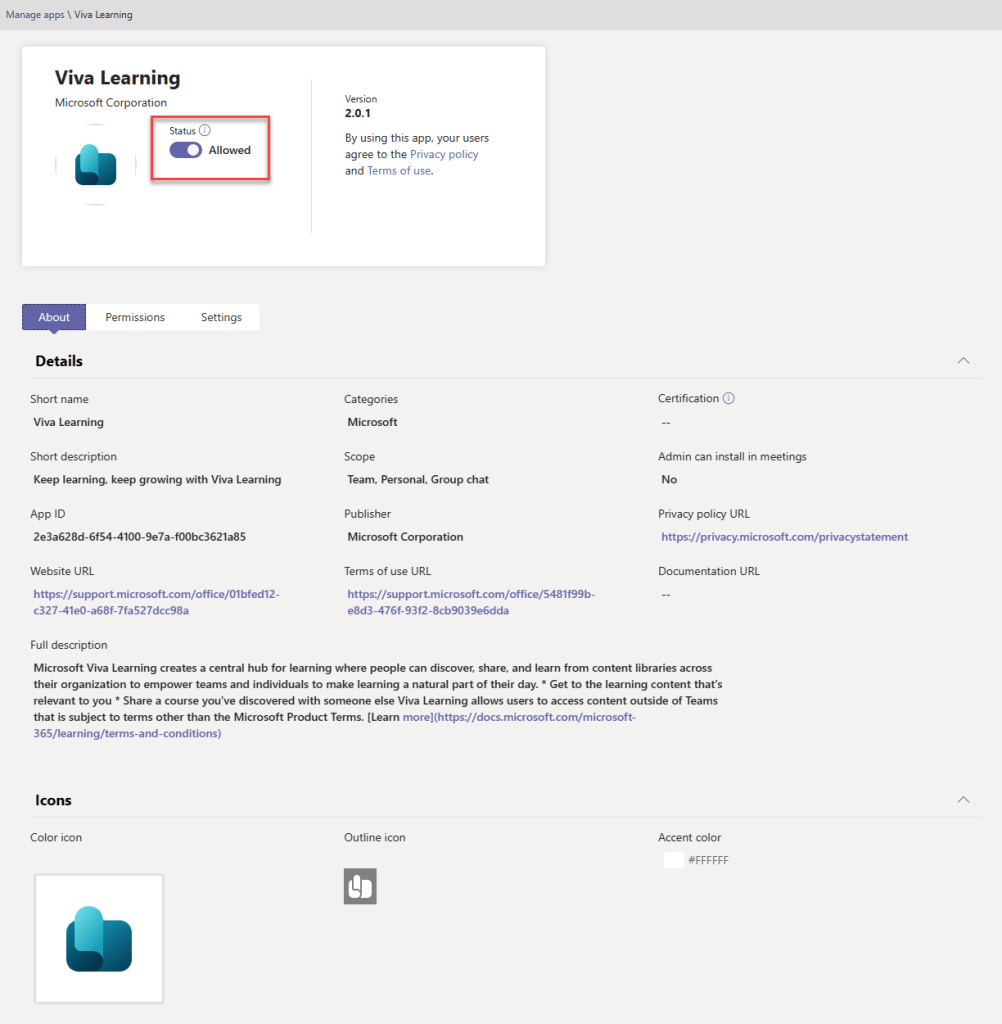
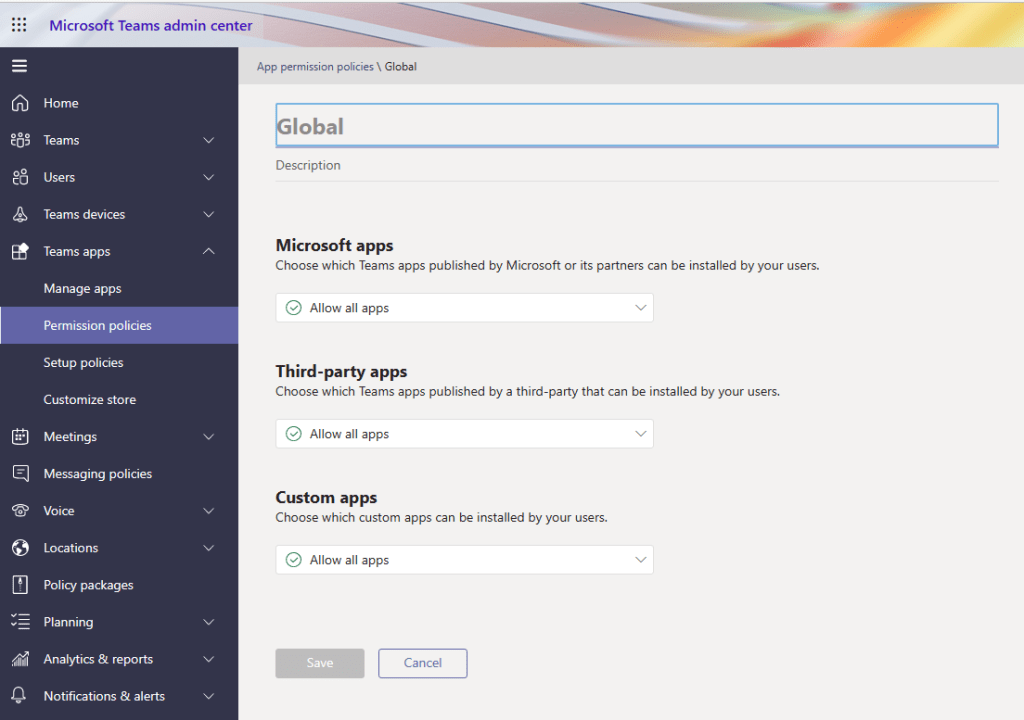
Additionally, users will need to be able to access the Mesh Immersive Spaces app, which is blocked by default. To enable the app, go to Teams Admin Center > Teams Apps > Manage Apps and search for Mesh Immersive Spaces app. Note how the app is Blocked by publisher.
Select the app and click the Allow button to authorise for use in your tenant
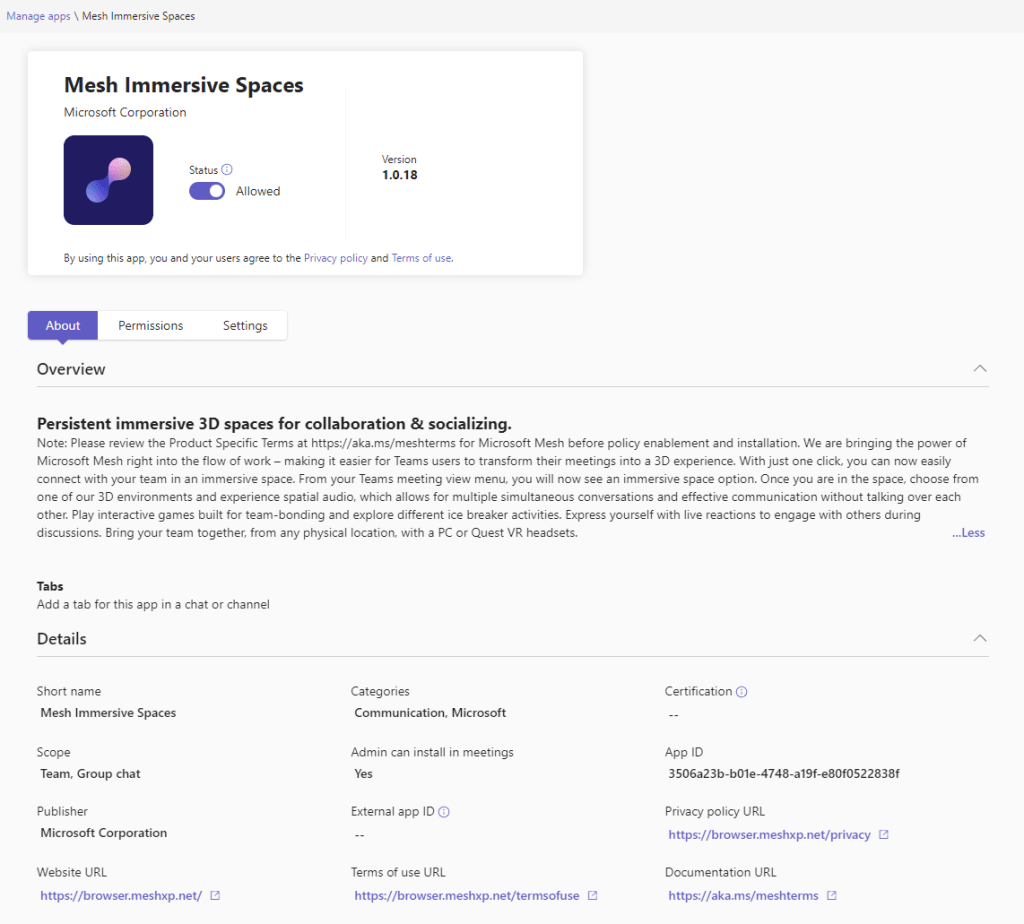
The app will now show as Allowed.
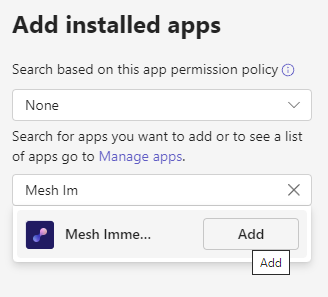
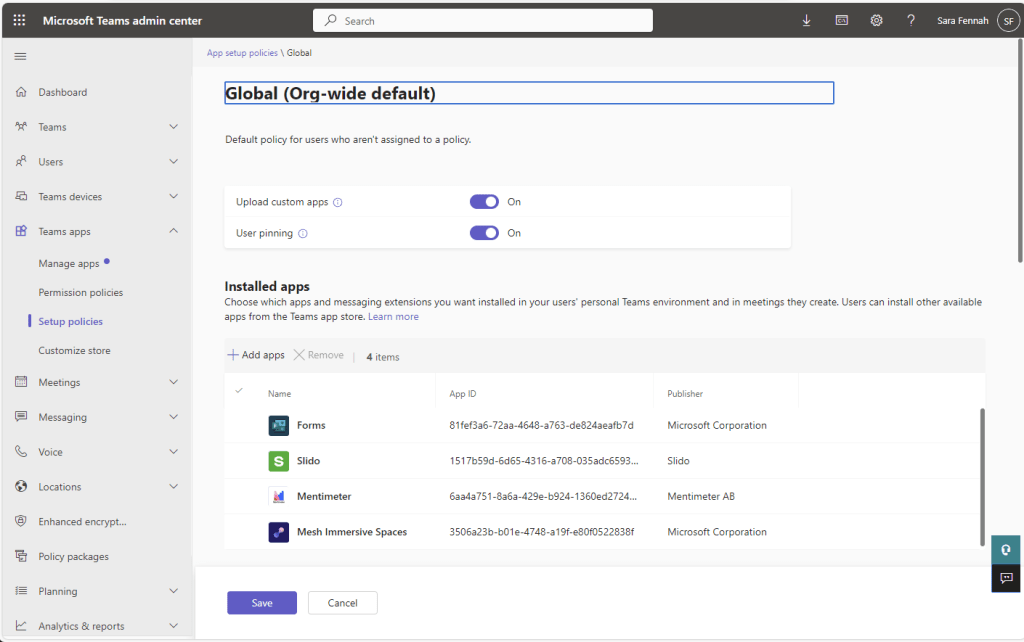
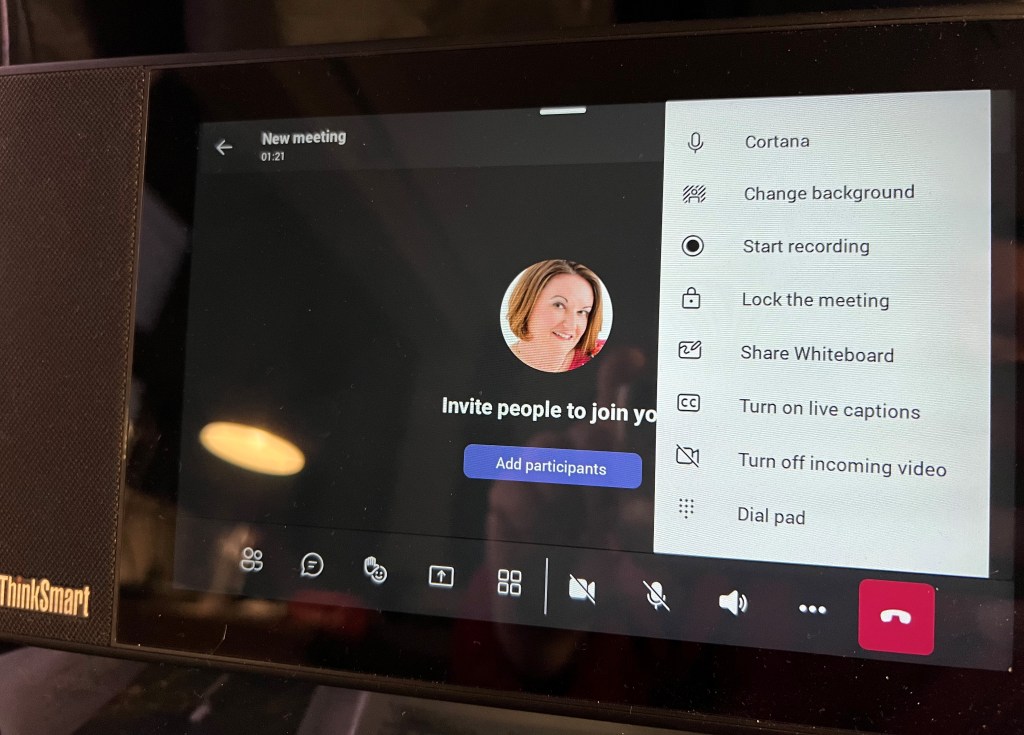
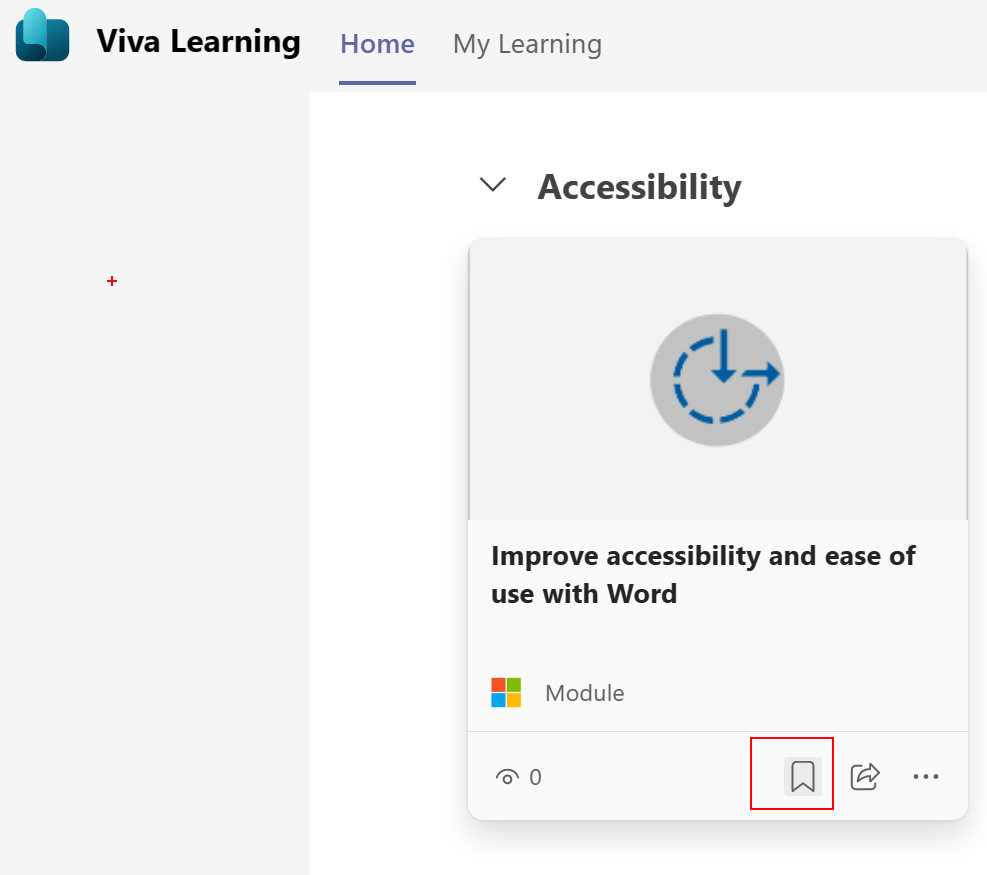
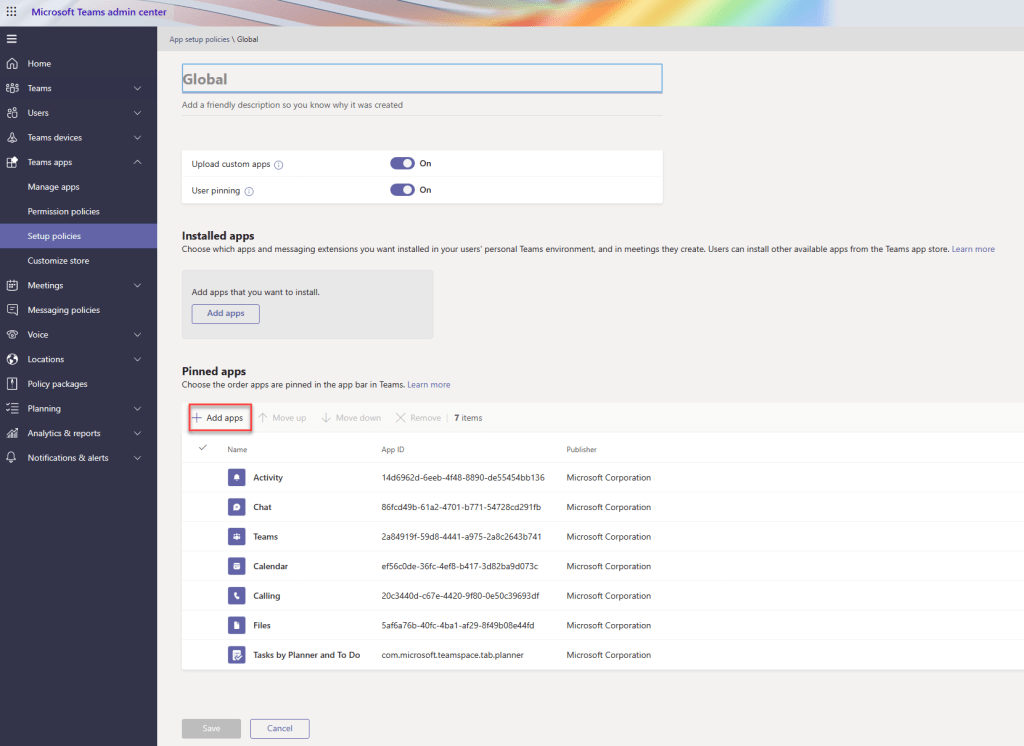
You should also ensure the app is allowed in the App Permission Policies assigned to users who will be testing the immersive spaces and you may also wish to install it for them using the App Setup Policy, as shown in the image below.
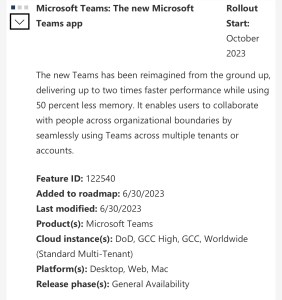
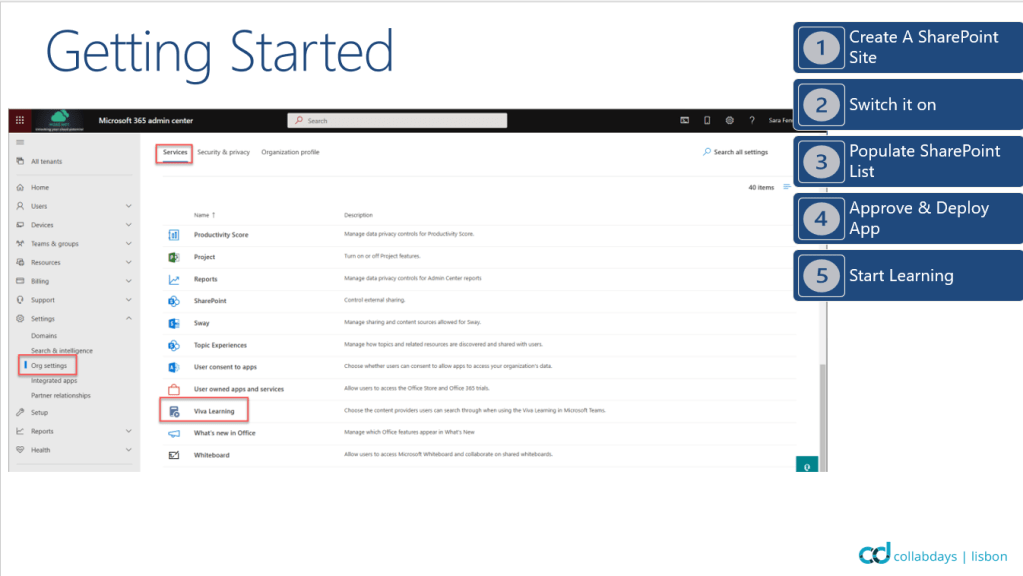
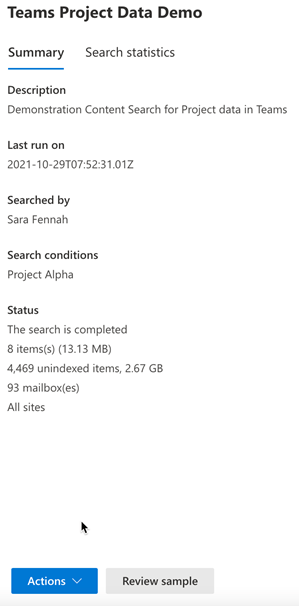
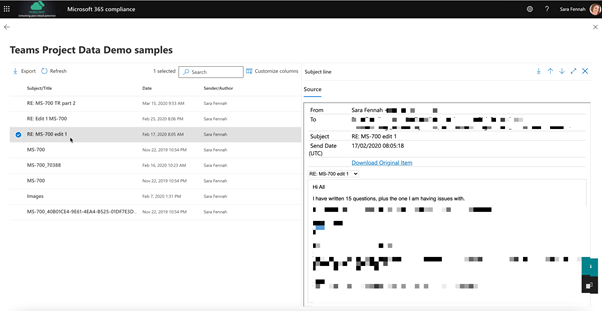
There are two new announcements about Microsoft Teams the administrator need to be aware of. These were published on June 30th 2023 via the Microsoft 365 Roadmap and in the Message Center.
Screenshot of Microsoft 365 Roadmap PostScreenshot of Microsoft 365 Message Center post. Text included later in the article
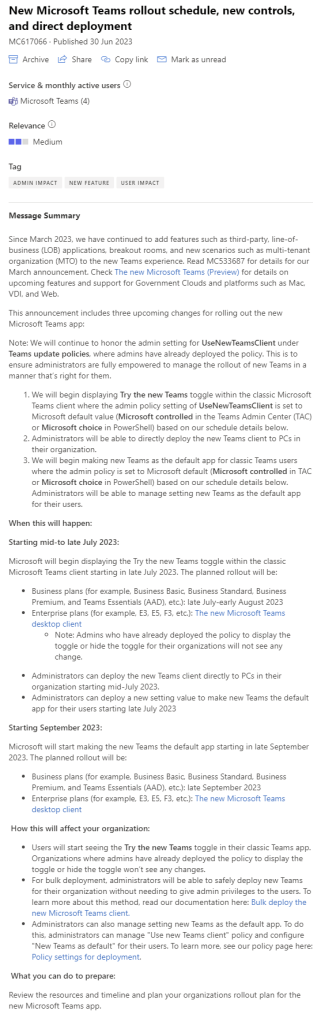
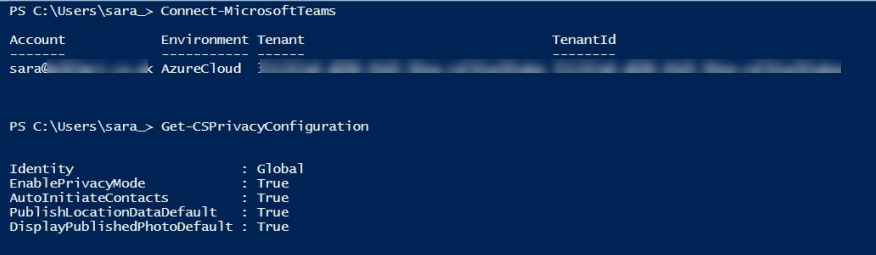
Teams administrators can set the New Teams control via an update policy in the Teams Admin Center or using Powershell.
Screenshot of the Teams Update Policy settings with New Teams client options expanded to show choices
The default value is Microsoft Controlled and with this setting the message center post indicates that the toggle to try the new Teams client will start appearing for business and enterprise users in late July. From mid July administrators will be able to start deploying the new client to PCs and choose to make New Teams the default from late July onwards.
Starting mid September organisations using the default value of Microsoft Controlled for the new Teams client in update policies will see new Teams becoming the default.
You can read the full text of the message center post below, with the links also available for more information.
Since March 2023, we have continued to add features such as third-party, line-of-business (LOB) applications, breakout rooms, and new scenarios such as multi-tenant organization (MTO) to the new Teams experience. Read MC533687 for details for our March announcement. Check The new Microsoft Teams (Preview) for details on upcoming features and support for Government Clouds and platforms such as Mac, VDI, and Web.
This announcement includes three upcoming changes for rolling out the new Microsoft Teams app:
Note: We will continue to honor the admin setting for UseNewTeamsClient under Teams update policies, where admins have already deployed the policy. This is to ensure administrators are fully empowered to manage the rollout of new Teams in a manner that’s right for them.
We will begin displaying Try the new Teams toggle within the classic Microsoft Teams client where the admin policy setting of UseNewTeamsClient is set to Microsoft default value (Microsoft controlled in the Teams Admin Center (TAC) or Microsoft choice in PowerShell) based on our schedule details below.
Administrators will be able to directly deploy the new Teams client to PCs in their organization.
We will begin making new Teams as the default app for classic Teams users where the admin policy is set to Microsoft default (Microsoft controlled in TAC or Microsoft choice in PowerShell) based on our schedule details below. Administrators will be able to manage setting new Teams as the default app for their users.
When this will happen:
Starting mid-to late July 2023:
Microsoft will begin displaying the Try the new Teams toggle within the classic Microsoft Teams client starting in late July 2023. The planned rollout will be:
Business plans (for example, Business Basic, Business Standard, Business Premium, and Teams Essentials (AAD), etc.): late July-early August 2023
Users will start seeing the Try the new Teams toggle in their classic Teams app. Organizations where admins have already deployed the policy to display the toggle or hide the toggle won’t see any changes.
For bulk deployment, administrators will be able to safely deploy new Teams for their organization without needing to give admin privileges to the users. To learn more about this method, read our documentation here: Bulk deploy the new Microsoft Teams client.
Administrators can also manage setting new Teams as the default app. To do this, administrators can manage “Use new Teams client” policy and configure “New Teams as default” for their users. To learn more, see our policy page here: Policy settings for deployment.
What you can do to prepare:
Review the resources and timeline and plan your organizations rollout plan for the new Microsoft Teams app.
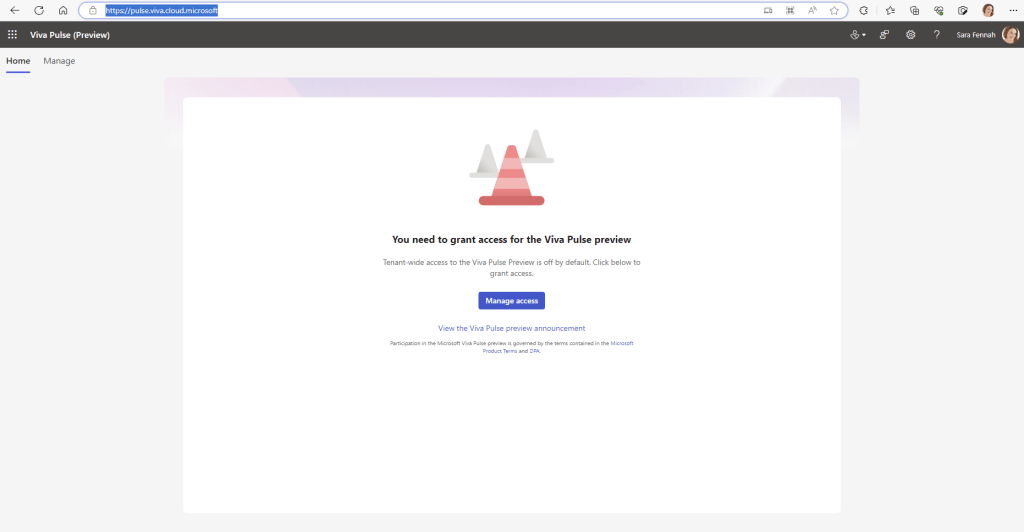
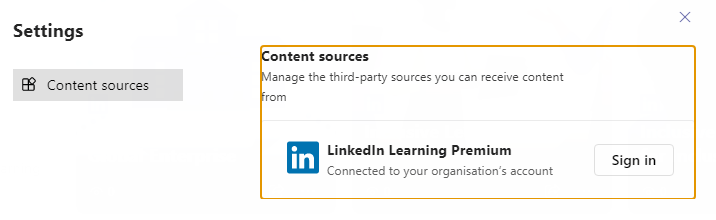
Viva Pulse public preview is available as announced on the Microsoft Viva Blog.
This is a visual walkthrough of the first steps. (EDIT: I missed a step in the original version, this post has been edited to include configuring notifications)
links to the Product terms and DPA or Microsoft Products and Services Data Protection Addendum (DPA) as well as the announcement blog post.
The URL! Pulse is the first product I’ve seen using the new cloud.microsoft format URL
The Viva icon is a menu
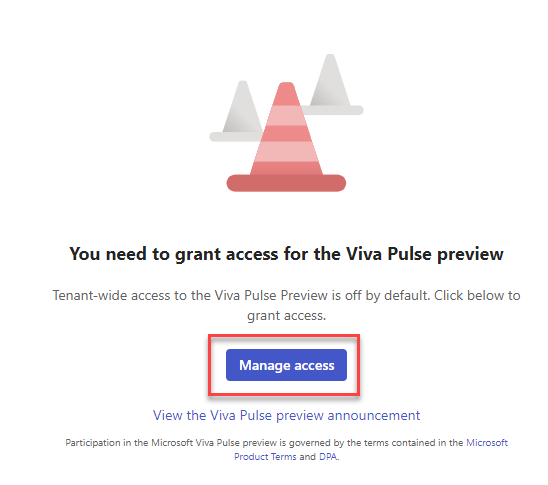
Next, click the Manage Access button
Turn on the public preview via the toggle
Additional options then appear
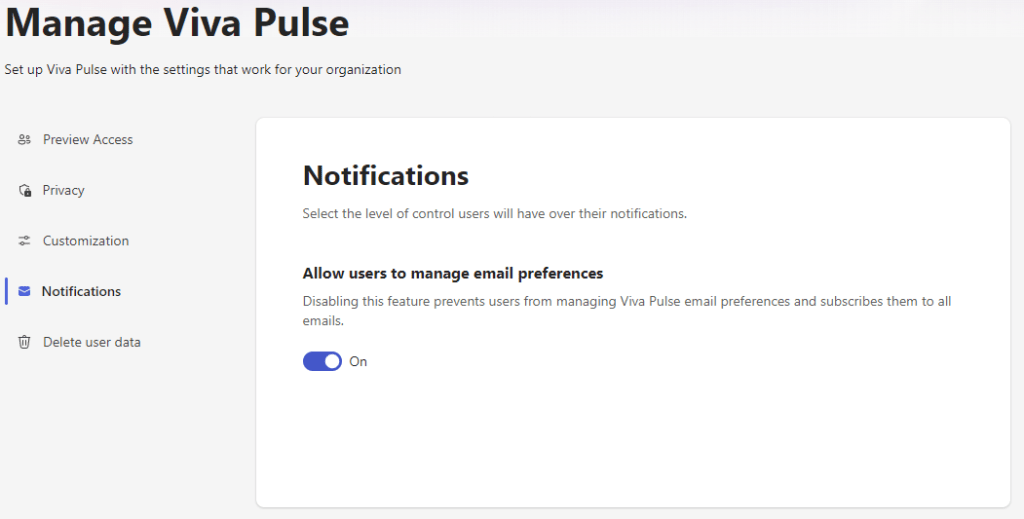
Under Privacy, the default number of responses is set to 5, but can be reduced to 3. Privacy is an important factor and you should consider these issues. Whilst these are the appropriate settings for my tenant they are not a recommendation of best practice.
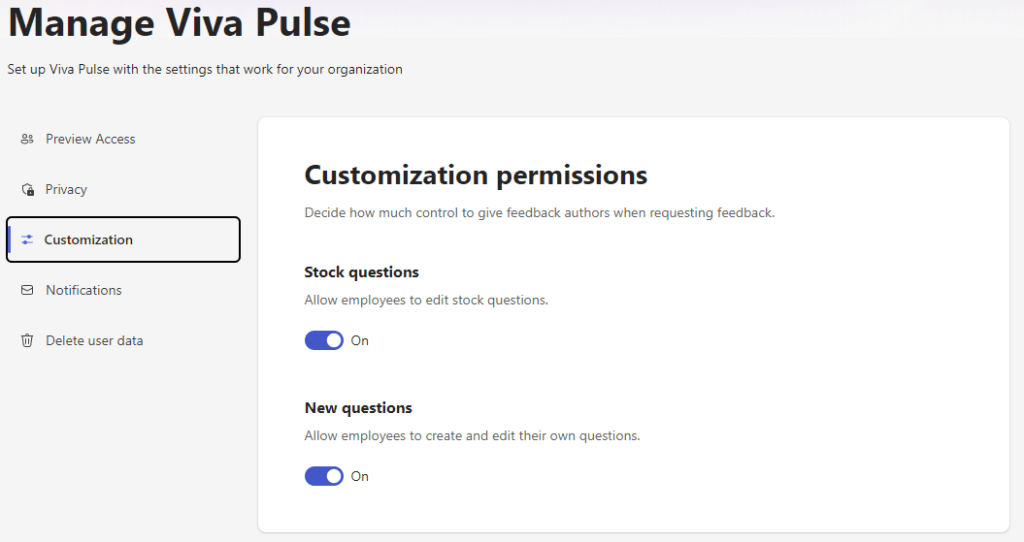
Customization settings allows you to block or permit users to edit stock questions or create custom questions. If both are disabled only standard stock questions will be available.
Under notifications, choose if users can subscribe to updates from Viva Pulse via email or not.
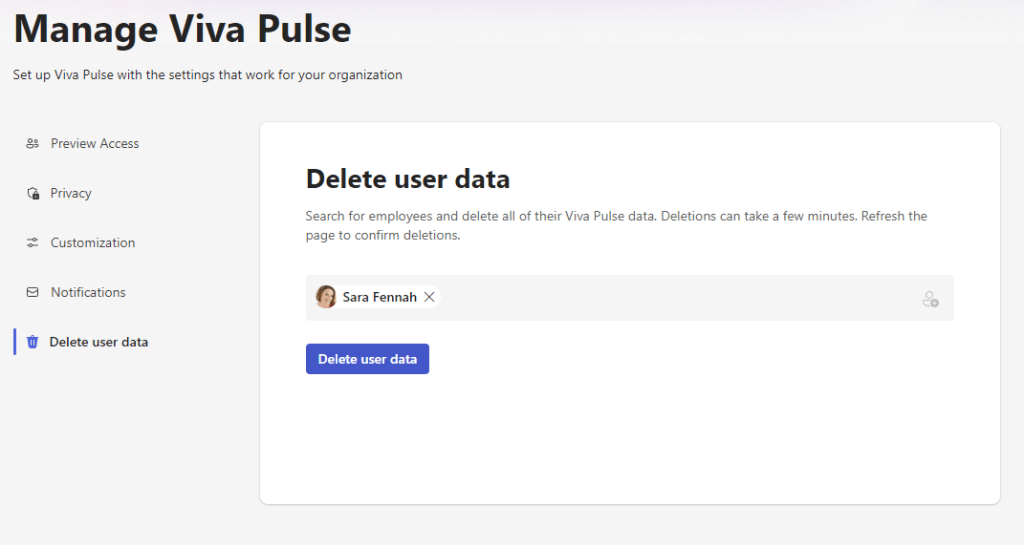
It’s great to see delete user data option in here too. I can see many scenarios where it will be necessary to delete user data. For example during preview, people will be contributing to surveys and it may be inappropriate to keep the results, as they are likely to be dummy responses and not helpful for tend analytics later.
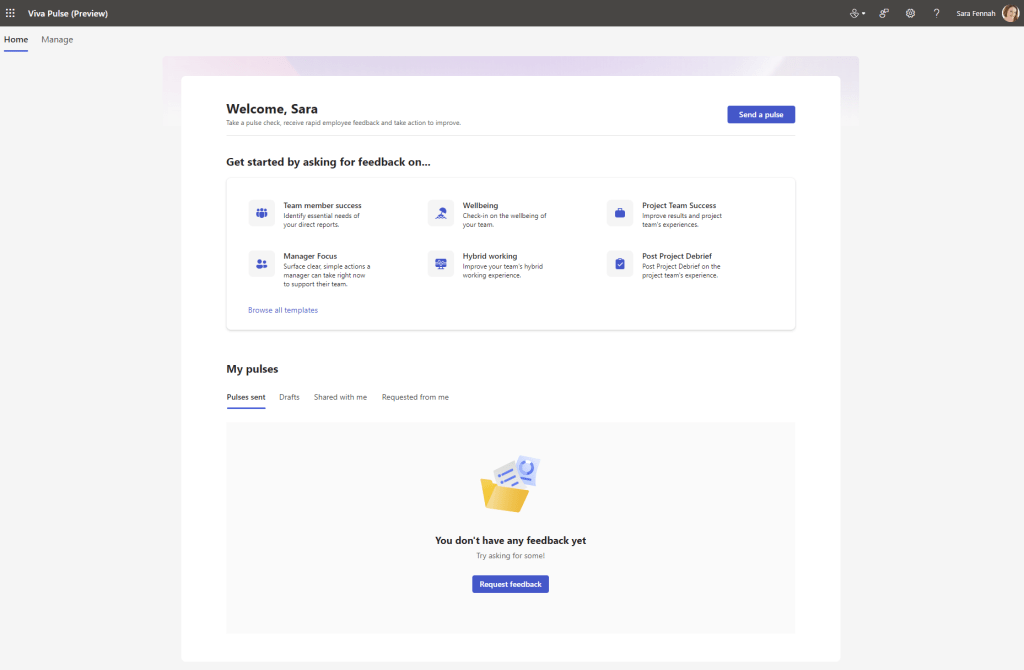
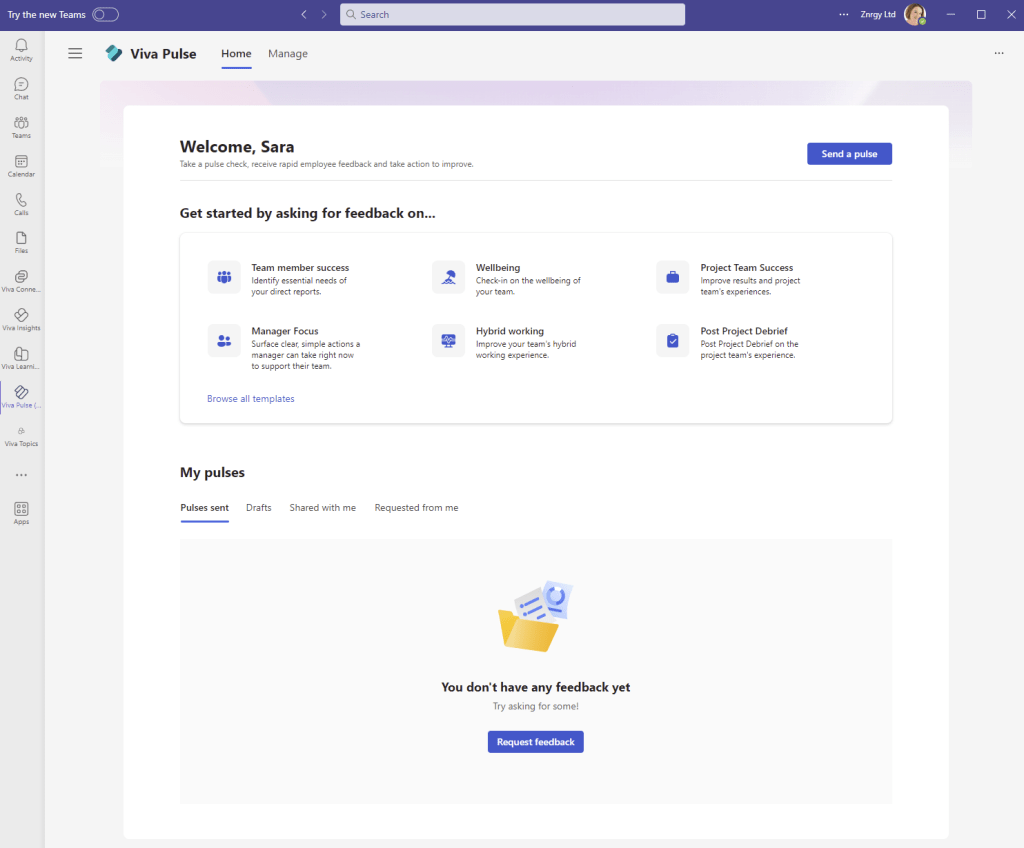
Having reviewed the settings, click back onto Home link and you will see the welcome page.
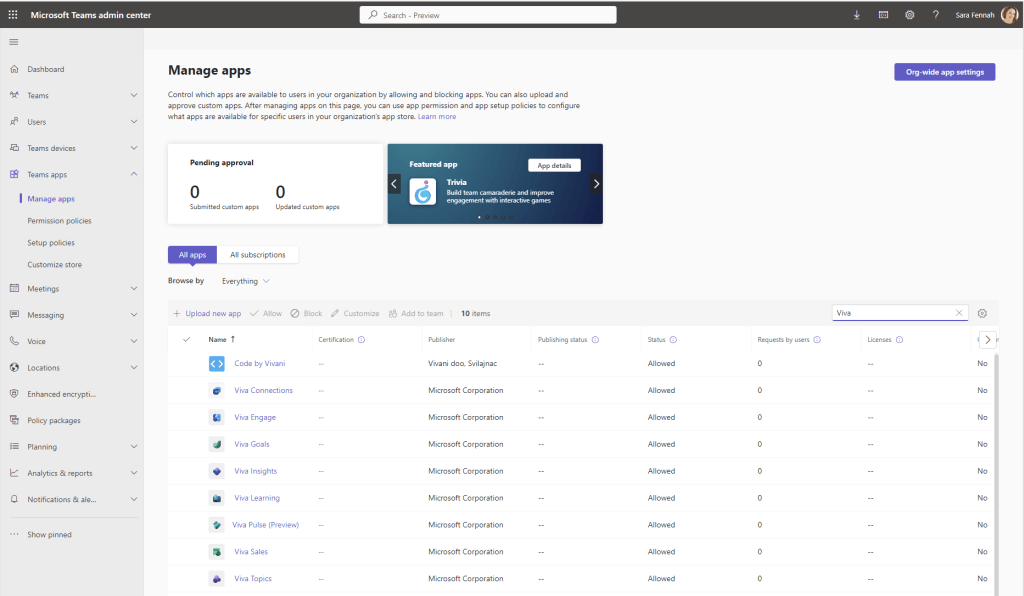
If you wish to use the Teams app, ensure it is enabled for your users, via the Teams Admin Center. This is the same process as for other Teams apps, however there is an article on Microsoft Learn to guide you through the process: see Manage, install, and pin Viva Pulse in the Teams admin center
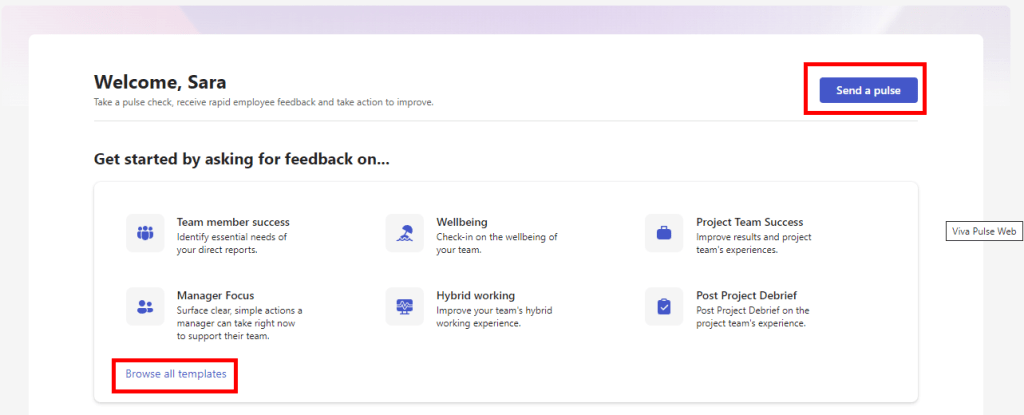
To send your first pulse, you can click Send a pulse or Browse all templates
A information dialog pops up explaining the purpose of Pulse
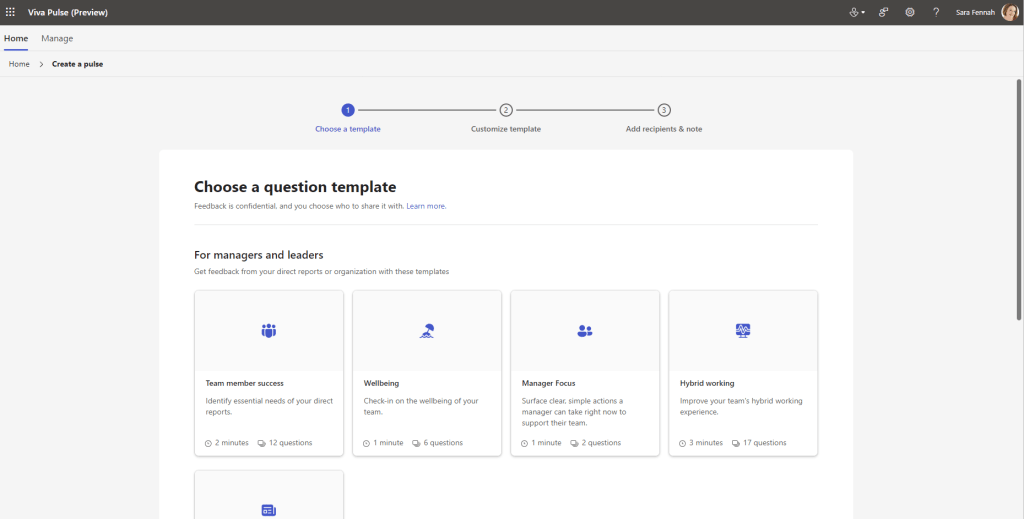
And you can then browse the templates to choose a starting point for your survey.
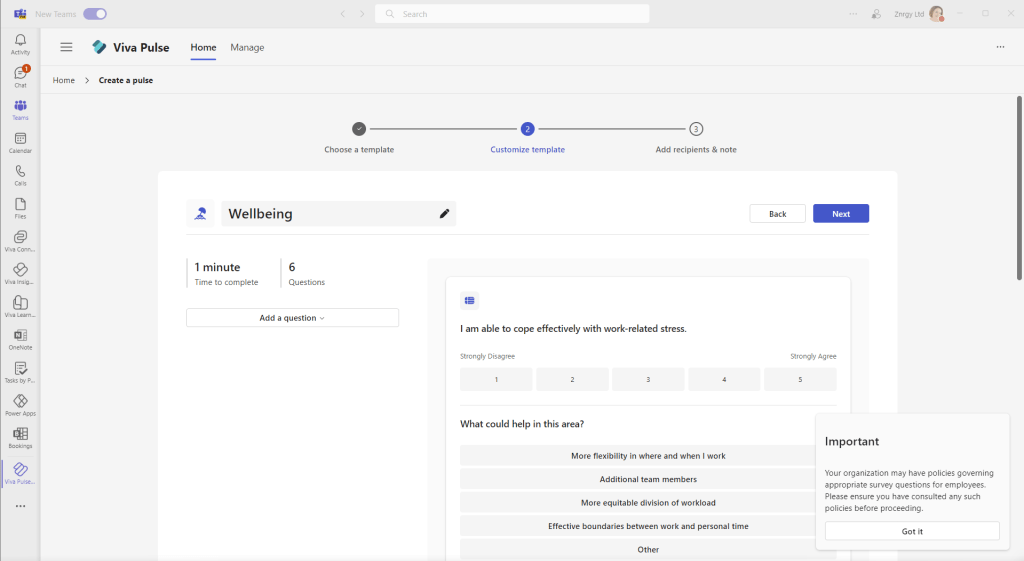
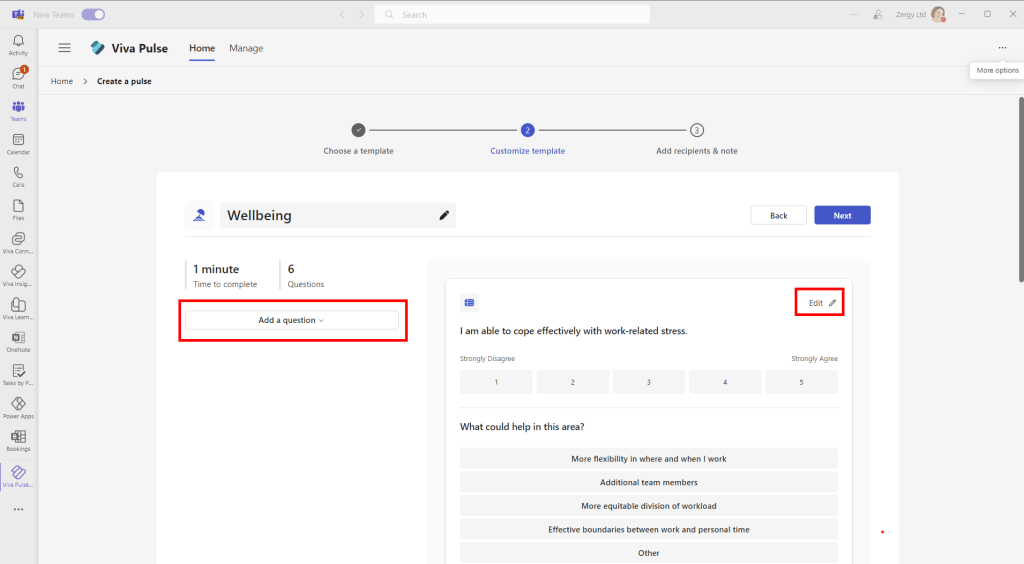
I chose Wellbeing. There is a little reminder about appropriate user policies which pops up, as shown in the bottom right hand corner of the screenshot.
As I allowed all customization, I can now edit each question and add my own.
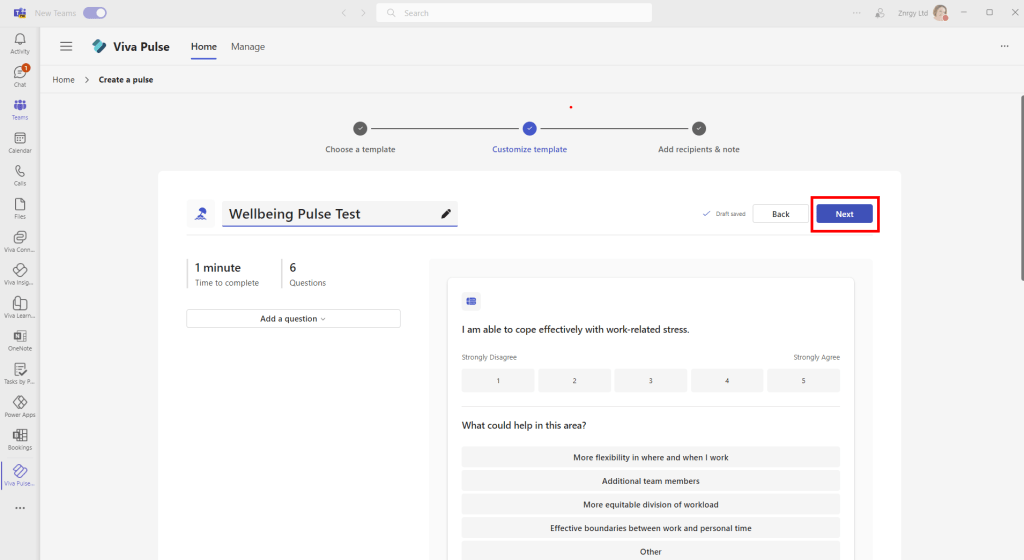
In this first walk through, I left the survey with the default questions, but edited the survey title to Wellbeing Pulse Test and clicked Next to choose recipients
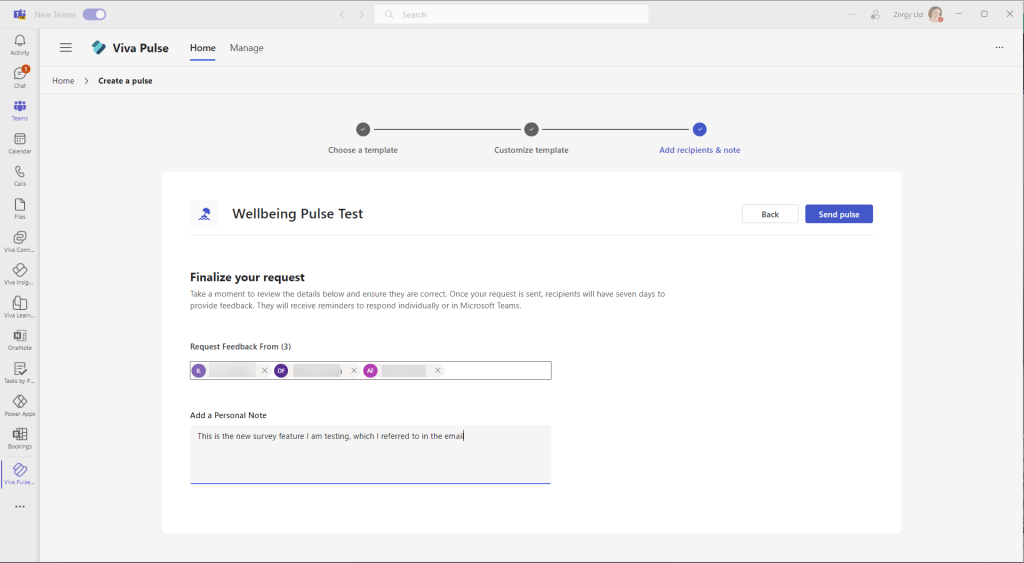
So now I just need my recipients to respond to the survey!
Edit starts here!
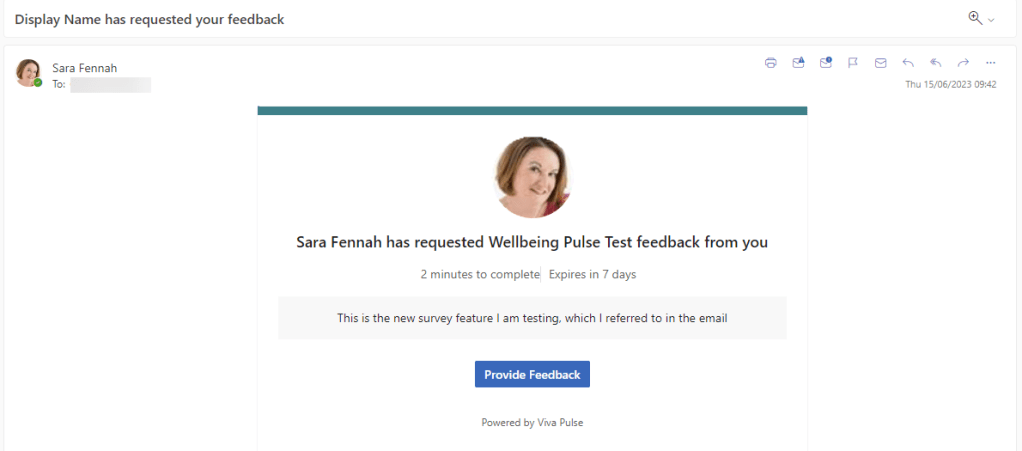
In the original blog above I missed allowing notifications which meant my users received emails which had the subject “Display Name” has requested your feedback.
At least in the preview, permission needs to be given for Pulse to access user properties in Azure AD. This is included in the Microsoft Learn guidance, though that does use the older PowerShell Azure AD method not the new PowerShell Graph commands. Thanks to @kevmcdonk for the updated script and confirming the cause.
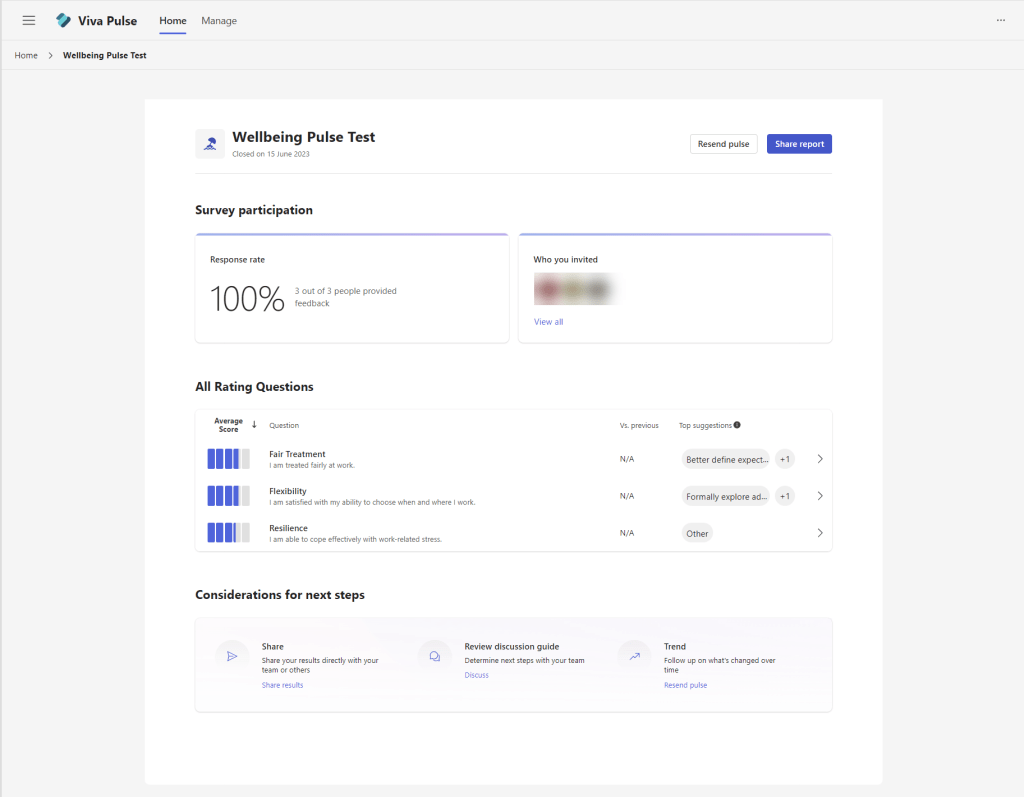
My finished report shows a summary of the responses and links to recommendations to improve the score going forwards.
I can honestly say that I was glad this is not true workplace feedback, but my family obviously feel I need to be more clear how I communicate my requirements in the futures.
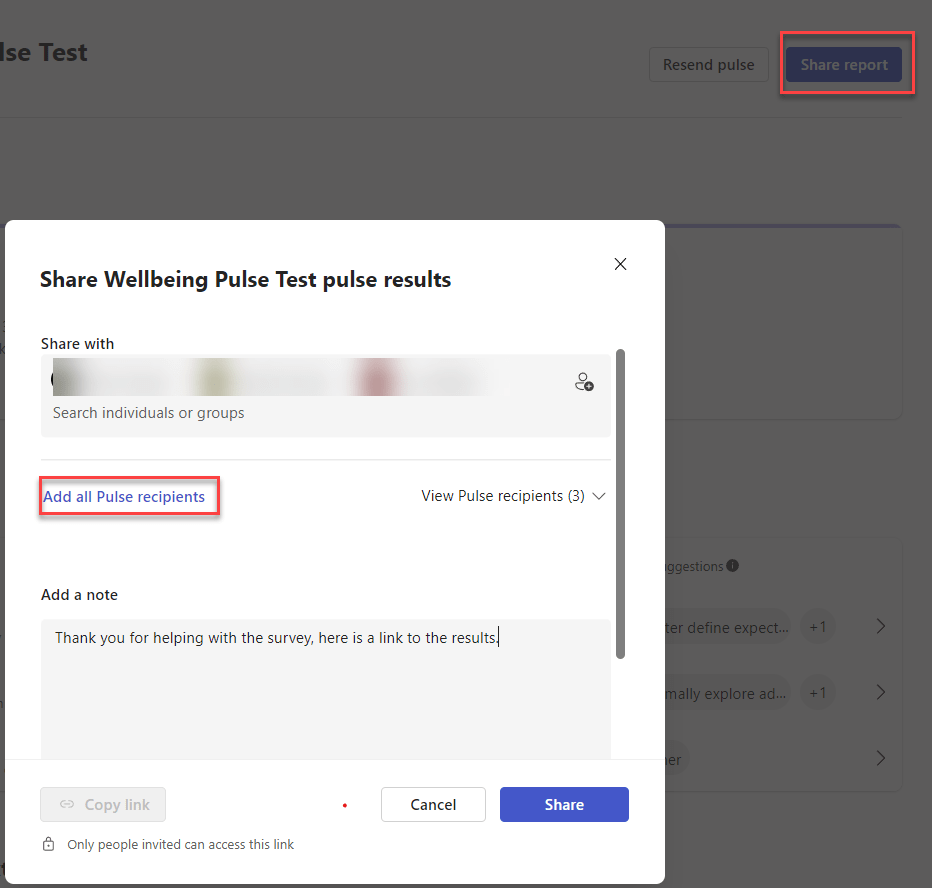
Using the Share Report button I was able to send the summary to the participants and thank them for their contributions.
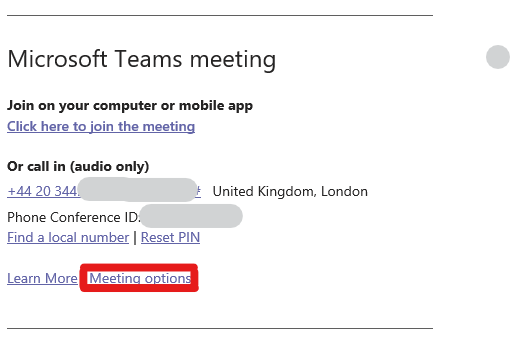
Do you need to send meeting invites without disclosing the distribution list? In email we can use the Bcc field to send emails to lots of people whilst keeping their email addresses confidential, and whilst that feature is not available in meeting invites, there is an option which achieves the same result.
The required option is available in Outlook for Web, New Outlook for Windows and Outlook for Mac.
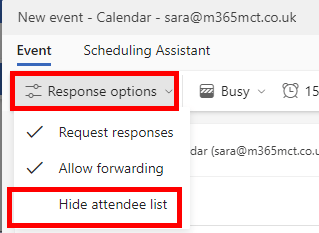
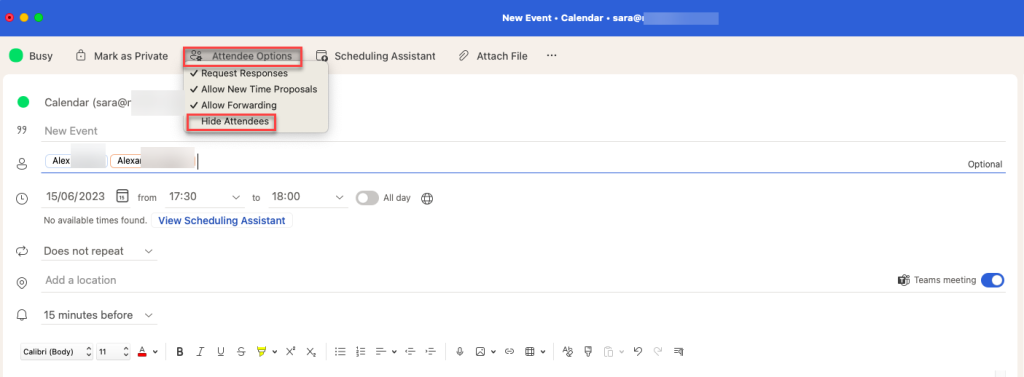
To use Hidden attendees set up your meeting request as normal and then BEFORE sending, choose to hide the attendee list, as described below.
On Web and Windows, in your meeting invite choose Response options then click Hide attendee list to enable the feature. A tick will appear beside the option when selected.
On Mac choose Attendee Options then Hide Attendees.
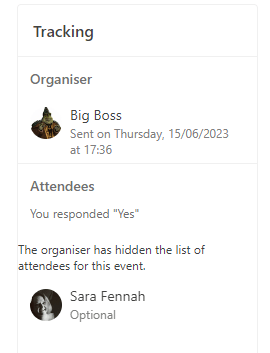
The meeting invite will work as normal, in that:
As the meeting organizer you will still see the list of invited people and their responses in your Outlook and Teams calendar.
You can edit all other meeting settings from Outlook or Teams.
The meeting invitees can be viewed, accepted/declined etc by the invitees.
The meeting invitees receive any updates to the meeting invite you send.
If the meeting is a Teams meeting, the meeting join experience works in the standard way for users and the meeting lobby settings are applied as expected.
BUT
Meeting invitees cannot see the other invitees in the calendar entry in Outlook or Teams.
During a Teams meetings, the invitee name will be visible, but not any contact details. UNLESS they are already known people, such as users in the same organization as yourself.
Now you know how to hide the attendee details on your meeting invite and avoid sharing contact details when working with people from multiple organisations.
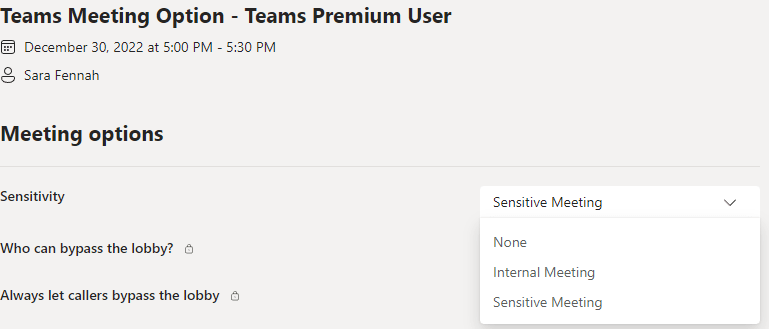
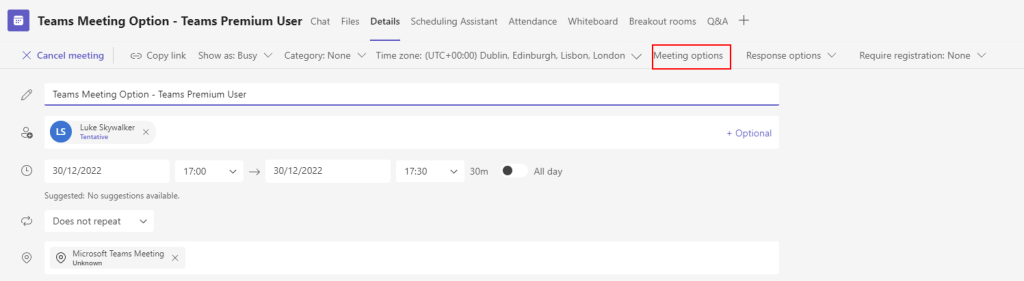
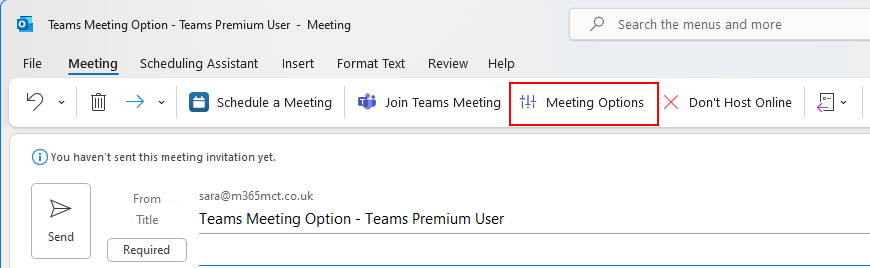
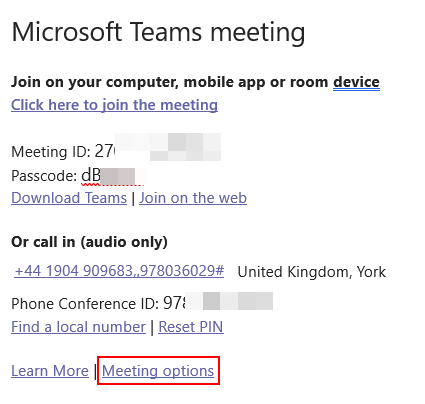
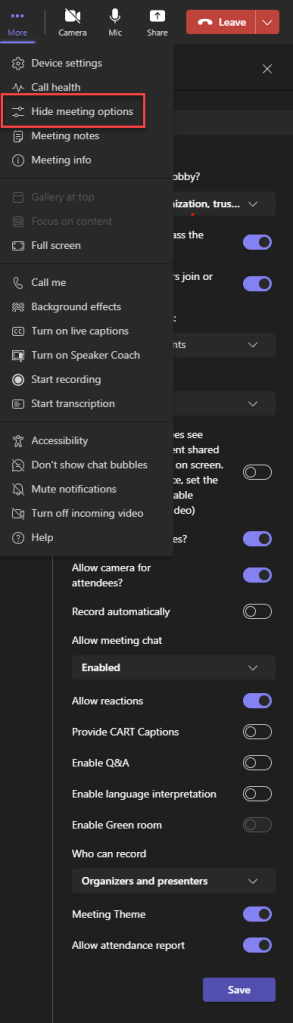
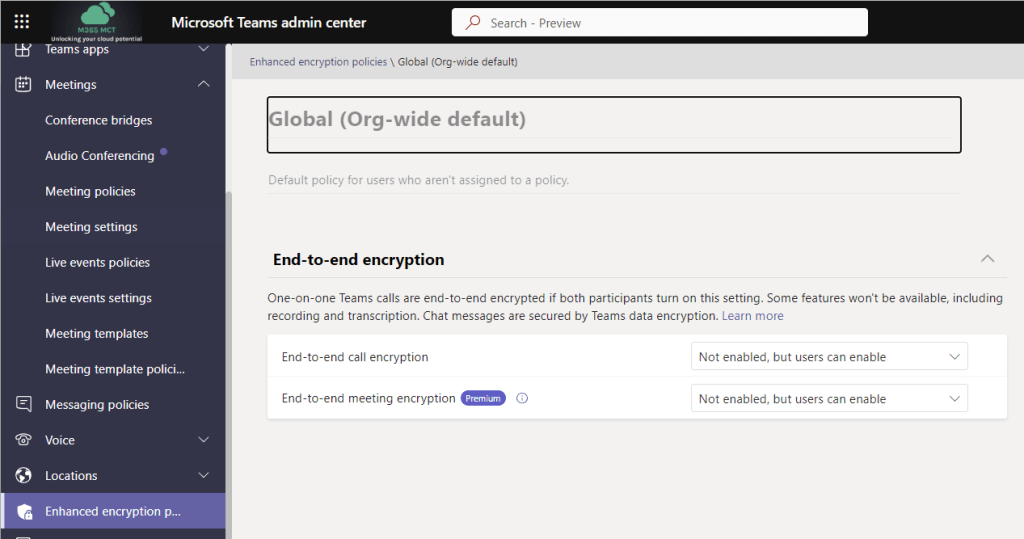
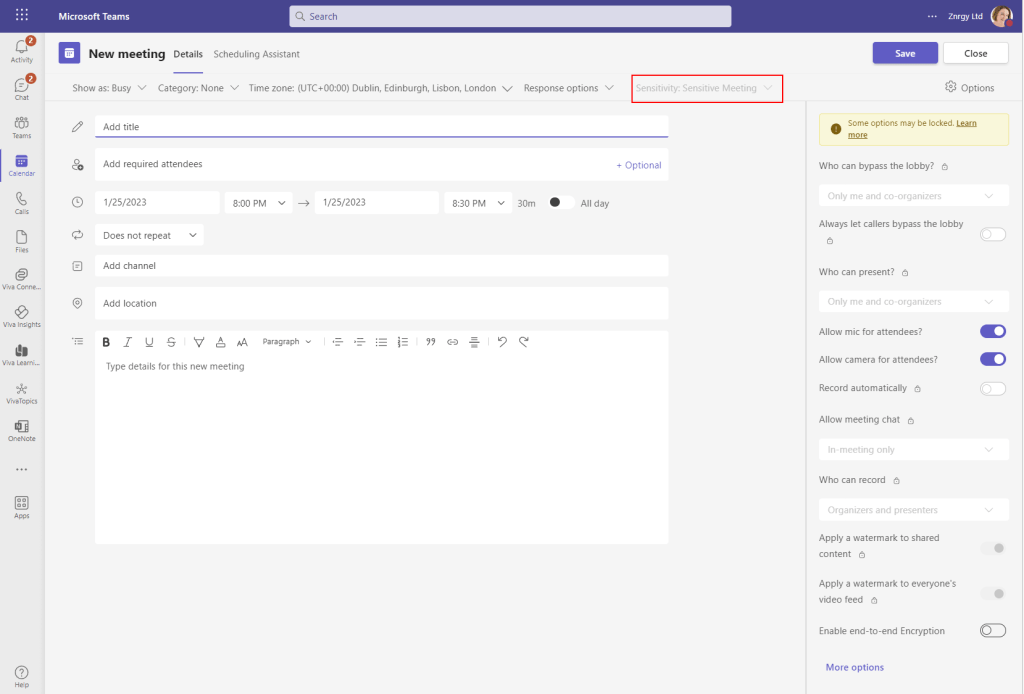
Sensitivity labels can now be assigned to meetings as part of Teams Premium. This provides the ability to limit access to the meeting invite and responses in Outlook and Teams as well as the meeting and chat in Teams as well as enforce meeting options for the meeting. Sensitivity Labels will be best used in conjunction with meeting templates for the majority of users, whilst advanced users may wish to manually set the label on the meeting with or without meeting templates. More on meeting templates to follow.
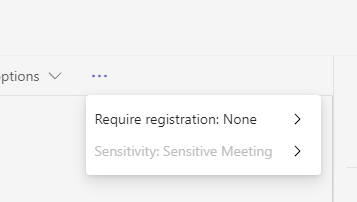
The Sensitivity Label is visible on the meeting in Teams, though not currently in the position shown in the documentation, but rather under the … menu on the meeting edit screen.
In the official documentation, and presumably coming soon this should be showing next to the join button
If the label includes item encryption the meeting invite is encrypted. This encryption works in the same way as email encryption. Meaning that recipients using a mail client which can decrypt the message (such as Outlook) will be able to see the message whilst those using other clients will need to use Outlook on the Web or the encryption portal to access the invite.
There are some practical limitations to consider as well. They key ones:
Sensitivity labels cannot be applied to instant meetings (Meet Now), Webinars or Live Events
Automatic labelling is not supported
Mobile clients cannot decrypt the meeting invite in calendar applications including Outlook mobile and as such a link to the encrypted content will be displayed
Copy chat restriction is currently not supported for external users, nor in all browsers when using Teams for Web. In this case external users means anonymous users and external users who are NOT guests in your organisation.
If the label is changed during a meeting, the changes will not apply unless the meeting ends & restarts
Labelling meeting using the graph API is not supported
As these limitations are very likely to change as the product evolves, please do review these here for up to date information.
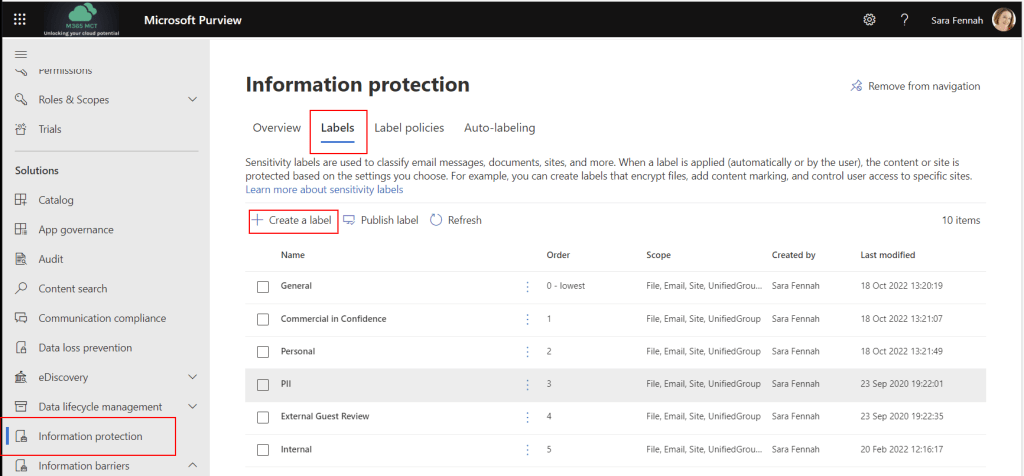
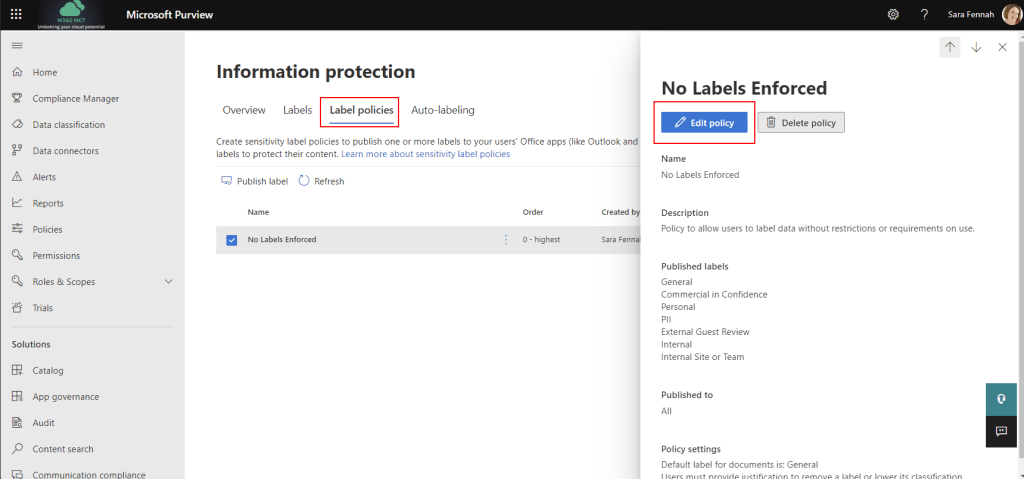
Create a Meeting Sensitivity Label
Sensitivity labels are created from the Microsoft Purview Compliance Portal (https://compliance.microsoft.com/) under Information Protection > Labels. General instructions on creating sensitivity labels is available in the documentation on Microsoft Learn.
To create a label for a meeting, choose Create a Label
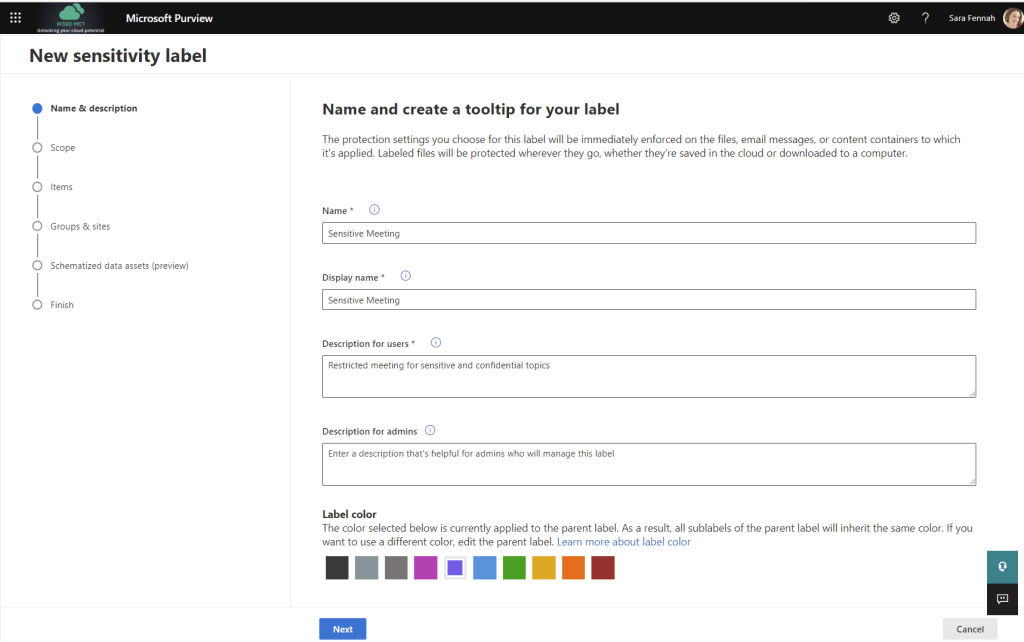
Enter an appropriate a Name and Display name. The reason for two names is so that the display name can be reused when an updated label is required with different settings (a new version of a label) but to the users it should look the same. For example Name = SensitiveMeetingV1 and Display name = Sensitive Meeting. Add appropriate description for users and include version detail in description for admins. Finally (optional) pick a label colour. Click Next on each screen to advance to the next.
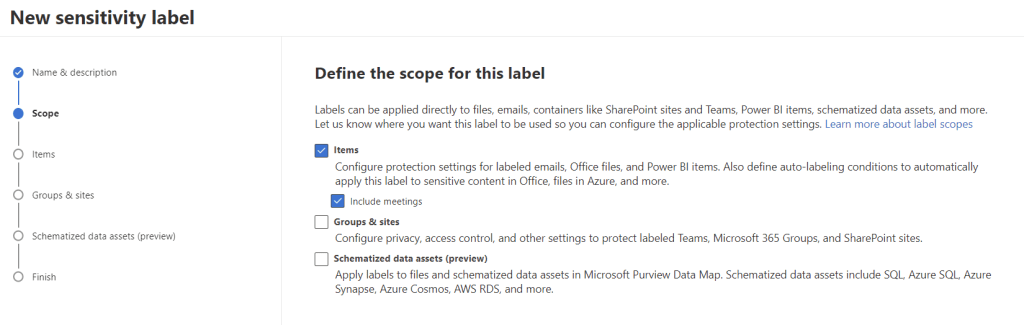
For a meeting label choose a scope of Items and Include meetings. Click Next to advance to the next screen
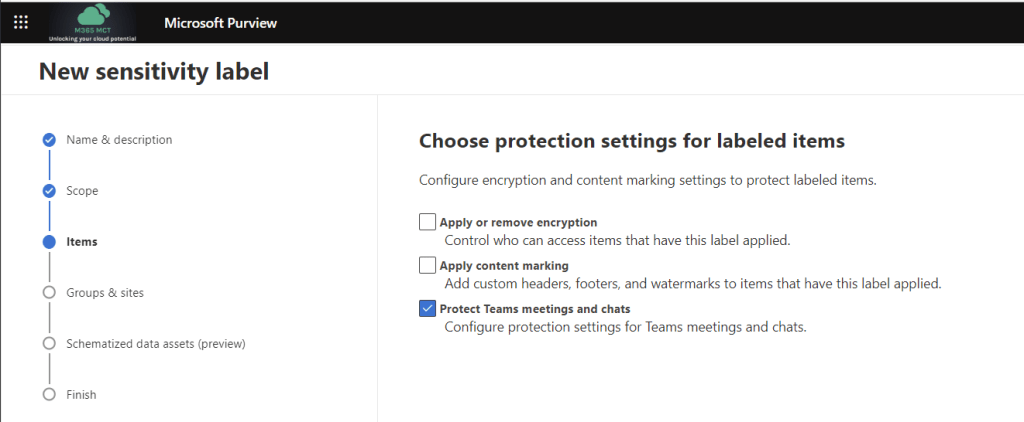
In protection settings encryption is used to control who can access the meeting invite, content marking is used to put header/footer into the meeting invite and Protect Teams meeting and chats is used to configure the meeting options and protection for meeting chat.
Encrypting the meeting controls access to the meeting invite, meeting details and join link, which can help ensure your meeting join information is not shared further than those invited by the organizer of the meeting. Encryption and content marking settings are the same as for all other item sensitivity labels, so here we will focus on the new settings, those for meetings and chats. Click Next to advance to the next screen
These controls set the meeting options on meetings with the sensitivity label assigned to the values set in this screen and prevent the organizer from altering those settings. After the walk through of creating the label this article discusses these options in more detail. Click Next to advance to the next screen
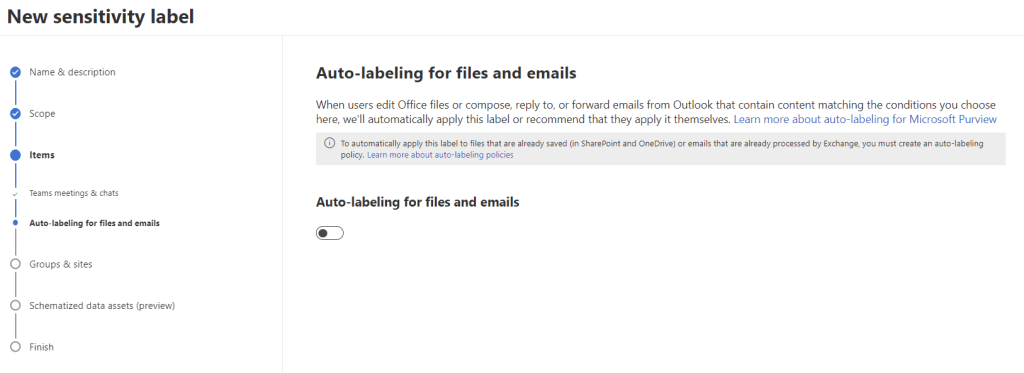
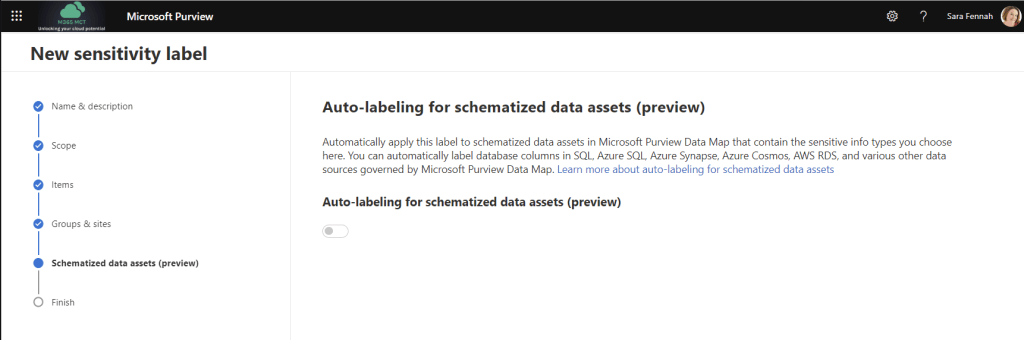
Auto labelling is not supported for meeting labels, so leave this option off. Click Next to advance to the next screen
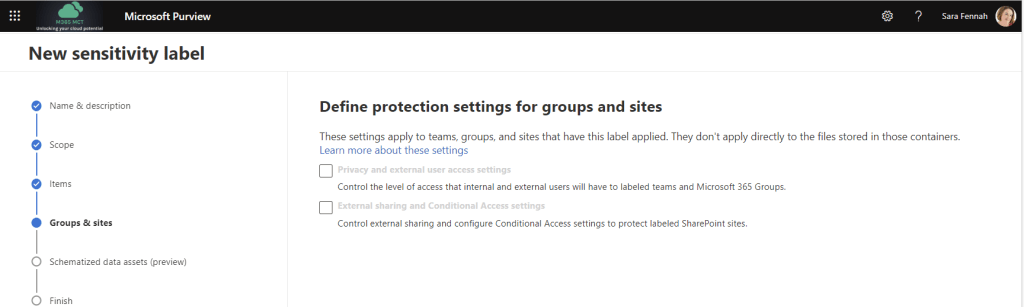
As groups were not selected in the scope at the start, the group options are greyed out. Click Next to advance to the next screen
Options for schematized data assets were not selected in the scope at the start, the group options are greyed out. Click Next to advance to the next screen
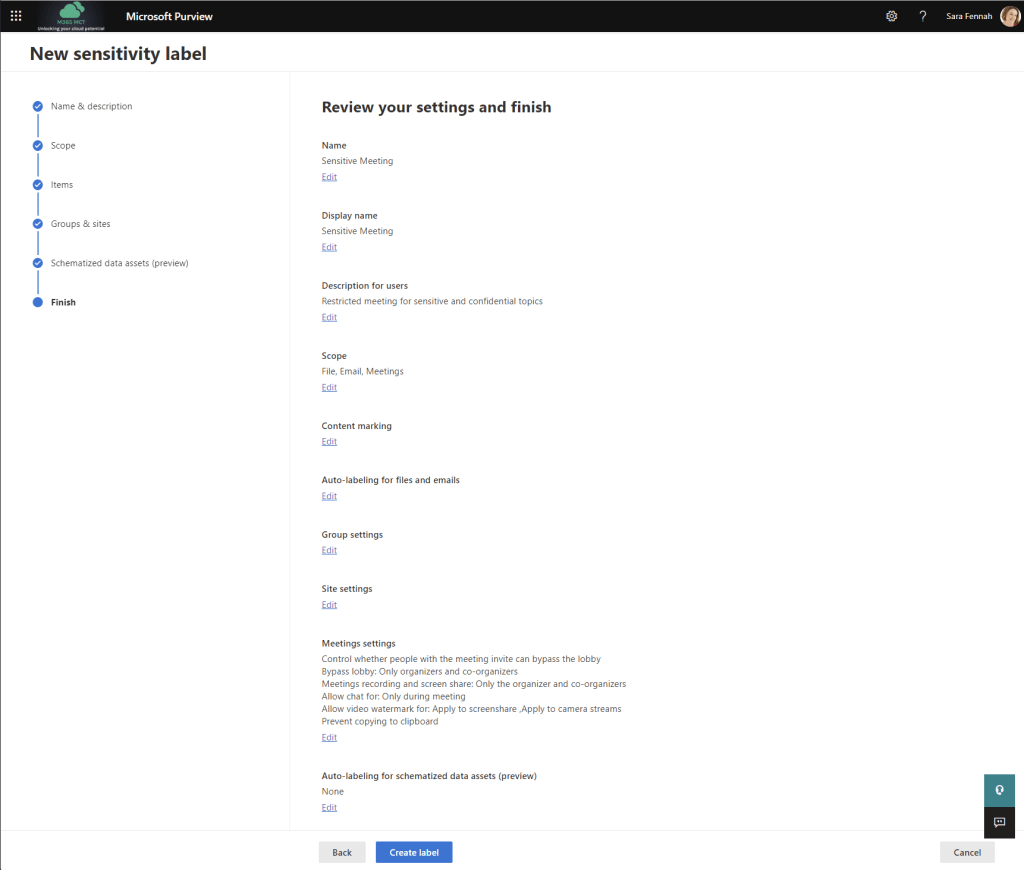
Review the summary of chosen settings. You can return to any step and edit the settings if they do not look right using the Edit link on each section or click Create label if all settings are correct to create and save your label.
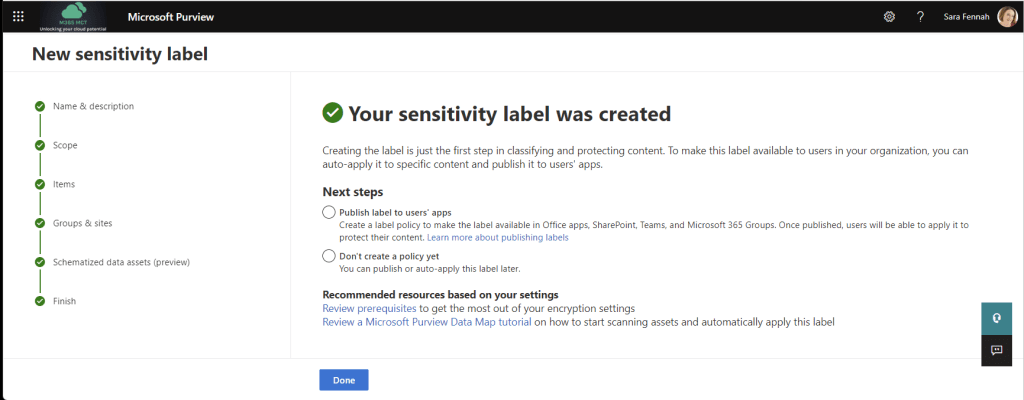
Once the label has been created it needs to be published to be available to users. Publishing a label is no different for a meeting label as other labels. Assuming your organization already uses sensitivity labels and you wish to add this label to an existing policy this is covered later in this article. To learn about label policies and publishing sensitivity labels see the documentation on Microsoft Learn.
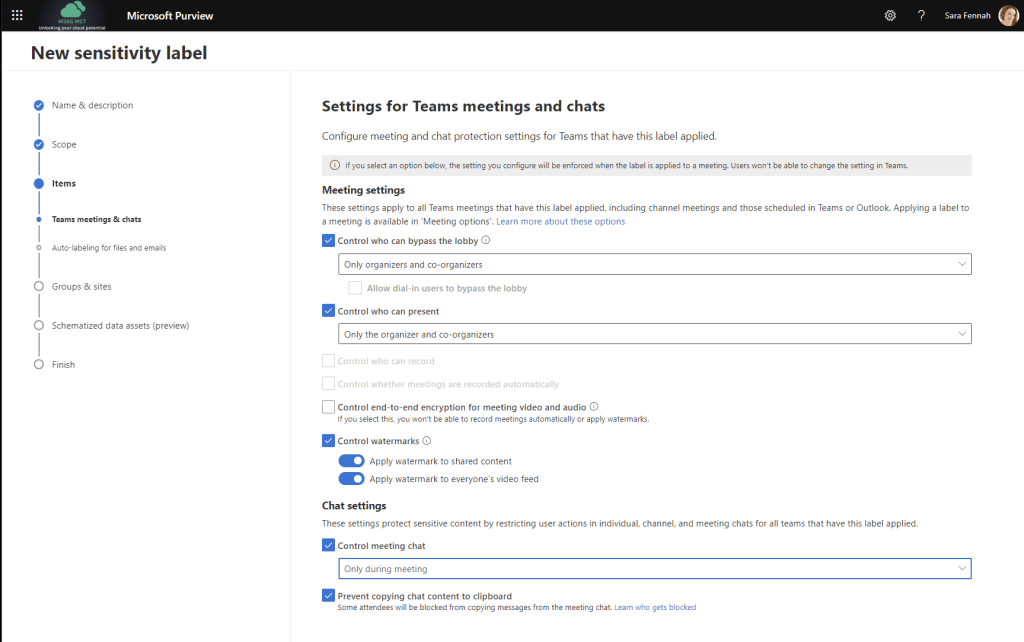
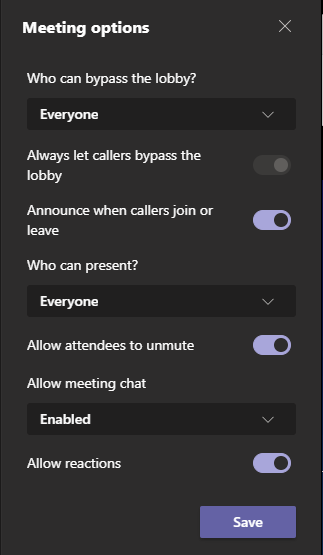
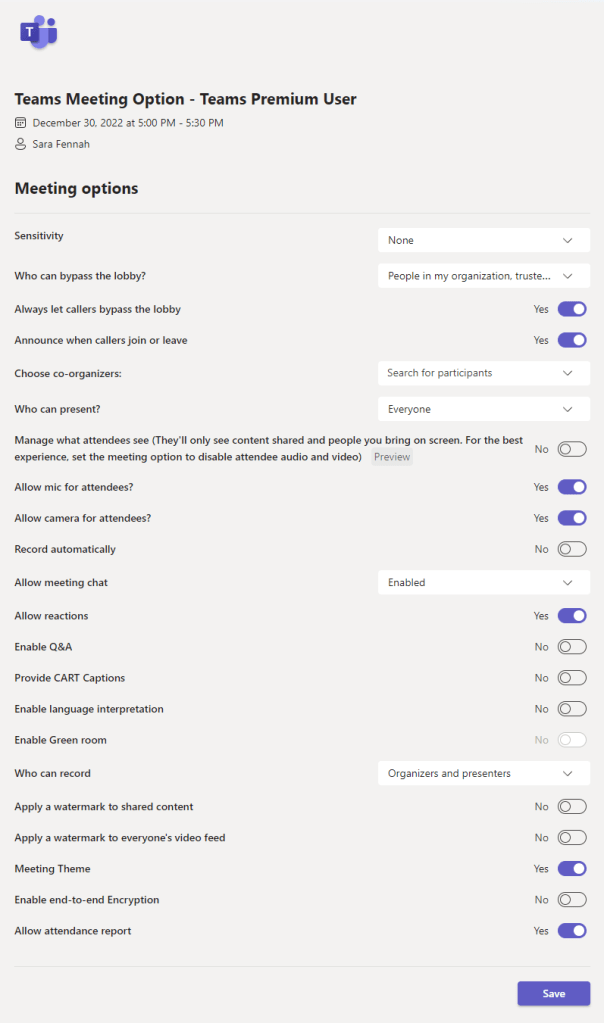
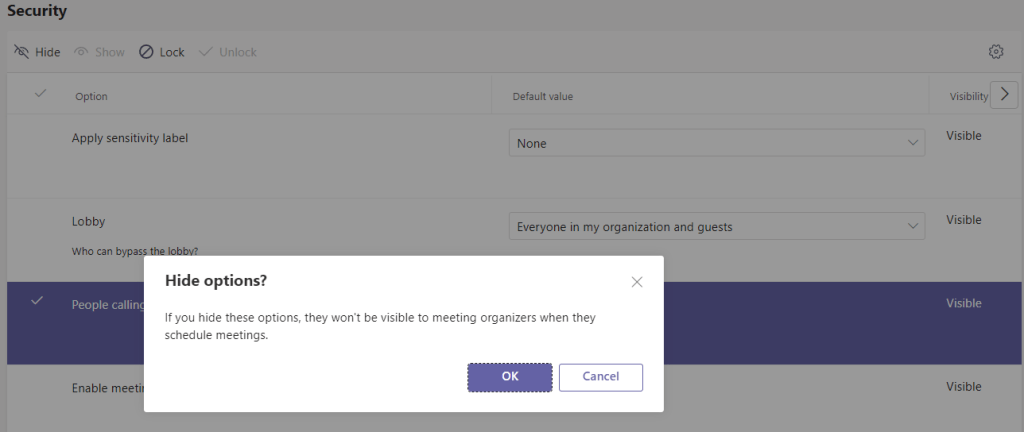
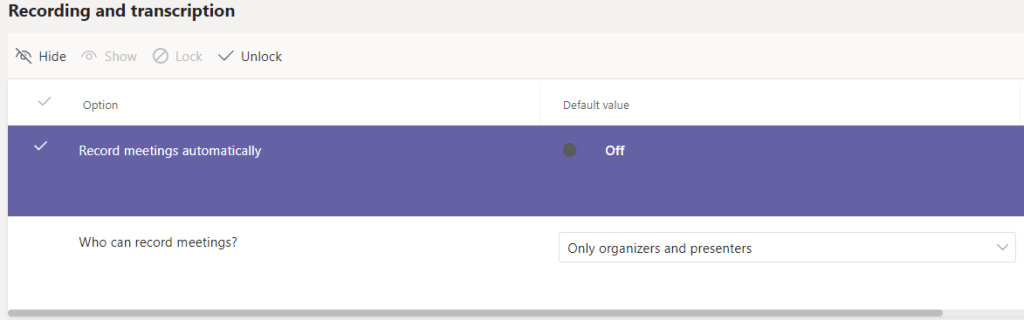
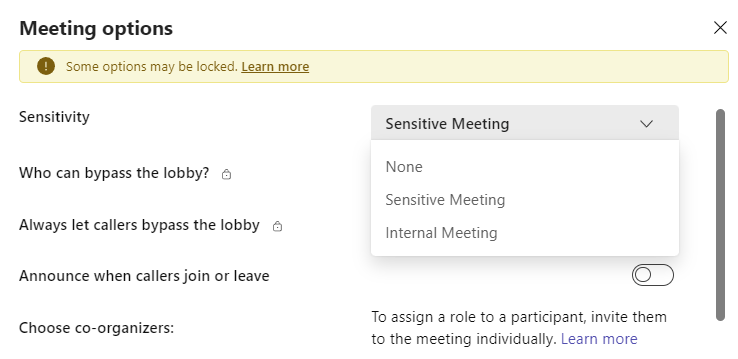
Meeting Options Controls for Meetings & Chats in a Sensitivity Label
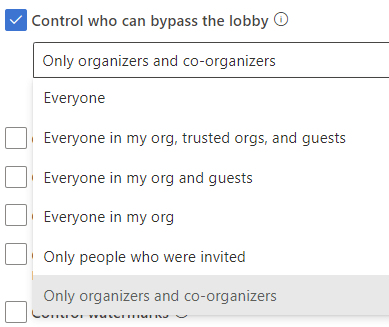
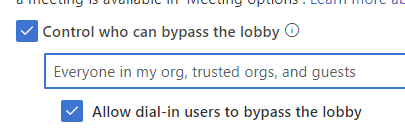
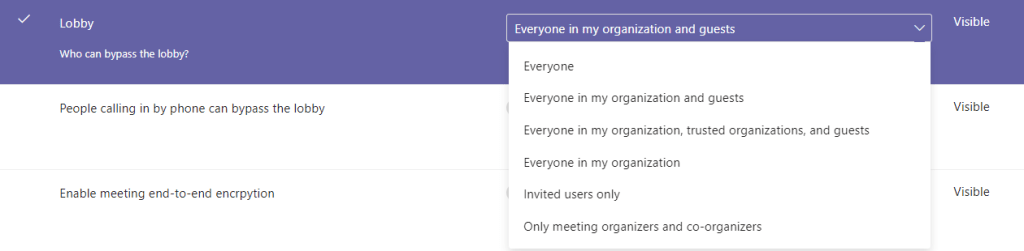
The first setting is to set the meeting lobby controls for the meeting.
When selecting people who can bypass the lobby to Everyone in my org, trusted orgs and guests, you can also choose to allow dial in users to bypass the lobby
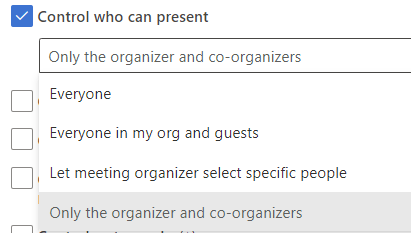
The label can also be used to set who can present in the meeting.
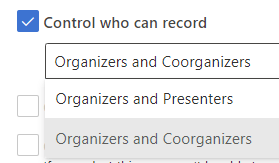
By default anyone from the same organization as the meeting organizer with presenter rights in a meeting can start the recording. The recording will then be stored in the OneDrive of the user who starts the recording with the meeting organizer having owner rights and ability to change permissions, expiry date and video settings. This can lead to confusion, so it can be preferable to limit recording to the meeting organizer and appointed co-organizers.
Automatic recording of meetings is helpful in some situations, such as when the organizer cannot join at the start of the meeting, or when it is important that no-one forgets to start the recording.
Of note on this control is that the wording changes when the toggle is switched. With the setting off the wording reads Don’t record automatically and with the setting off it reads Record automatically.
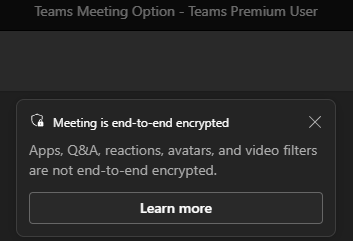
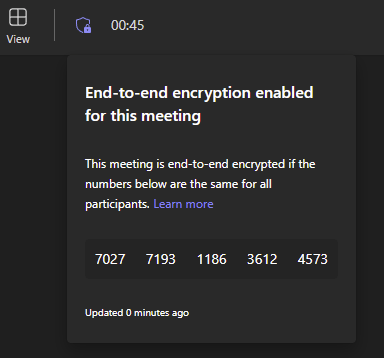
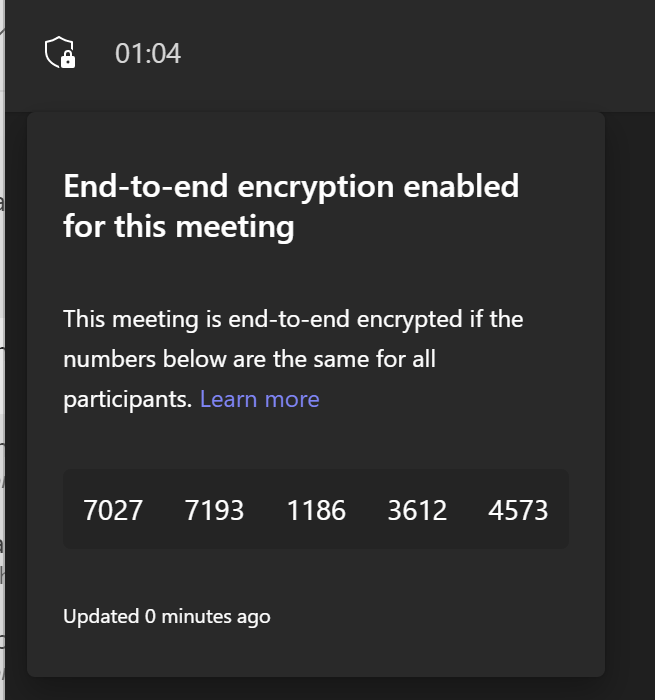
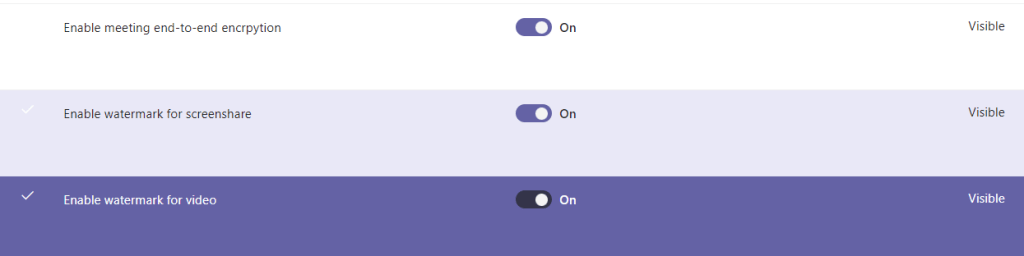
End-to-end encryption can be enforced from the sensitivity label. This toggle, as with the automatic recording toggle, changes wording as it is set. When off it reads Don’t apply end-to-end encryption.
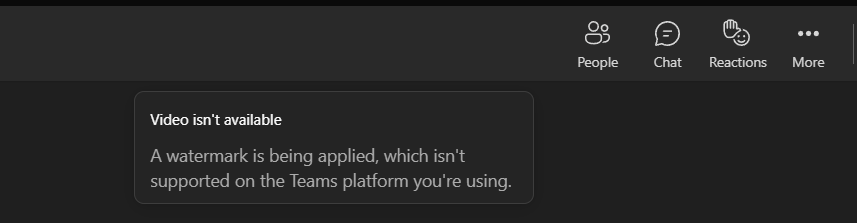
When enables the setting reads Apply end-to-end encryption.Remember end-to-end encryption disables recording of the meeting and as such encryption must be off to set recording options in a sensitivity label and if recording is set to automatic within the label then encryption cannot be switched on.
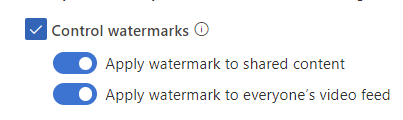
Watermarking can also be set by the sensitivity label. Remember watermarks disable recording of the meeting and as such watermarks must be off to set recording options in a sensitivity label and if recording is set to automatic within the label then watermarks cannot be switched on.
Water mark settings also change their wording within the controls from Don’t apply … to Apply…
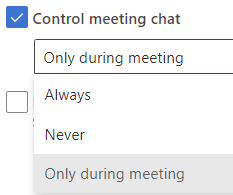
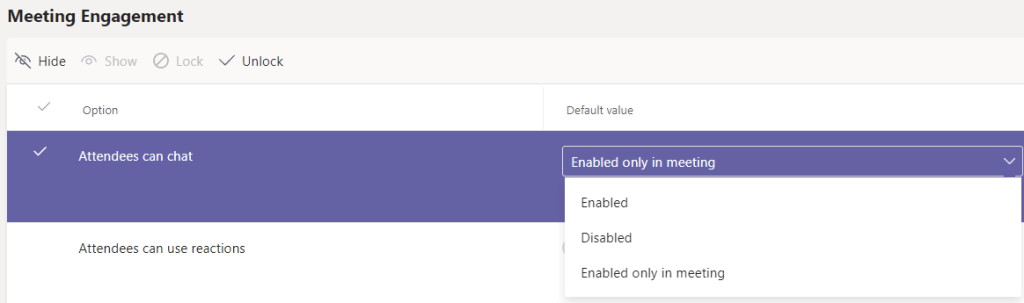
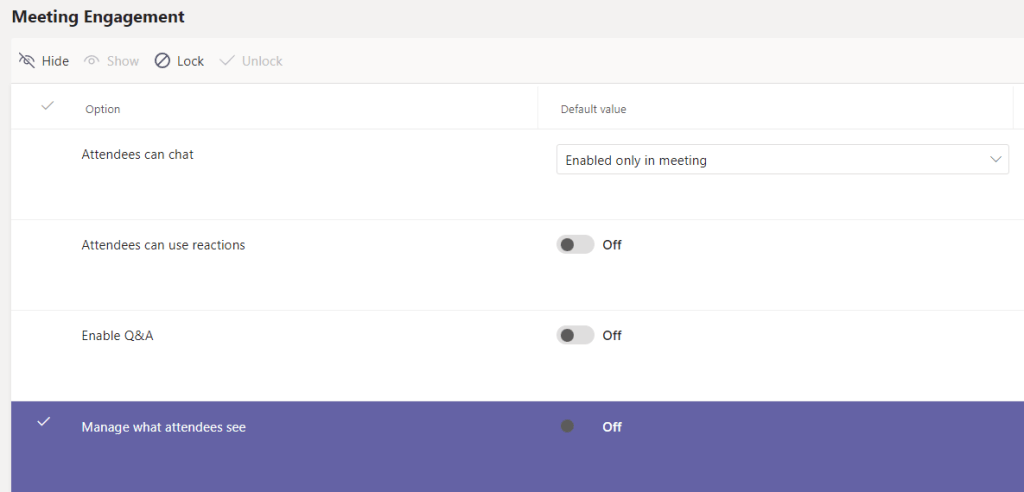
As in direct meeting option controls the sensitivity label can be used to limit availability of meeting chat. The chat can be set to be disabled for the meeting, available only during the meeting or Always which means from the time the meeting is created.
A control which is only available via the sensitivity label currently and not directly in meeting options is to prevent the copying of the meeting chat. Please note that this restriction is currently not supported for external users, nor in all browsers when using Teams for Web and it is recommended you read the learn who gets blocked link for more information: Prevent copying chat to the clipboard label setting
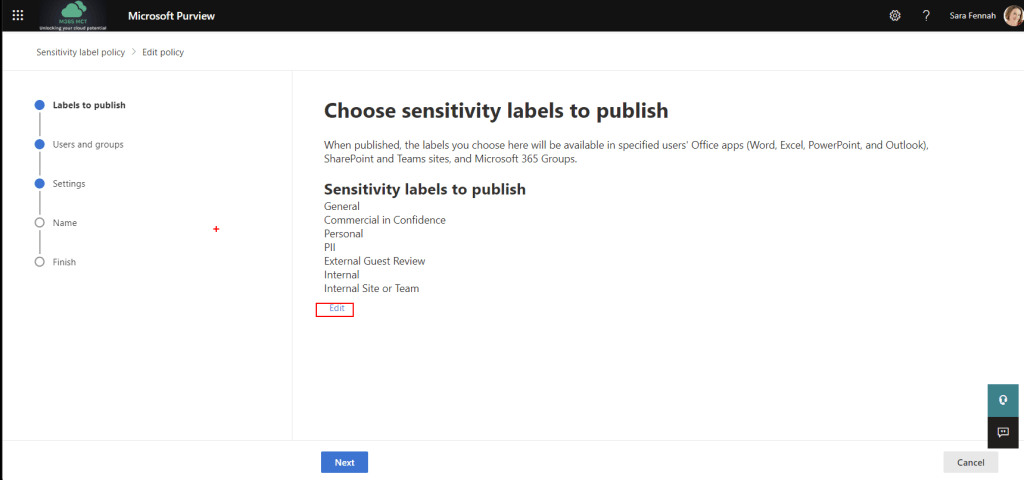
Publish a New Label Using an Existing Policy
To add your new label to an existing policy choose Label policies in the Information Protection page within the Microsoft Purview Compliance Portal. Select the label policy to be edited and choose Edit policy
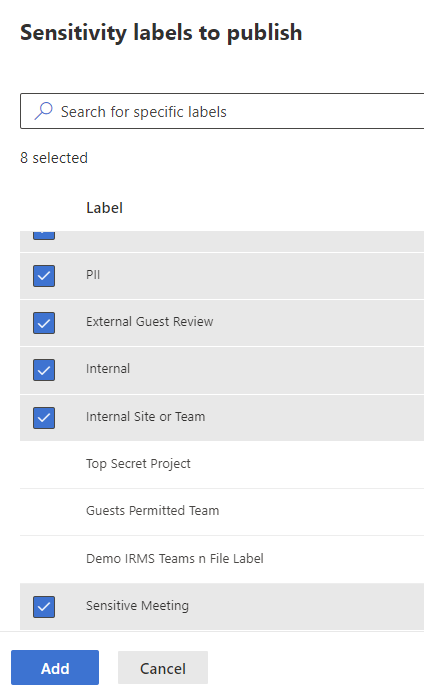
To add a new label move to the Labels to publish page and choose Edit below list of labels
Search for and select the new label then click Add
Verify the list of labels is correct and click Next
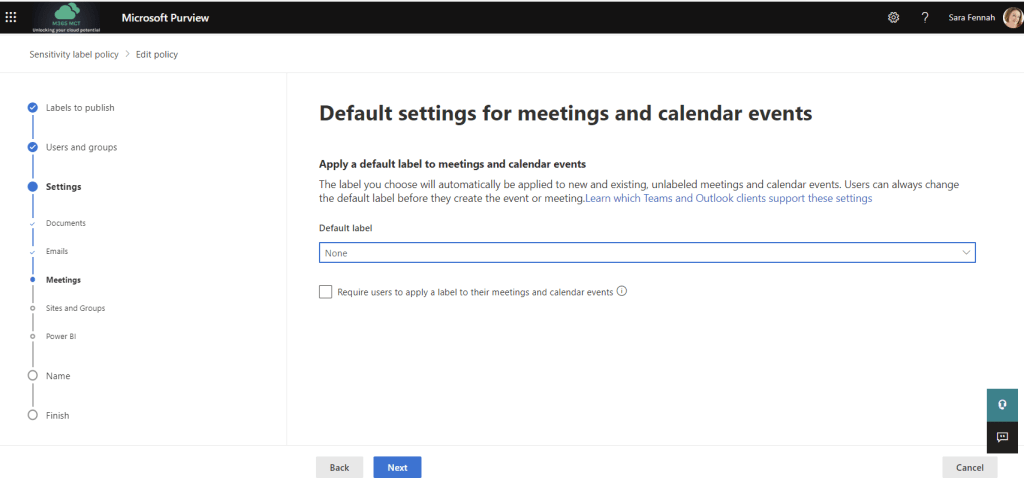
Assuming you do not need to make any further changes to the policy at this point other than for meetings click Next until you reach the Default settings for meetings and calendar events, choose the default label to be applied or leave blank. If not all users in your organization will have Teams Premium and E5 licences it is likely to cause confusion setting a default as users without the licenses will not be able to see the sensitivity label assigned not change it, and therefore I would recommend not setting a default.
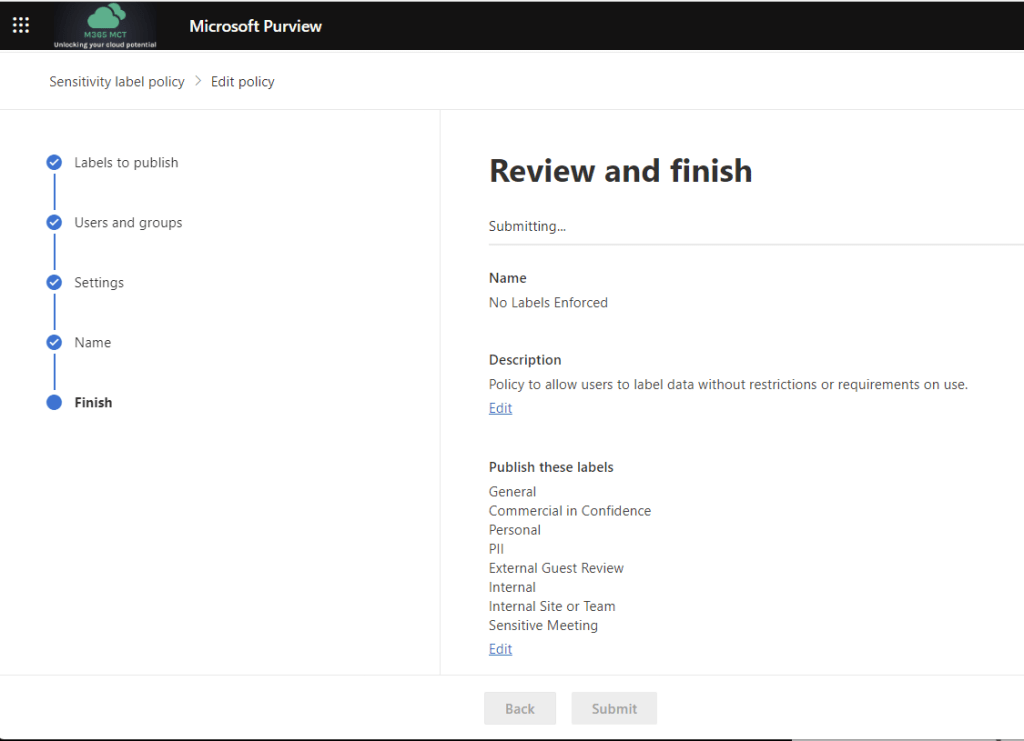
Review the settings and click Submit if all are correct.
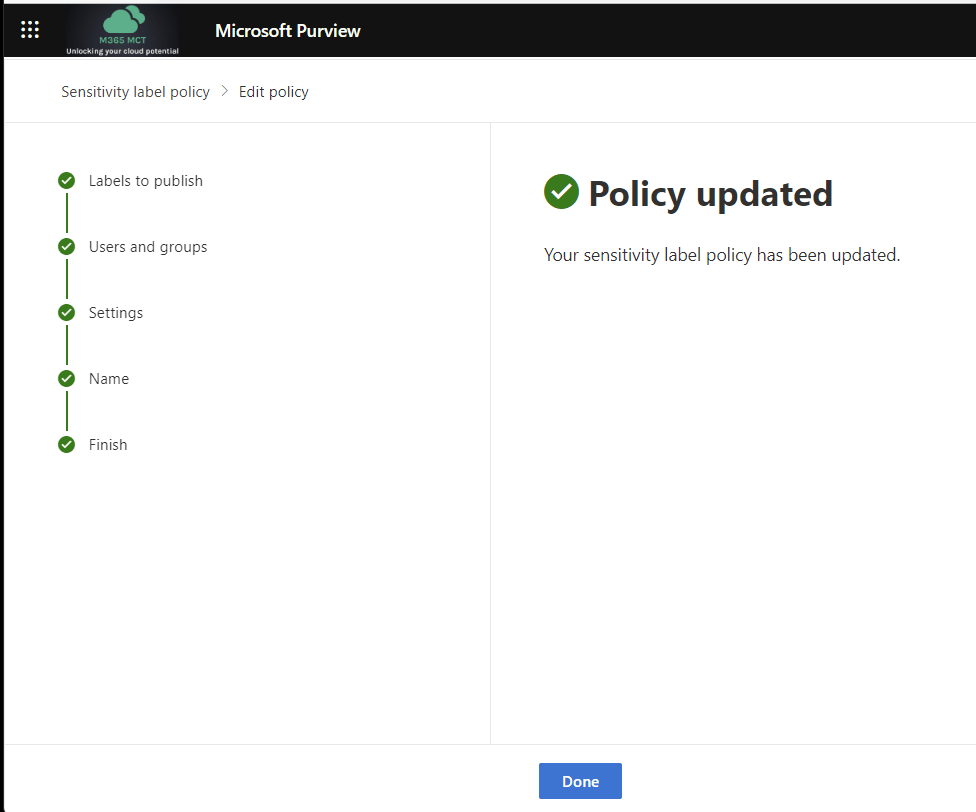
Wait for confirmation that the policy has been updated before navigating away from the page.
Add Sensitivity Label for Channel Meetings
You will first need to create AND SAVE a label that applies to a meeting before choosing that label as a default for channel meetings.
If (and that’s a big if), you want create one sensitivity label to apply to items (incl meetings), groups and channel meetings, you would need to create the label with the scope set to items incl meetings plus groups. Once created you will then edit that same label and set the label itself as the default for channel meetings in a Team with the label applied.
Too muddled? Then just make it simple and don’t set multiple scopes within the same label.
For example to use sensitivity labels to restrict files, meetings, groups, teams and sites to internal use only, I would:
Create a label called Internal scoped to Items (excl meetings) and applying only encryption, with encryption limiting access to internal users. This label could also include marking with a watermark/header/footer, as required.
Create a label called Internal Meeting scoped to Items (incl meetings) with encryption enforced and limited to internal users plus meeting options with lobby bypass limited to only People in my organisation, along with any other meeting options you wished to apply. This will limit access to the meeting invite to internal users only and ensure anyone else who is given meeting join codes is sent to the meeting lobby.
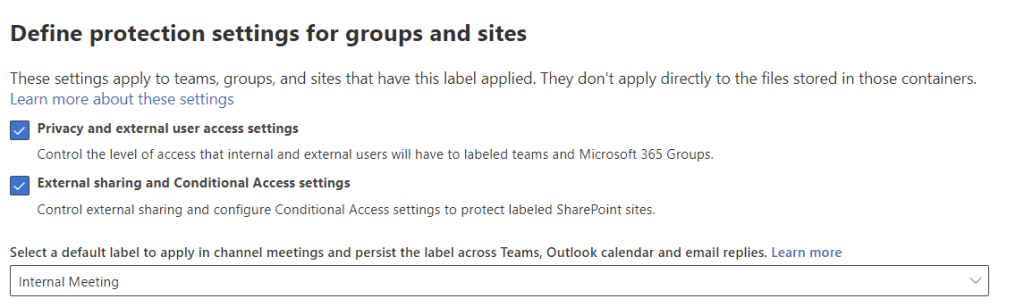
Create a label called Internal Team scoped to Groups & sites with controls on Privacy and external user access settings which sets the group to a Private group and does not allow external users; External sharing and Conditional Access settings which sets sharing to Only people in your organization; and pick the Internal Meeting label as the default for channel meetings.
Publish the 3 labels to required users
Apply a Meeting Sensitivity Label to an Individual Meeting
To manually assign a sensitivity label to an individual meeting, open the meeting options before the meeting starts and choose a sensitivity label, then Save the changes.
Whilst you can change the sensitivity label from meeting options within the meeting the changes do not apply until the meeting ends. So if you need to change the label during meeting the organizer should make the change and then end the meeting, which will remove everyone from the meeting. When people rejoin the meeting, the updated meeting options will apply.
Licensing
Only the meeting organiser needs the Teams Premium licence applied to be able to set a sensitivity label on a meeting. However they also need to be assigned a Microsoft 365 E5/A5/G5 or Office 365 E5/A5 license.
Platforms
Applying, changing and viewing a sensitivity label on a meeting is supported in Teams for web, Windows and MacOS. You can also manage and view the label applied to a meeting from Outlook for web, Windows and MacOS. However note at time of writing no Outlook for Mac versions have been released with this support, see Requirements for details of supported version numbers.
Admin and Set up
To ensure the feature is available for users to apply via meeting options the labels need to be created and published by a Compliance Administrator. There is not additional set up for the Teams Administrator.
Microsoft Teams Premium is an add-on to Microsoft 365 and brings additional features. In this blog series we’ll explore each of the 5 categories of features:
Meeting Customisation
Meeting Protection
Meeting AI Features
Webinars
Virtual Appointments
I’ve also written an overview of Teams Premium and who needs it and a first steps guide for the public preview or all my Teams Premium articles on one place. The official getting started with Teams Premium guide for Teams Administrators can be found on Microsoft Learn.
The Meeting Customization features of Teams Premium allow organizations to add their own branding to meetings with a branded lobby, customized backgrounds, custom together mode scenes, custom meeting templates, meeting themes plus create and assign custom policy packages for easier administration.
Not all of the meeting branding features have been released into the preview of Teams Premium at the time of writing (December 2022). Customization will include a branded lobby and meeting themes which will both be created using Customization Policies in the Teams Admin Center when they are released. In this article we’ll look at the other meeting customization features which are available in the Teams Premium license as at Dec 2022.
Organizational Virtual Backgrounds
One feature of Teams Premium available in the preview are Organization backgrounds. This is a feature which is also part of the Advanced Communications license. To use organizational backgrounds the organisation must have at least one Teams Premium (or Advanced Communications) license and the published images will only be available to those users with the Teams Premium (or Advanced Communications) license assigned.
NOTE: Microsoft have not announced any plans with regard to the Advanced Communications license going forward. However as Teams Premium includes more features than the Advanced Communications license and is expected to be lower cost, I would expect organizations who had adopted the Advanced Communications licenses to move to Teams Premium.
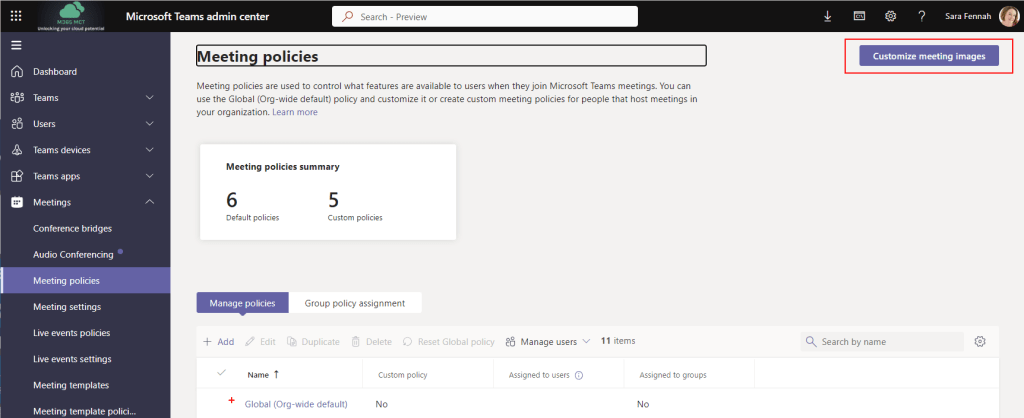
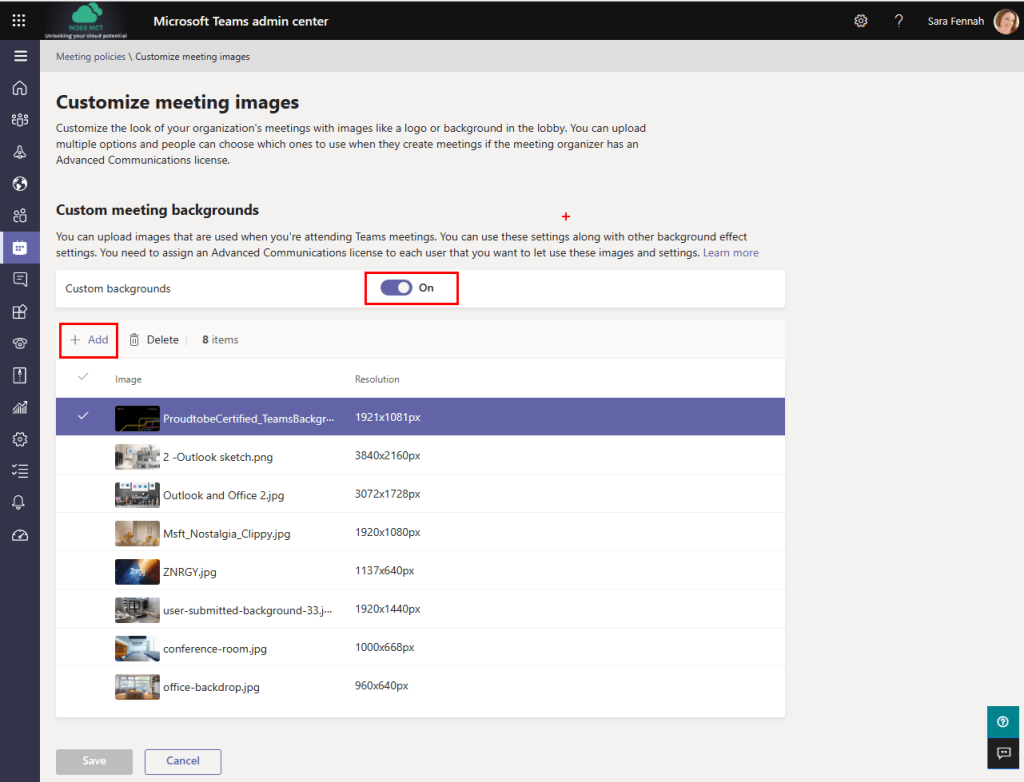
To upload and publish organizational backgrounds in the Teams Admin Center choose Meetings > Meeting Policies and select the Customize meeting images button. This option is expected to move to Meeting Customization Policies when they become available.
Use the Add button to upload images.
Images must be in JPEG or PNG format and between 360 by 360 px and 3840 by 2160 px. You can have a maximum of 50 images per organisation. For more details on custom meeting backgrounds review the official documentation on Microsoft Learn.
Custom Together Mode Scenes
You can also create and publish Custom Together mode scenes for your Teams Premium users. Custom Together Mode scenes can only be applied by those with a Teams Premium license, but a Together Mode scene can be set to be visible for all meeting attendees and this includes custom scenes.
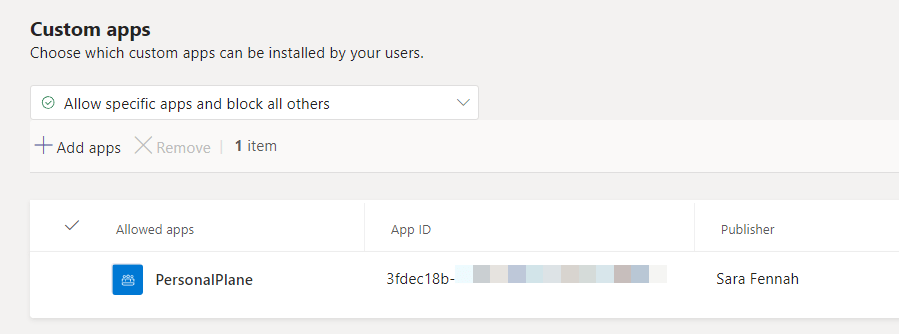
Also note that custom together mode scenes are considered a custom Teams app. And as such the user publishing the scene will need to be permitted to add custom teams apps in your tenant via an app set up policy, the app will need to be approved by Teams Admin and included in the appropriate app permission policies for users who need access. More details on managing custom app in Microsoft Teams is available on Microsoft Learn.
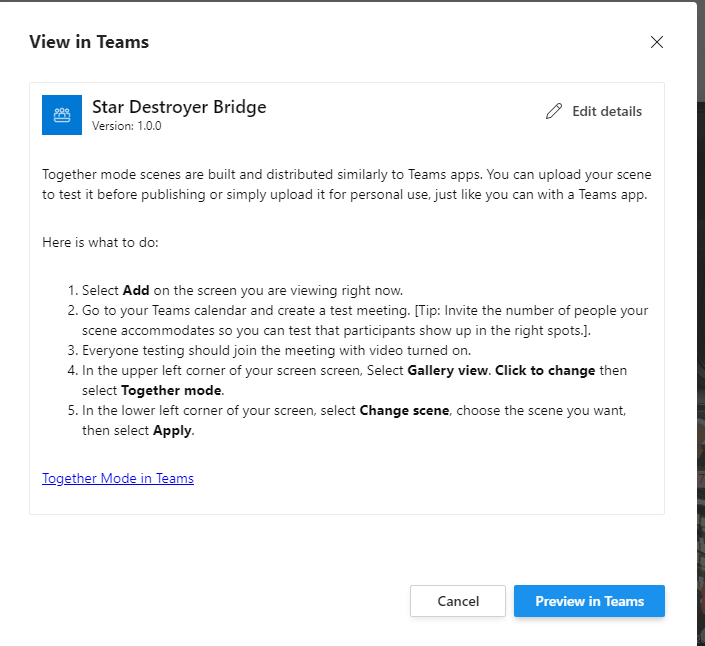
Here’s an article I wrote about creating my first custom scene. Since that blog was written there are some small changes. You still create your custom scene using https://dev.teams.microsoft.com/, but the publication process is different.
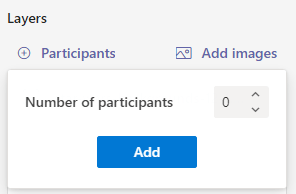
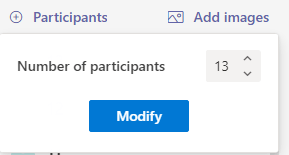
Whilst it is recommended that before publishing to the organisation, you test the scene in a meeting, take car how you undertake this. You can deploy the app to a single Teams client using the Preview in Teams button and follow the prompts to install. If using this method I recommend testing on a different device and Teams account to your default or renaming the app after testing. This is to avoid ending up with two copies of the same app once it is published, a sideloaded (preview) and full load (publish). As an alternative with Together Mode scenes, you could publish them and only deploy to limited number of users for testing using app permission policies.
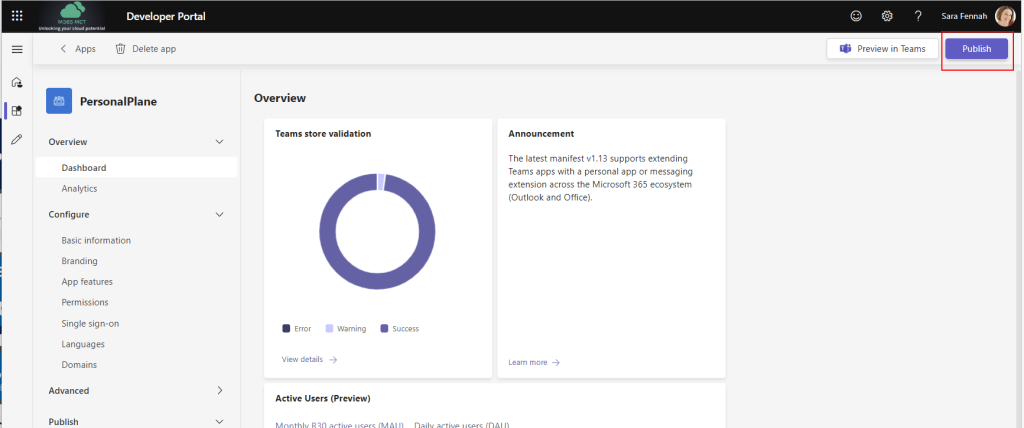
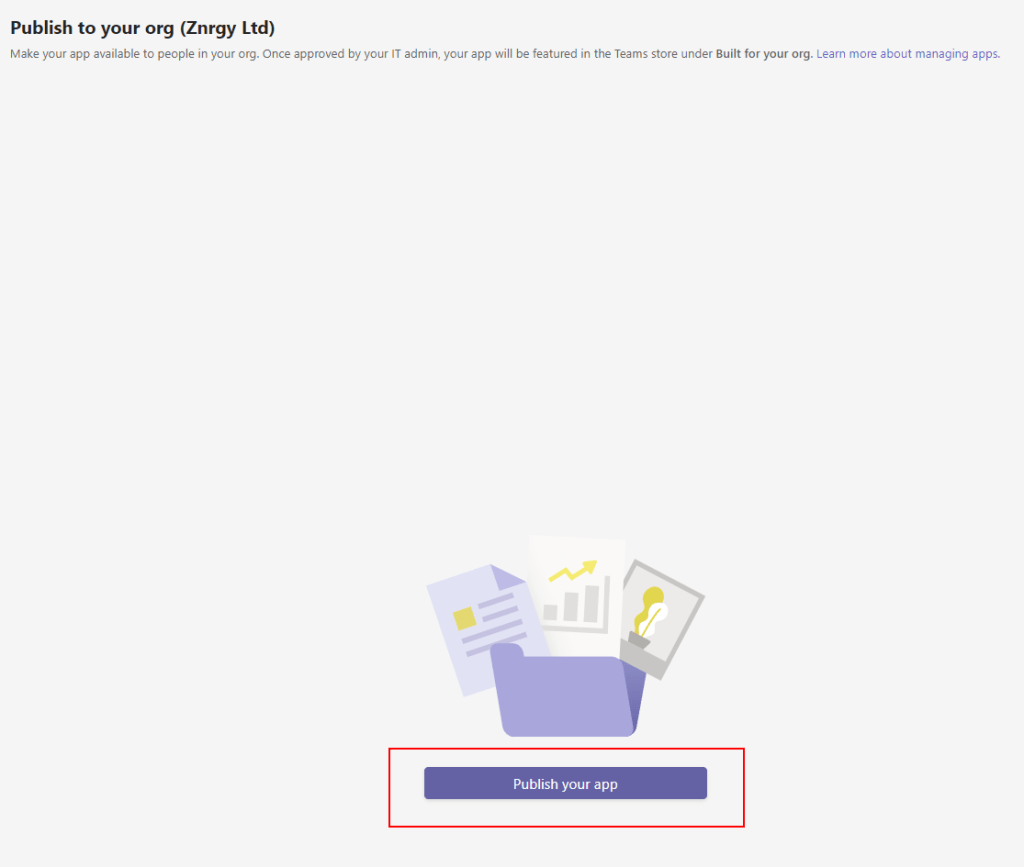
To fully publish a scene, once the app/scene is created choose Publish button
Confirm the publication method. If you are signed on to Developer Portal with an account which is permitted to publish app you can Publish to your org directly. Otherwise you will need to download the app package and submit for upload by a Teams Administrator using your internal processes.
If you chose Publish to your org you will then confirm this by clicking the Publish your app button on the next screen.
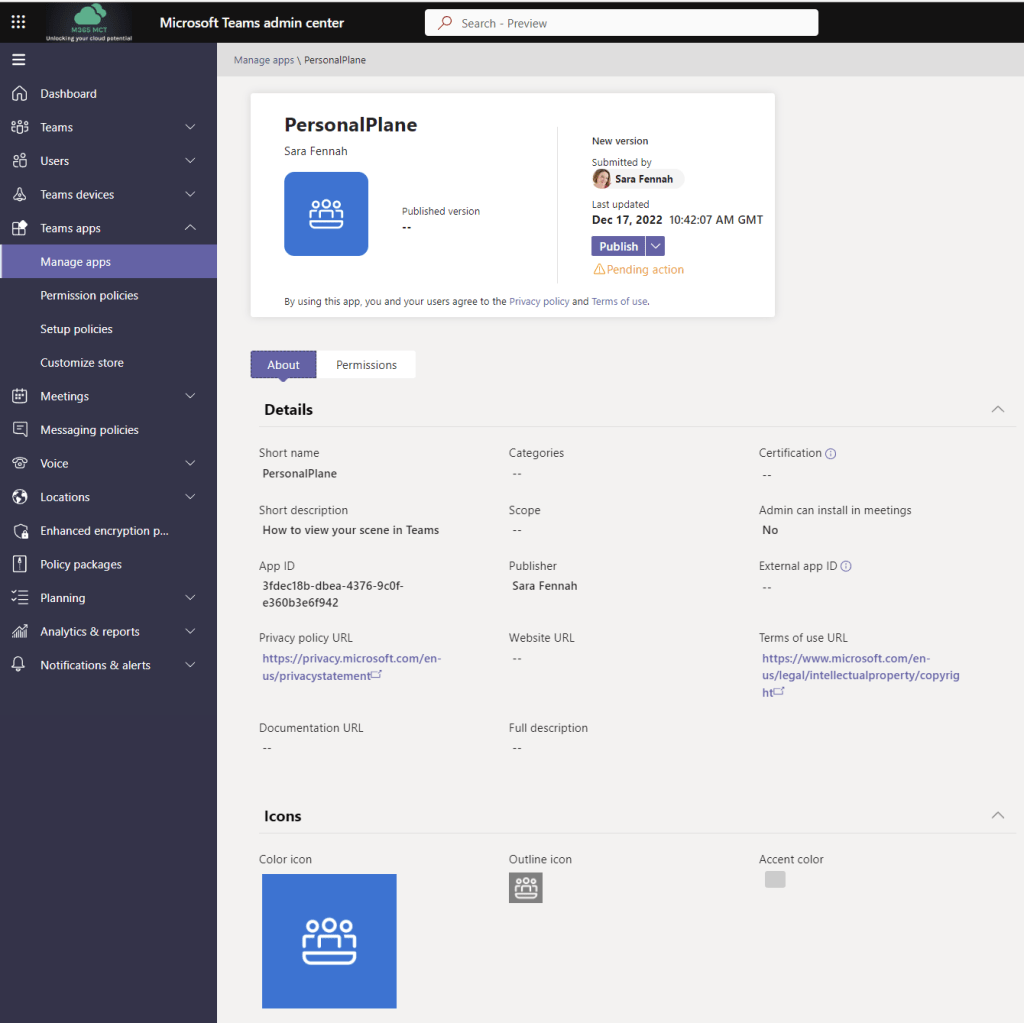
Once published to your org, the app will need to be approved before it becomes visible to your users and ensure it is not blocked by an app permission policy. The screen shown below is used by the Teams Administrator to publish the app, thus approving it for use with the organisation. To reach this screen in the Teams Admin Center choose Teams apps > Manage apps, locate the app in the list and click the app name.
Once published and approved, users can add the apps from the teams client. Or, as an admin, you can add it for your users via a Teams App Setup Policy.
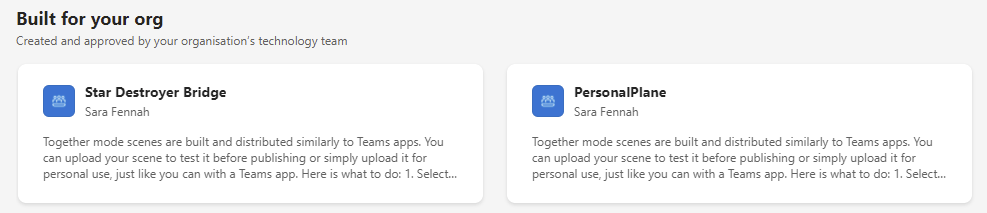
If the app does not appear for users in Microsoft Teams under Apps in the Built for your Org section then check to ensure the app is allowed in the App permission policies under Custom Apps section.
You can view the official guidance on Together Mode scenes on Microsoft Learn
Microsoft Teams Premium is an add-on to Microsoft 365 and brings additional features.
Not everyone will need Teams Premium, but most organisations will find that there people in the organisation who will benefit, especially those who organise virtual and hybrid events or hold sensitive meetings. As a trainer it’s definitely something that will be of benefit to me.
The features can be seen as falling into 5 categories:
Meeting Customisation
Meeting Protection
Meeting AI Features
Webinars
Virtual Appointments
Meeting Customisation features allow organisations to add their own branding to meetings with a branded lobby, customised backgrounds, custom together mode scenes, custom meeting templates, meeting themes plus create and assign custom policy packages for easier administration.
Meeting Protection features include adding a watermark to videos and shared content to help protect sensitive shared information by adding the email of the attendee so any screenshots taken or video captured shows who took the image/recording. Sensitivity labels can be used to restrict features in a meeting such as apply watermarking, limiting lobby bypass, restricting recording, preventing copy & paste from chat.
Meeting AI Features are not available in the preview, as at launch. These include automatically generated chapters in meeting recordings, time markers in meeting recordings showing when you joined/left plus when you were mentioned and the much anticipated auto generated tasks.
Webinars are also getting some new features with a refreshed webinar creation screen rolling out to everyone which includes the ability to limit numbers who can register. The advanced webinar features with Teams Premium are a green room for presenters only to use prior to meeting start, ability to control which presenters are visible on screen, a wait list for registrations once webinar is at capacity, manually approve registrations and reminder emails to registered attendees.
Virtual Appointments are aimed at businesses who have customers scheduling appointment to be held over Teams. Premium features in this space do include the SMS notifications, analytics in Teams admin center and scheduled queue view which were previously announced and now only to be in Teams Premium. Additional features include customised waiting room, chat with attendees in the waiting room and post appointment follow ups.
Some features are licensed by meeting organiser and can be applied to meetings they create, believed to be those set in meeting options, such as adding watermarks and preventing recording. Other features are per user and only available where the individual is licensed for Teams Premium such as assigning or being assigned custom policy packages. Many of these details will be confirmed as the preview phase comes to an end. It should also be noted that Sensitivity Labels for meeting also requires a Microsoft 365 E5 license for the users creating the meetings and assigning the sensitivity label.
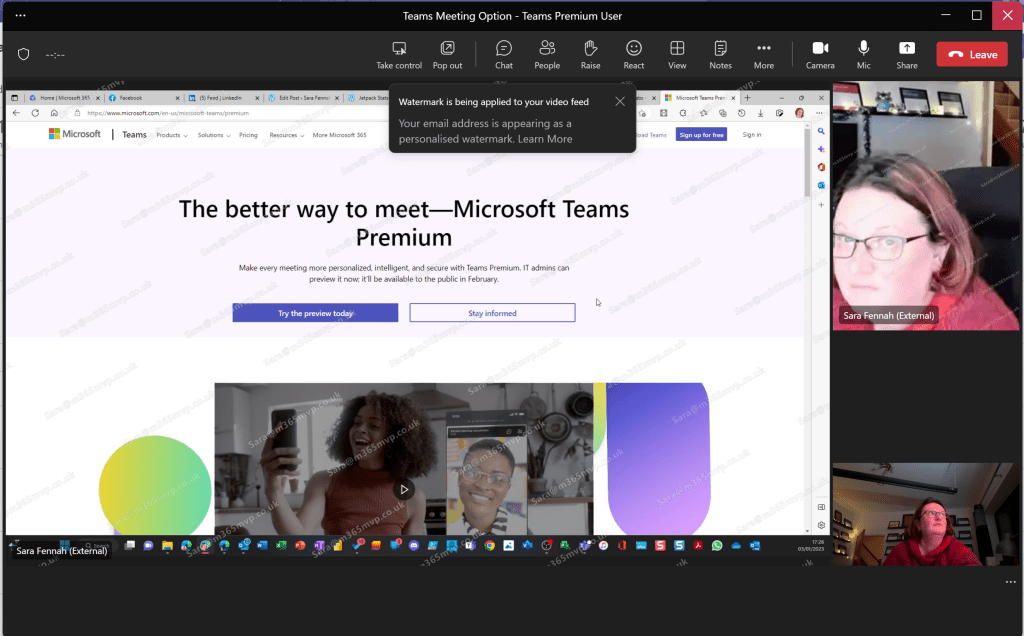
The public preview of Teams Premium is now available and you can read the official launch blog here. In this blog I’ll look at how to sign up and how to enable Meeting Encryption, Water Marking, Meeting Templates, Advanced Webinars plus some of the meeting branding experiences. This blog is aimed at Teams Administrators.
Other features will follow in future blogs, as the settings update in my tenant and I get to test them out.
The trial is currently only available for up to 3 users in a tenant, though this should increase as we get closer to launch which is expected in February 2023.
Some of the upcoming Teams Premium features are not yet included in the trial. Custom branding is due to roll out into the trial in Jan 23, but intelligent recap is not included in the preview and RMTP in to webinars is not mentioned in the blog launching Teams Premium Preview.
There is a nice comparison of the features in Microsoft Teams as standard and in Teams Premium in the documentation around Teams Licensing on Microsoft Learn.
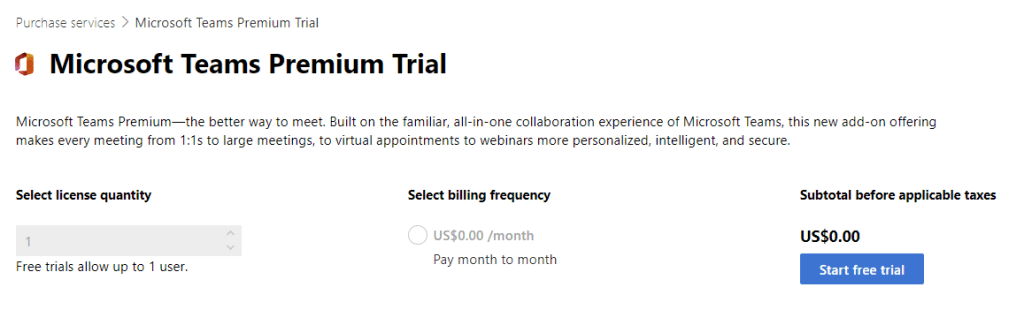
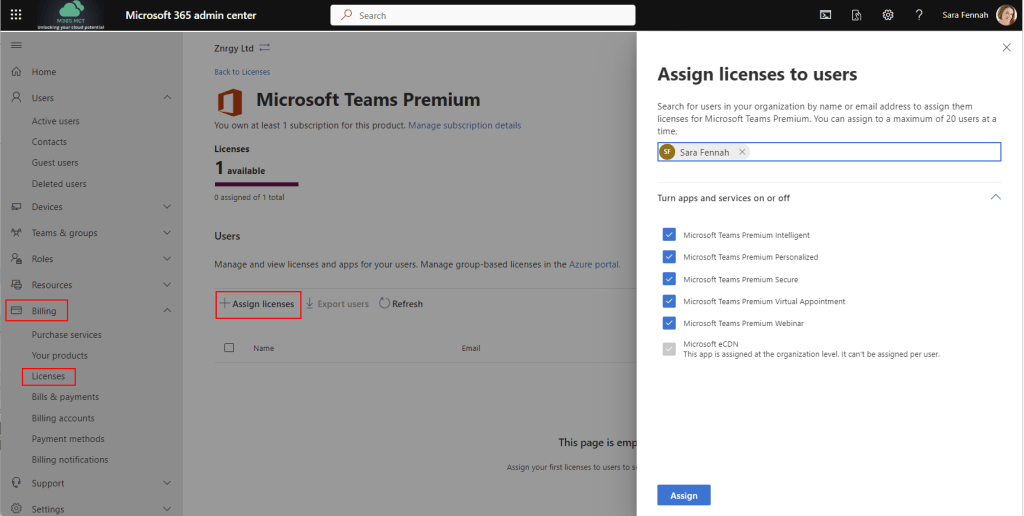
If like me you could not find the Teams Premium trial licences in your tenant, there is a way to add the trial. As per the Trial Licensing FAQ’s at the bottom of the blog, log in to your tenant and then visit https://aka.ms/tpdlnk. This will allow you to redeem one trial licence. You can use the same link to get the 2nd and 3rd trial licences.
Click the Start free trial button.
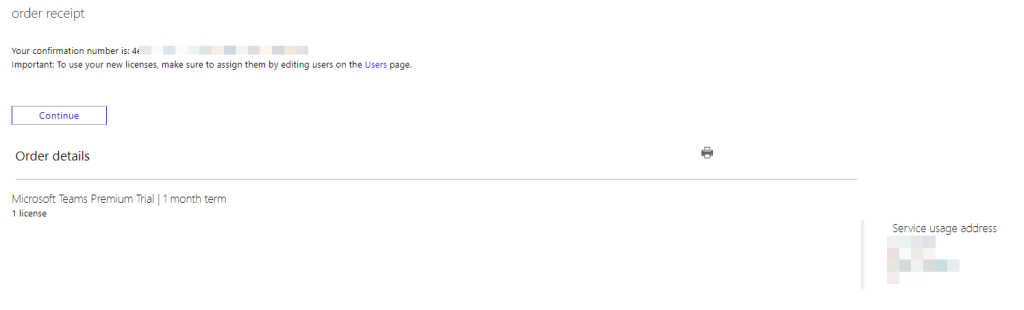
Confirm the service address and click Try now button
Once confirmed you can assign license to the user who will use the trial.
I recommend you redeem at least two trial licences. One for an admin to create meeting sensitivity labels and one test user to trial the features.
Once you have assigned the licences you can explore the features. As an admin you may need to enable features in policies which are assigned to the test users. That trial launch blog has a good amount of detail on each of the features, how to use them and how to enable them. However I have found that the images in the official blog are a little different to what I am seeing in my production tenant currently hence I’ve included my screen shots here.
Meeting Encryption
To test out meeting encryption change the appropriate encryption policy to allow users to apply encryption to meetings
Watermarking for Content & Video
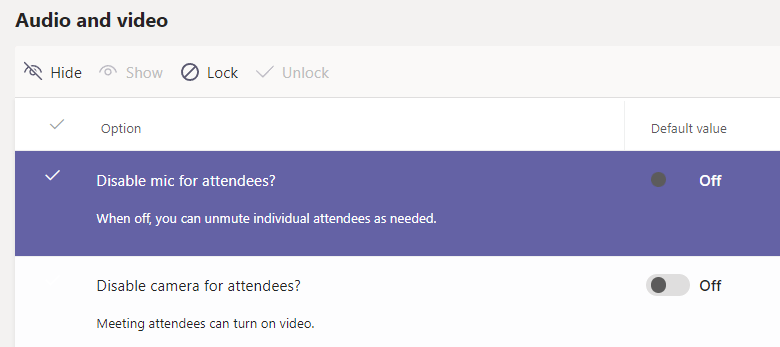
Watermarking adds the email of the attendee as a water mark on videos and/or shared content in meetings to discourage screenshots or the sharing of such when sensitive content is shared in meetings. To ensure the feature is available for users to apply via meeting options it must be enabled in the appropriate Meeting policy:
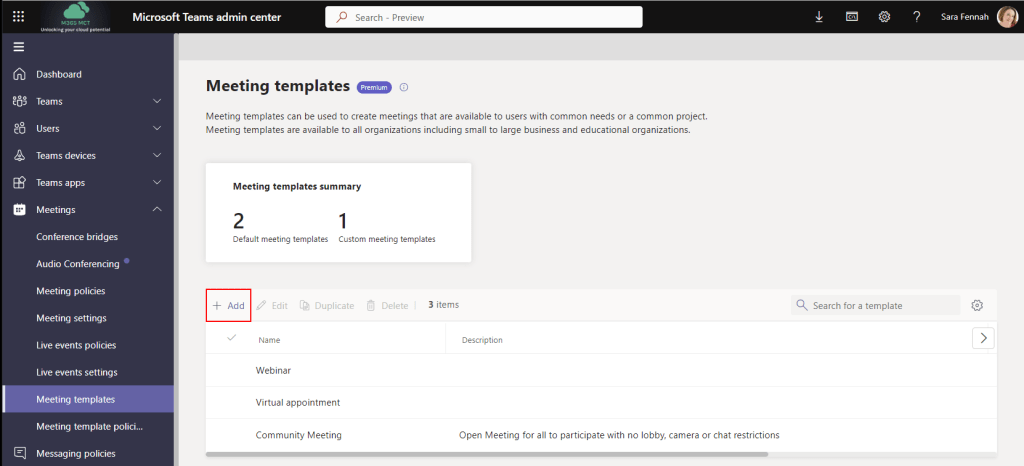
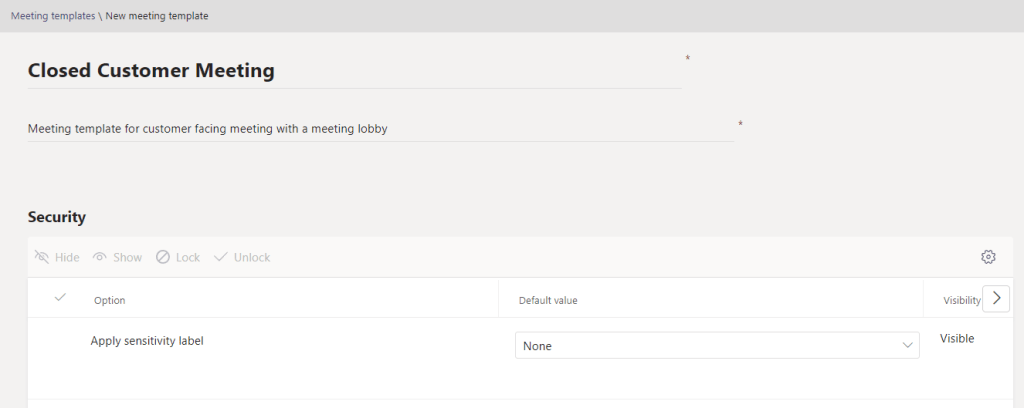
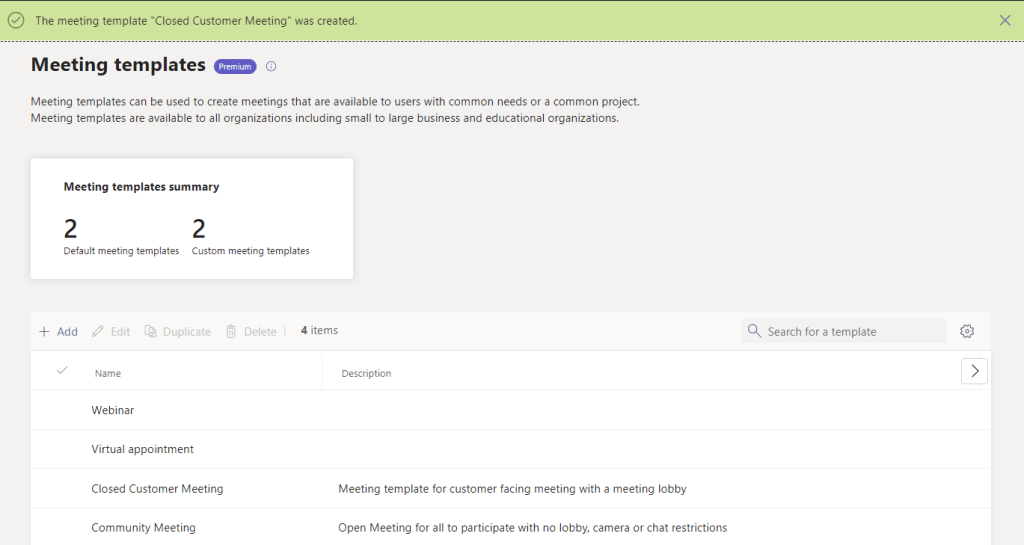
Meeting Templates
Meeting templates provide pre-set configurations for meeting options. They can be set up under Meeting templates in Teams Admin Center and published to users with a Meeting template policy. By default all new templates are added to the global policy and are only available to those licensed for Teams Premium, so there is no need to create a custom policy for testing purposes.
Custom Meeting Branding
Not all of the meeting branding features have been released into the preview of Teams Premium as yet. Customisation will included a branded lobby and meeting themes and be created using Customization Policies in the Teams Admin Center when they are released. However for now you can try out pushing Organization backgrounds from the Customize meeting images button in the Meeting Policies page. This has been in my tenant for a while by virtue of having the Advanced Communications license.
You can also create and publish Custom Together mode scenes for your Teams Premium users. Here’s an article I wrote about creating my first custom scene. Since that blog was written there are some small changes. You still create your custom scene using https://dev.teams.microsoft.com/, but once built you publish your app to your organisation by following the 3 steps shown below.
Once published to your org, the app will need to be approved before it becomes visible to your users and ensure it is not blocked by an app permission policy.
Once published and approved, users can add the apps from the teams client. Or, as an admin, you can add it for your users via a Teams App Setup Policy.
Advanced Webinars
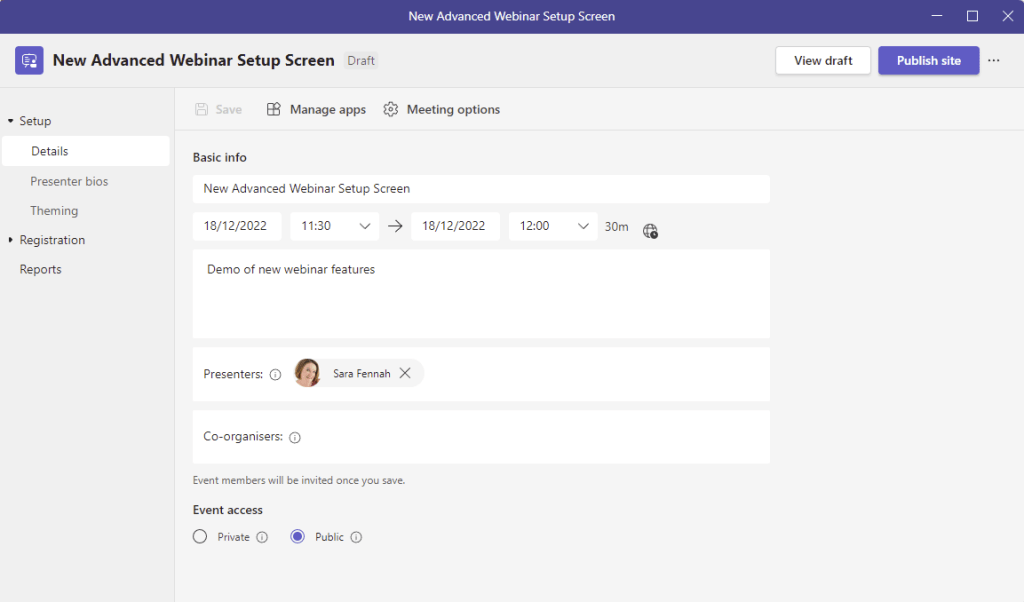
To use the advanced webinar feature with the new set up screen, users will need to have the Meeting Registration feature enabled in the meeting policy, which can be set via Teams Admin Center. However a second setting in the new Events policy which can only be set via Powershell enables the new features. This is AllowWebinar. With both settings enabled the webinar set up screen looks like this:
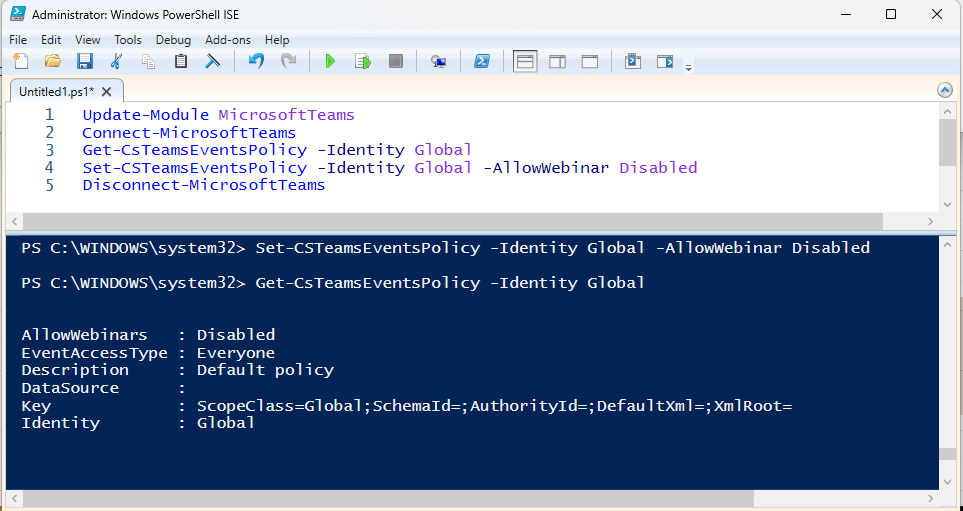
The default Events policy has AllowWebinar enabled by default.
The following PowerShell will disable allow webinar in the default Events policy:
Update-Module MicrosoftTeams Connect-MicrosoftTeams Set-CSTeamsEventsPolicy -Identity Global -AllowWebinar Disabled Disconnect-MicrosoftTeams
You may have seen the information about the changes to licensing for Teams rooms announced at the beginning of September 2022. If not, Tom Arbuthnot did a great write up on it on his blog.
Notifications are now rolling out into the Teams Admin Center for Teams Administrators letting them know about the changes.
If you have a Teams Room device on the older licence, going to the Teams Room pages under Teams devices in the Teams Admin Center, will trigger notifications.
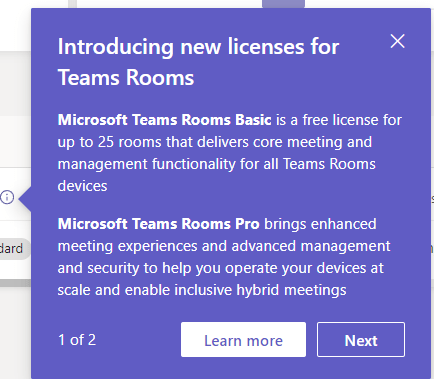
There are two steps to the notifications. Step 1 offers a high level explanation of the two new licences
Step 1 of the tool tip reads:
Introducing new licenses for Teams Rooms
Microsoft Teams Rooms Basic is a free license for up to 25 rooms that delivers core meeting and management functionality for all Teams Rooms devices
Microsoft Teams Rooms Pro brings enhanced meeting experiences and advanced management and security to help you operate your devices at scale and enable inclusive hybrid meetings
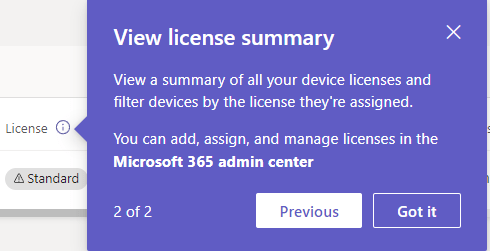
Step 2 offers advice on viewing licenses on existing Teams devices.
Step 2 of the tool tip reads:
View license summary
View a summary of all your device licenses and filter devices by the license they’re assigned.
You can add, assign, and manage licenses in the Microsoft 365 admin center
When hovering over the license column where a device has a standard license the advice is to upgrade.
This notification from reads:
Microsoft Teams Rooms Standard
To use Pro features upgrade this device to a Microsoft Teams Rooms Pro license in the Microsoft 365 admin center before the current license expires.
There is also a warning banner at the top of the page advising an upgrade to pro licenses.
At the time of writing this upgrade option is not available but I understand that the option to upgrade is coming. This is usually done in the Product details page from the Microsoft 365 Admin Center under Billing -> Your Products. On the Product page there should be a link offering upgrades recommended for your org. Currently this is greyed out until upgrade is possible.
Accessibility note: The images included in this article are described in the article including text displayed on them and therefore no AltText has been added to the images. The images show the dialogs/tool tips/warning described in the article.
With the announcement that Shared Channels in Microsoft teams is now generally available, it’s worth considering how you can use this feature within your organization. There are now three types of channels available within a Team:
Standard Channel – Permissions set by the team, available to all team members
Private Channel – Permissions set on the channel and accessible to a sub set of team members
Shared Channel – Permissions set on the channel and available to team members and non team members
Whilst Shared Channels have had a lot of exposure for their use between organizations, you can also use them within a single organization to support cross-team working without the need for an extra Microsoft Teams team.
In this scenario, we are the owners of the Star Wars team. In the same organization we have an Avengers team and the two teams want to work together on a joint project. We are the team leader and owner of both teams, so can do all the steps ourself.
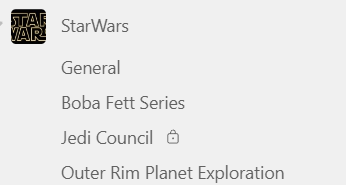
The Star Wars team already has several channels including a private channel.
Star Wars Team channels list with 3 standard channels and a private channel, the Jedi Council.
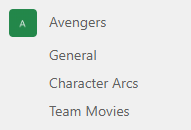
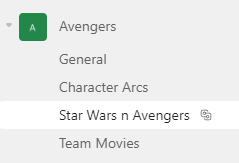
The Avengers team is also an established team with multiple channels.
Avengers team with 3 standard channels
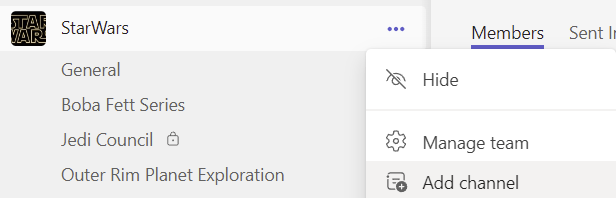
Rather than create a new team for the collaboration, we create a new channel in the Star Wars Team
… menu expanded with Add channel command highlighted
The privacy for this channel is set to Shared and the whole Star Wars team is added to the channel. If required, you could include only a subset of the team members, by unchecking the Share this channel with everyone on the team checkbox.
Create channel dialog with channel name StarWars n Avengers entered, Privacy of Shared selected and share this channel with everyone on the team option checked
Rather than the individuals from the Star Wars team the shared channel shows the Star Wars team as members of the channel. This means that as people are added or removed from the Star Wars team, they are also added or removed from the shared channel.
Channel setting page on the members tab, showing current user as the owner and StarWars team listed as a member under the heading Teams, showing the team has 14 members. The number of members of the team is a link to the a list of the current members.
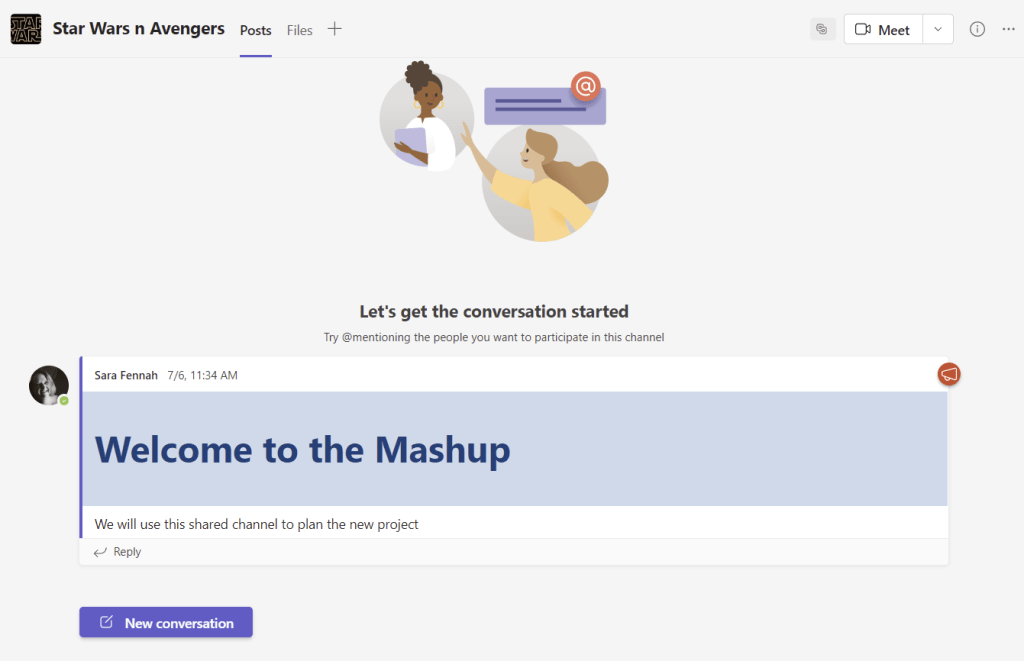
The members of the Star Wars team, can now use the channel from their team as with any other channel in the team.
Channel content on the Posts tab, showing an announcement style message welcoming members to the Mashup, stating the channel will be used to plan the new project.
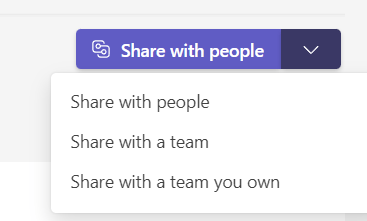
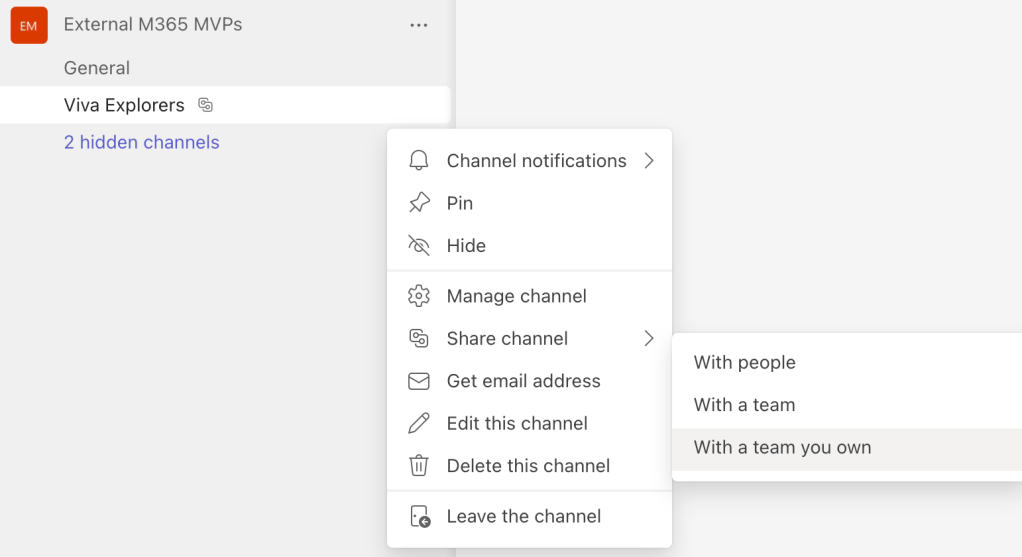
To add the Avengers team to the channel, we choose Share with a team you own from the members page. As we are also owners of the Avengers team, we have full permission to add the team. If we were not the owner we would choose Share with team and initially invite the owner of the team for them to approve add in the team.
Share with people button expanded showing options to share with people, share with a team or share with a team you own.
We can now pick from the teams we own and select Done
Pick Team dialog box, showing Avengers team which has 5 members. Avengers team is not yet selected, so Done button is greyed out.
The confirmation that the other team has been added will display.
Confirmation message
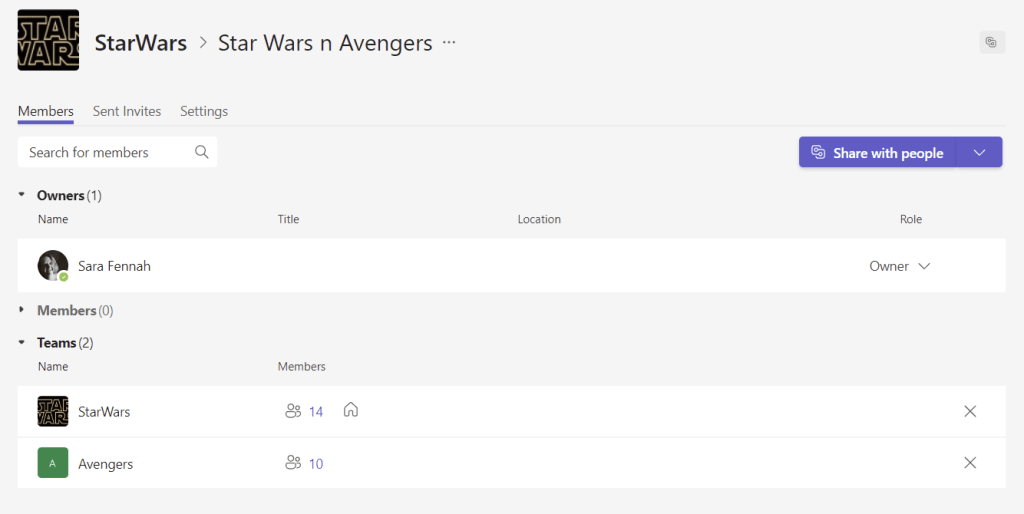
And we can now see both teams listed on the team members page
Channel setting page on the members tab, showing current user as the owner with both the StarWars and Avengers teams listed as a members. The Avengers Team now shows 10 members, illustrating that as team membership changes this is reflected in the shared channel.
Members of the Avengers team will not see the shared channel in the list of channels within their own team.
Avengers team list of channels including 3 original channels, plus the Star Wars n Avengers channel with the shared channel icon beside the channel name.
All the channel content is exactly the same across both teams and both teams can use the channel from within their team as any other channel.
Teams for Black Widow, showing only Avengers team with shared channel selected showing the same welcome announcement. There is now also a reply from Black Widow “On behalf of the Avengers team, looking forward to this project”. Avengers in this post is an @ mention so notifying the Avengers team of the post.
As we are members of both teams we see the shared channel in both teams.
List of channels for user in both teams showing the same shared channel, Star Wars n Avengers, listed in both teams.
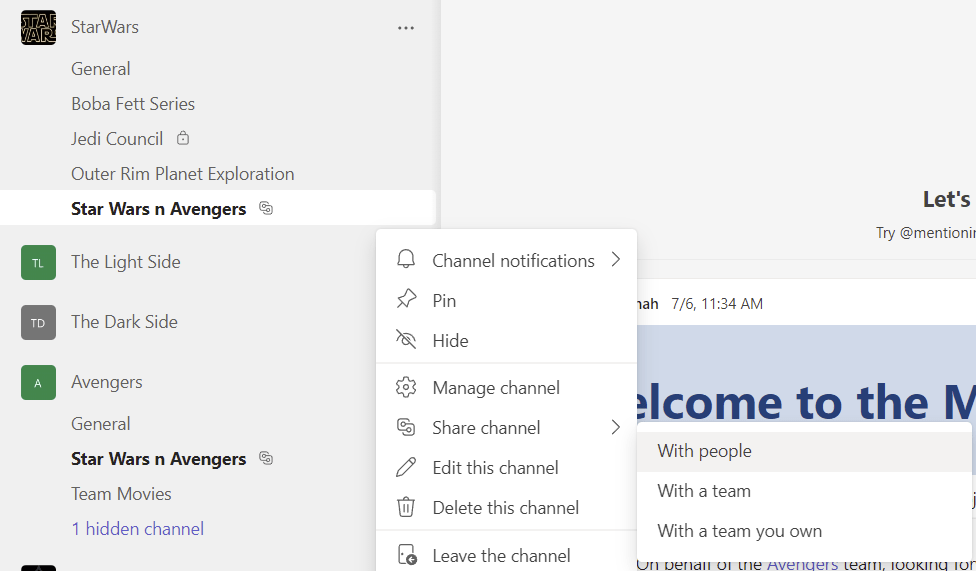
Another way to share the channel is from the … menu next to the channel, rather than needing the access the channel management page first.
… menu for the shared channel expanded and Share channel option selected to bring up options to share the channel with people, with a team or with a team you own. These are the same options as from the Share channel button on the members tab of the channel settings page.
External Collaboration settingsB2B Direct Connect settings
*Note: That Channel sites used to create a channel folder in the Documents library as for standard channels. However this is no longer the case going forward. Older private channels will keep their existing structure.
Cameo in PowerPoint is a feature which embeds webcam video into your slides, which means you can position your webcam where you want. Initially this feature was best used for recording content with PowerPoint, but it is now also supported by Microsoft Teams when presenting using PowerPoint Live. This means that your web cam will be positioned on the slide in the camera object, rather than in the normal meeting video position in Teams meetings.
Note: At time of publication (July 2nd 2022) Cameo in PowerPoint is only available in Office Insider Beta channel and in Teams meetings using Public Preview. These features are scheduled for general availably in September 2022.
Screenshot showing presentation inside Teams meeting with webcam in object on the slide
This feature is limited to the full desktop client, meeting recording, web & mobile clients show standard layout.
To use this feature, you need to prepare your slides to include the cameo object and then share into the meeting using PowerPoint live.
For more detailed instructions follow the following step by step instructions or view a video of these steps at https://youtu.be/AgfNgCoRxJc
Step 1: Create Your Presentation
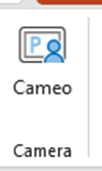
Build the presentation as normal, adding the Cameo object to each slide. To insert the camera placeholder select Cameo from the Insert ribbon tab.
Cameo button from the Insert ribbon tab
Adjust the size and position of the object on the slide and format the object using the Camera ribbon tab to best fit your content.
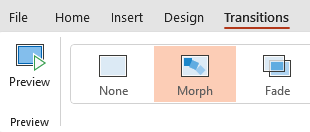
The Morph transition gives a smooth visual change between slides, especially when the cameo object is a different shape and/or in a different position on the slide. Apply the transition by choosing Morph on the Transitions ribbon tab
Transitions ribbon tab with Morph transition selected
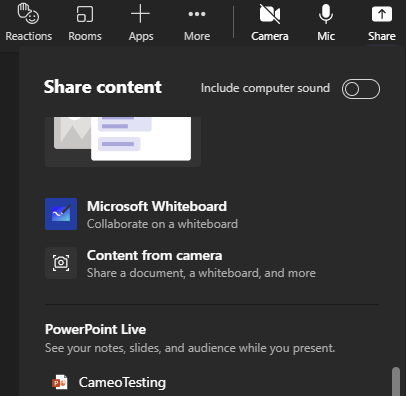
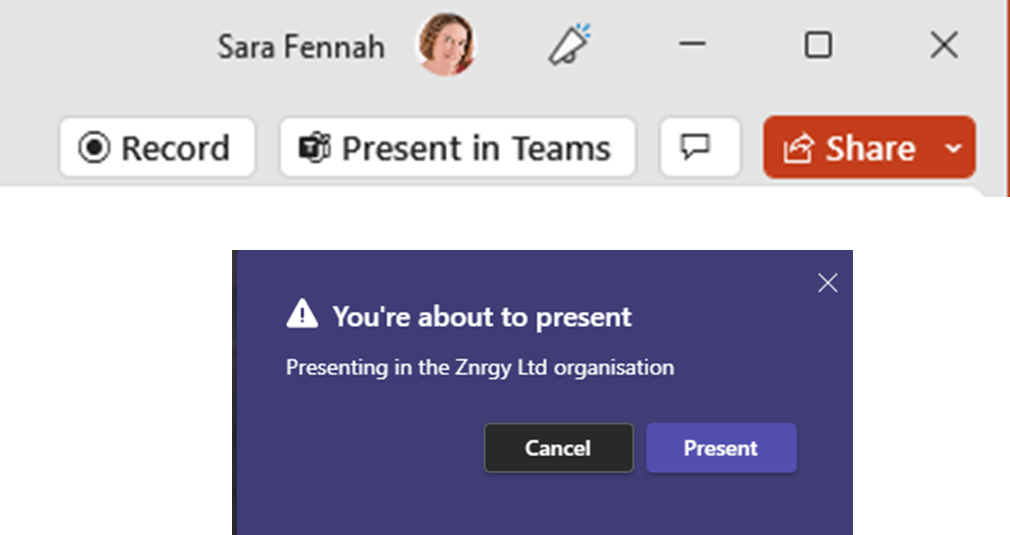
Step 2: Present in Teams
To share a presentation using PowerPoint Live choose the desired presentation from the Share button in the Teams meeting.
Share menu in Teams meeting showing file in PowerPoint Live list
OR…
Once you have joined the Teams meeting and opened the presentation in PowerPoint on your device and select Present in Teams button then confirm in the meeting by selecting Present.
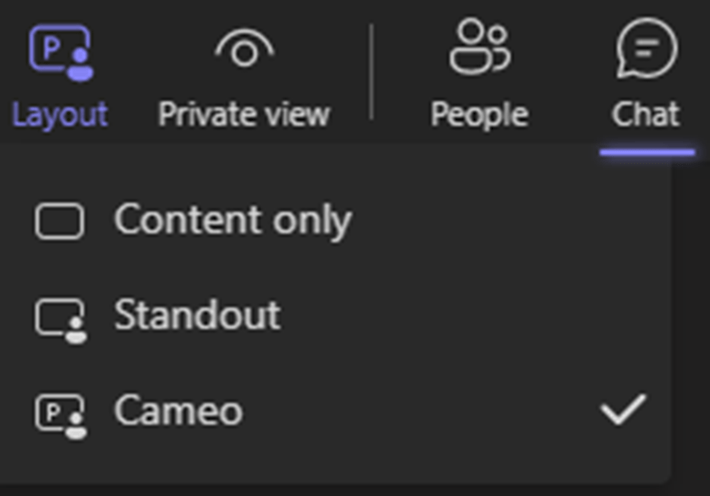
Step3 : Camera on and Choose Cameo Layout
In the meeting ensure your camera is on and virtual background enabled (if using a virtual background), then choose Cameo from the Layout button on the meeting toolbar.
Meeting toolbar with layout option expanded showing Cameo selected with other options of Content Only and Standout available.
Do you take your laptop or mobile into a meeting in a Teams Meeting Room? If you do this blog is for you.
Casting
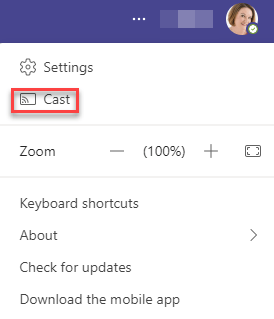
If you have you device with you and simply want to share something, there is no longer any need to connect your laptop to the meeting room system. The cast feature uses bluetooth to locate the meeting room, so both the companion device and meeting room need bluetooth enabled for this to work. First choose Cast from the …menu
Teams Desktop … Menu with Cast option highlighted
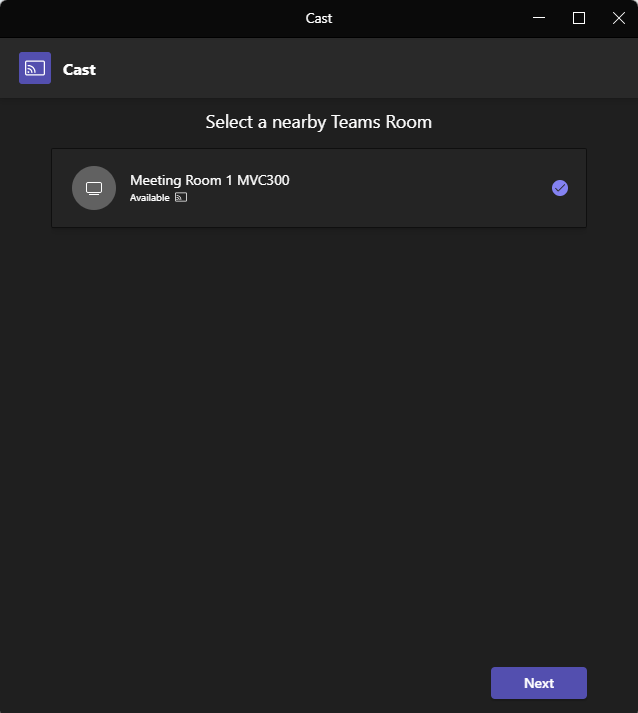
Then wait for your device to locate the meeting room and select the room and click Next
Teams room selector showing only one available room, which is ticked
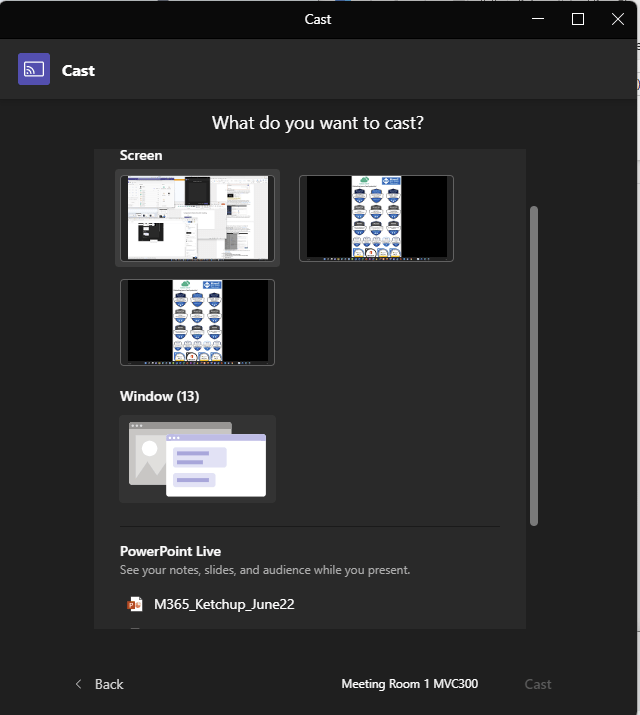
Select the content you wish to share and select Cast
Cast Window showing available sources from local machine
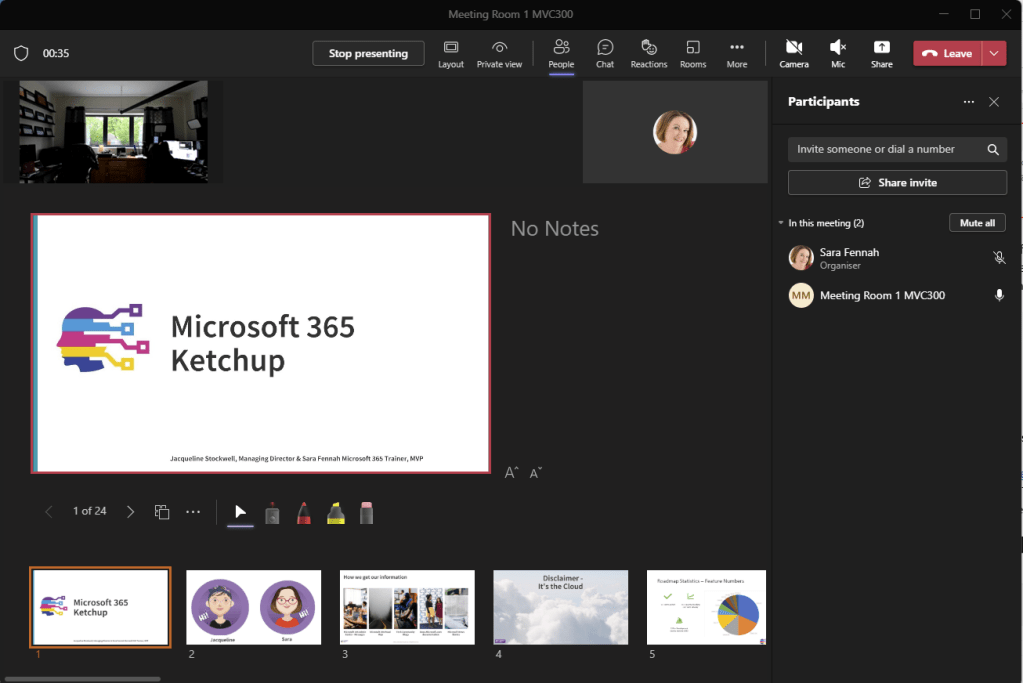
Your device will automatically join the meeting in ‘companion’ mode, with the camera, speaker and microphone off, and share the content.
Microsoft Teams on Desktop showing meeting screen with content shared with the sound and camera off.
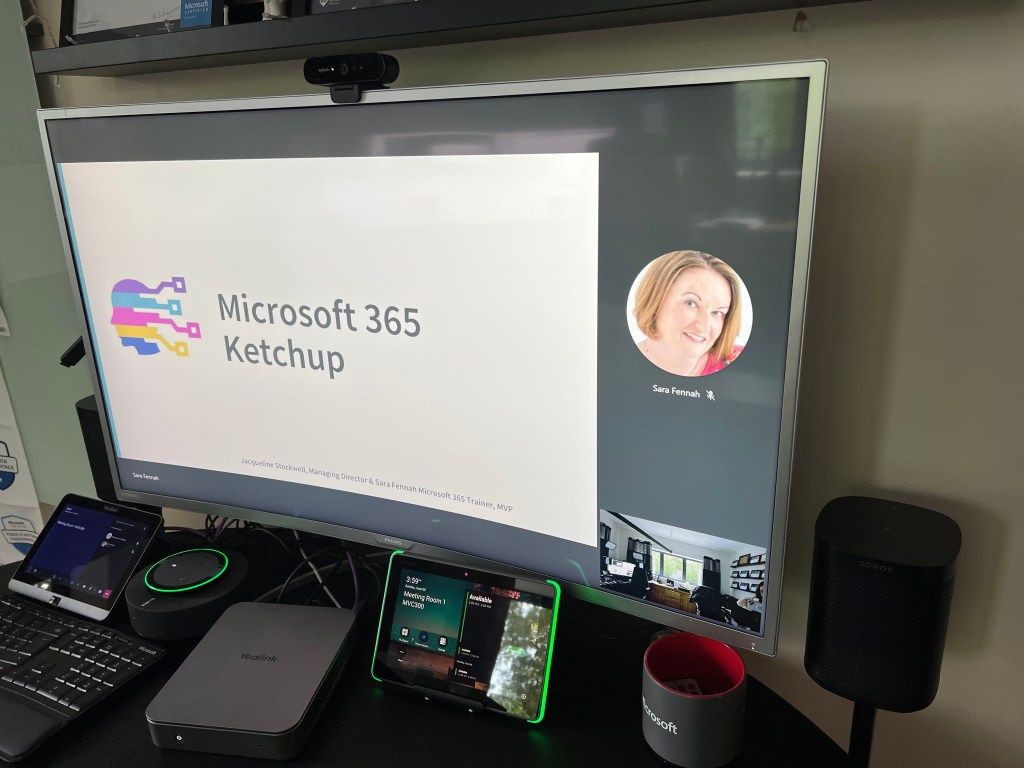
The meeting room screen will show the shared content.
Meeting room showing shared content and virtual attendee.
Companion Mode
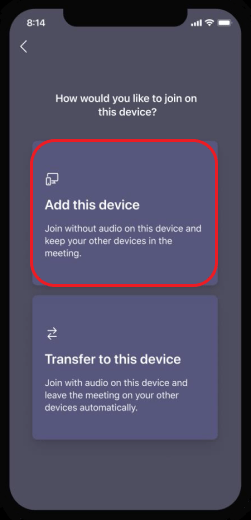
Companion mode (not its official name) is where you join a meeting but select the meeting room as the audio device. Note this is different to joining the meeting as yourself from a second device, here we are joining as ourselves but with audio disabled. For more information on joining as yourself from two or more devices see the guide for joining a Teams meeting on a second device from the Desktop or Mobile.
To join using room audio from a mobile device, open the meeting from your calendar and select Join. The Teams meeting should detect the room audio if the meeting is already in progress and default to that option.
Join meeting screen with meeting room audio selected
If you join from a meeting reminder, you will see the following screen, if the meeting is already in progress in the meeting room and should choose Add this device.
Meeting join choices screen on iOS with Add this device option highlighted
Once you are in the meeting, you can use the chat, reactions etc.
Meeting menu on iOS device
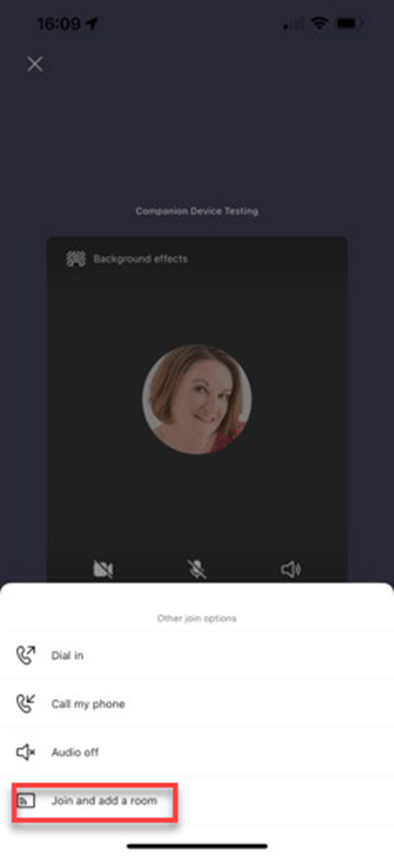
If the meeting has not started on the meeting room device, you can still join the meeting from your device and choose the room audio, by selecting the arrow on the Join Now button and choosing Join & add room.
Meeting join screen with join and add room audio option highlighted
Nearby rooms should appear automatically or you can search. Select required room and choose Join
Meeting room search screen with nearby rooms showing
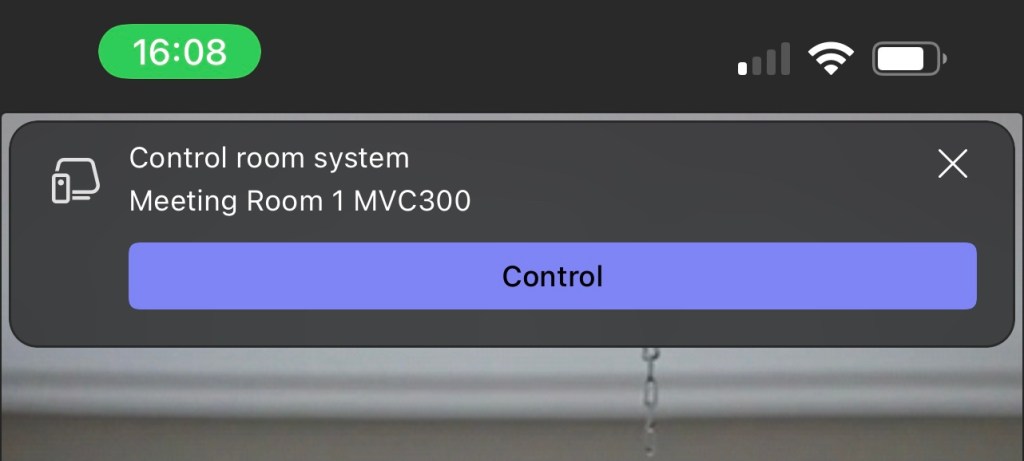
As the meeting had not started you will now also see the option to open meeting room controls.
Control room system screen with Control button to open controls
The meeting room controls allow you to control video and audio as well as select display layouts such as Front Row or Gallery.
Meeting room control panel with volume, video, mute, captions and layout options
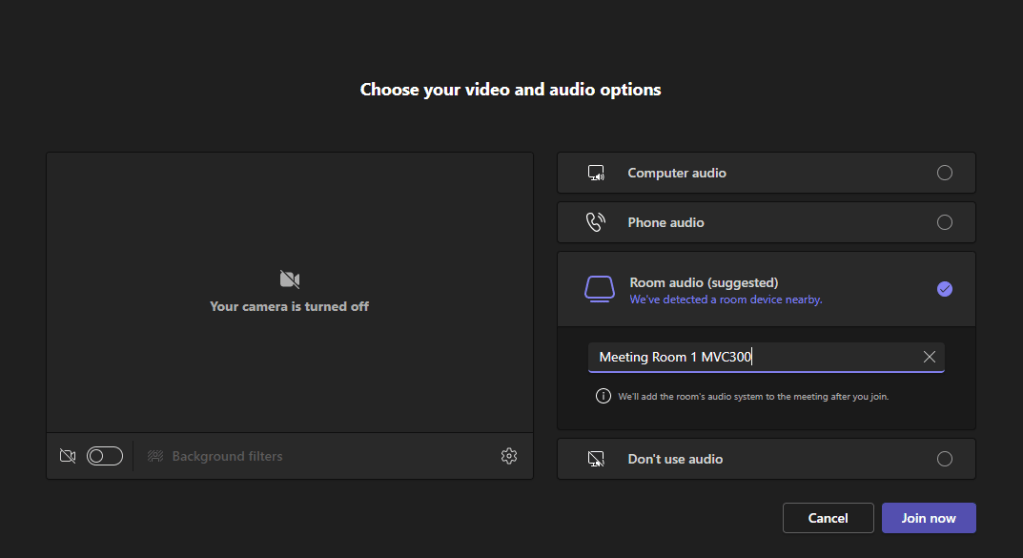
Should you with to join a meeting from a laptop or Mac then you should select the room audio on the join screen to join in companion mode.
Desktop meeting join screen with room audio option selected
Once you join the meeting from your desktop, you will see the camera is off and the mute button is replaced with a different icon to indicate all sound is disabled on the device.
Meeting tool bar in companion mode on desktop client with camera off and audio disabled
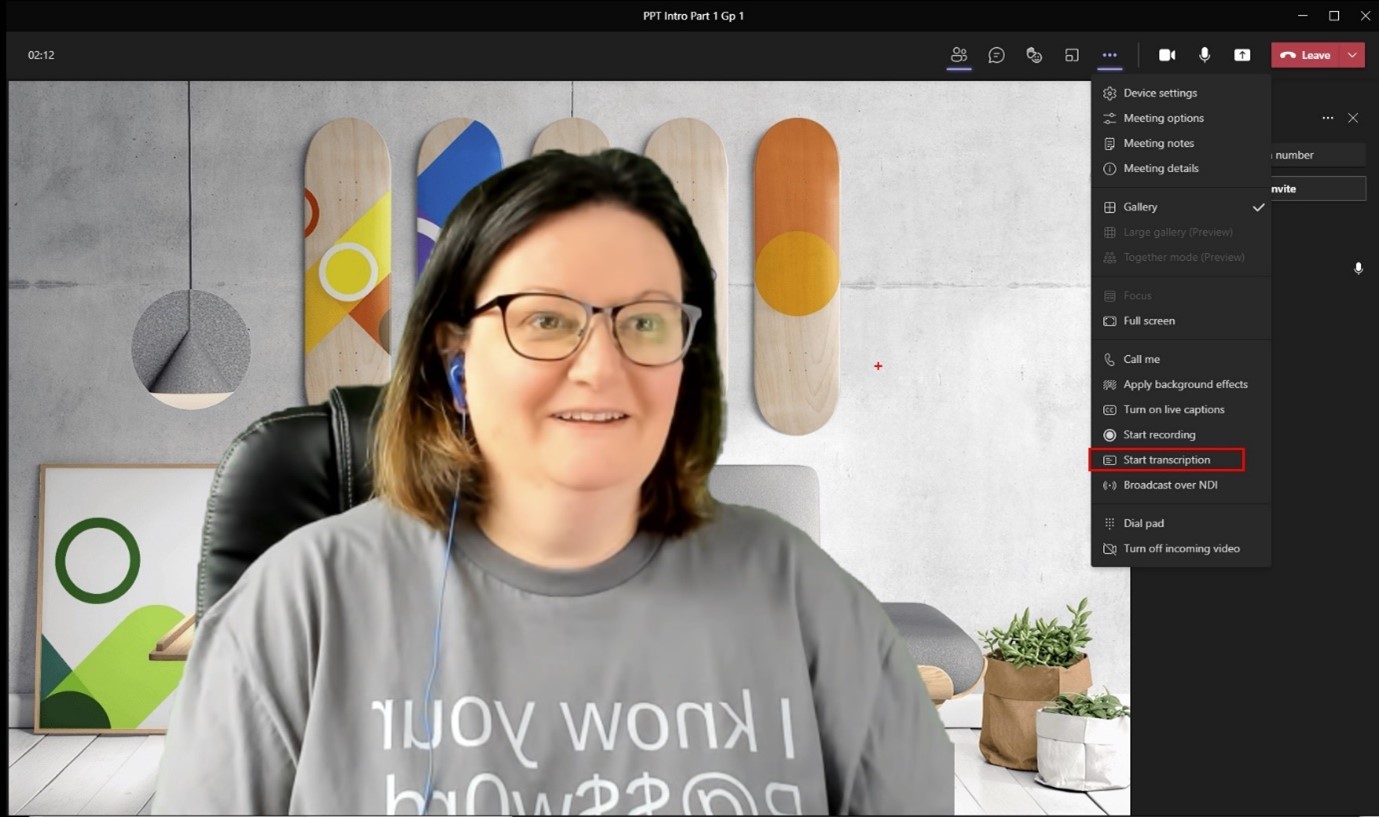
You may have started to see meeting expiry recording notifications in Microsoft Teams. Before you panic, you it is simply letting you know that the expiry date is now being enforced.
Meeting recording expiry is set by the meeting policy assigned to the user who recorded the meeting.
The person who recorded the meeting and the meeting organiser can view and edit the expiry date by clicking here in the message View or change the expiry date here.
This will take you to the recording. Clicking the i icon will open the file properties pane, which includes the meeting expiry date.
Once you start playing a meeting recording you will also see some icons on the top right.
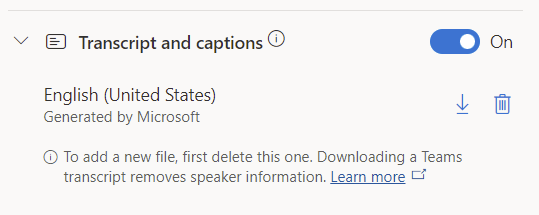
Video settings enables the automatic generation of a video transcript or upload, if one has already been generated, as well as the creation of chapters in the video and toggle to turn on/off the About video section.
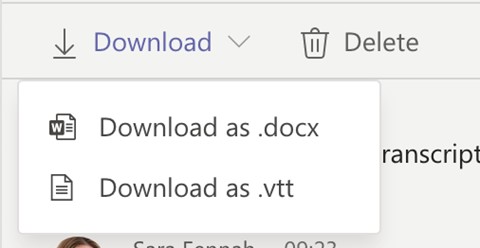
Once a transcript has been generated it can be downloaded.
About Video, includes the title which was taken from the meeting title, but can be edited and a description added as well.
The transcript shows up from the Transcript button, and the transcript can be used to navigate through the recording, by clicking on to the text in the transcript at the point of the meeting recording you wish to jump to.
With Chapters switch on, you can create chapters in the recording. Pause the recording where the new chapter should start and click the New chapter button, enter the chapter title and click the tick to create.
The chapters can then be used to jump to the marked point in the video.
Shared Channels are a channel within a Microsoft Teams Team. There are two stand out features which make this type of channel so eagerly anticipated
People (and Teams) can be given access to just the channel, without needing to join the team
Even channels hosted by another organisation are found in the list of Teams without any need to switch organisation. For anyone used to organisation switching they will know this is a big bonus.
Setting up shared channels is not the simplest process. In this walk through we will see the process to set up a shared channel from the hosting organisation and from a joining organisation.
NOTE: All Shared Channel features are OFF by default.
Organisation 1 – The Host
Shared Channels are set up by one organisation which we will call the host. The channel and all the information in it are stored in their tenant and subject to their security & governance controls.
To act as a host organisation you need to:
All channel owner(s) to create Shared Channels and invite external users to the channel using a Teams Policy
Allow member and owner users to enable Teams Public Preview (This is only required whilst the feature is in preview)
Enable inbound B2B direct connect. This can be open (not recommended) or per external organisation (recommended)
Organisation 2 – The Collaborator
In order to allow your users to join a shared channel in another organisation you need to:
Allow users to join external shared channels using a Teams Policy
Allow users to enable Teams Public Preview (This is only required whilst the feature is in preview)
Enable outbound B2B direct connect. This can be open (not recommended) or per external hosting organisation (recommended)
Setting Up Collaboration – A Walk Through
In this walk through we are setting up a Shared Channel called Viva Explorers in the organisation SaraFennahMVP (the host organisation). In this channel we are intending to invite users from Contoso (the collaborator organisation) to join. Administrators from the two organisations will work together to set up the collaboration. Starting with the hosts.
Setting up to Host a Shared Channel
Step 1 – Configure Cross Tenant Sharing for a Specific Domain
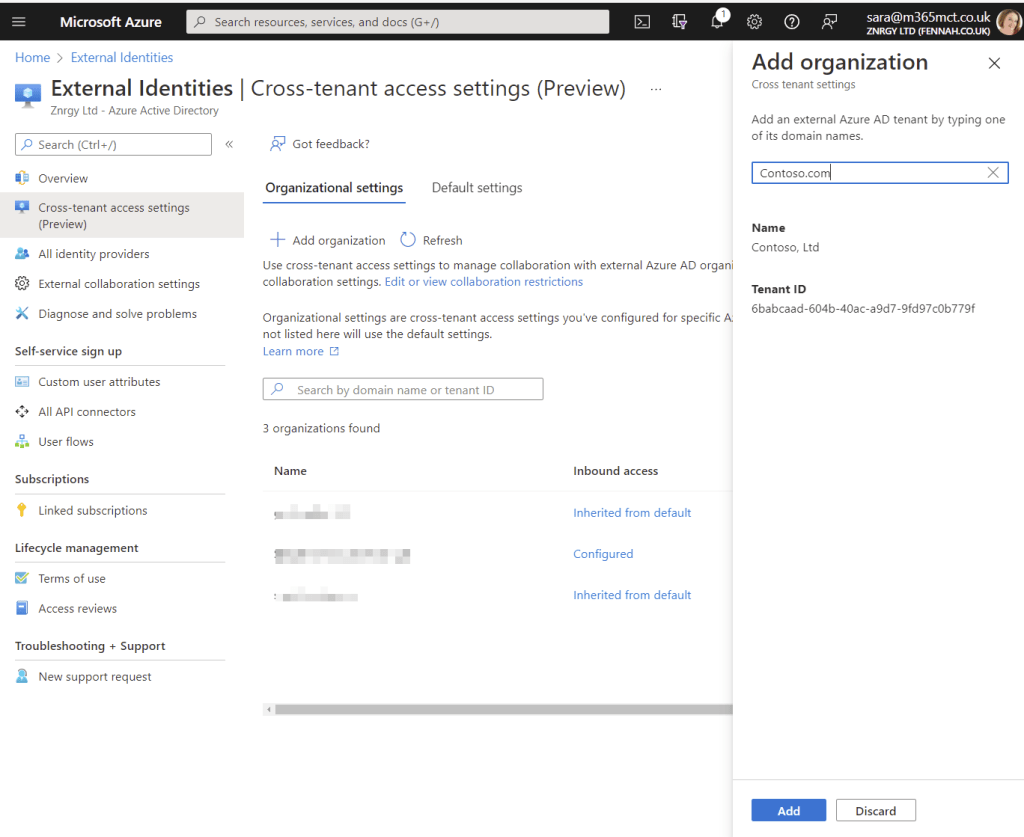
In our scenario the Global Administrator for SaraFennahMVP needs to configure external collaboration to allow users in Contoso to join the channel.
Search for the organization using domain name, this is case Contoso.com. Please remember that many organisations have multiple domain names registered. To avoid confusion, it is best to check with a Microsoft 365 administrator at the partner organisation for the domain. This will also allow you to verify tenant ID before opening up collaboration to ensure you are opening your doors to the correct organization!
Select Add
The new tenant will be added with both inbound and outbound settings inherited from default settings.
To be able to host shared channels to which Contoso users can be invited customise the inbound settings by clicking Inherited from default link
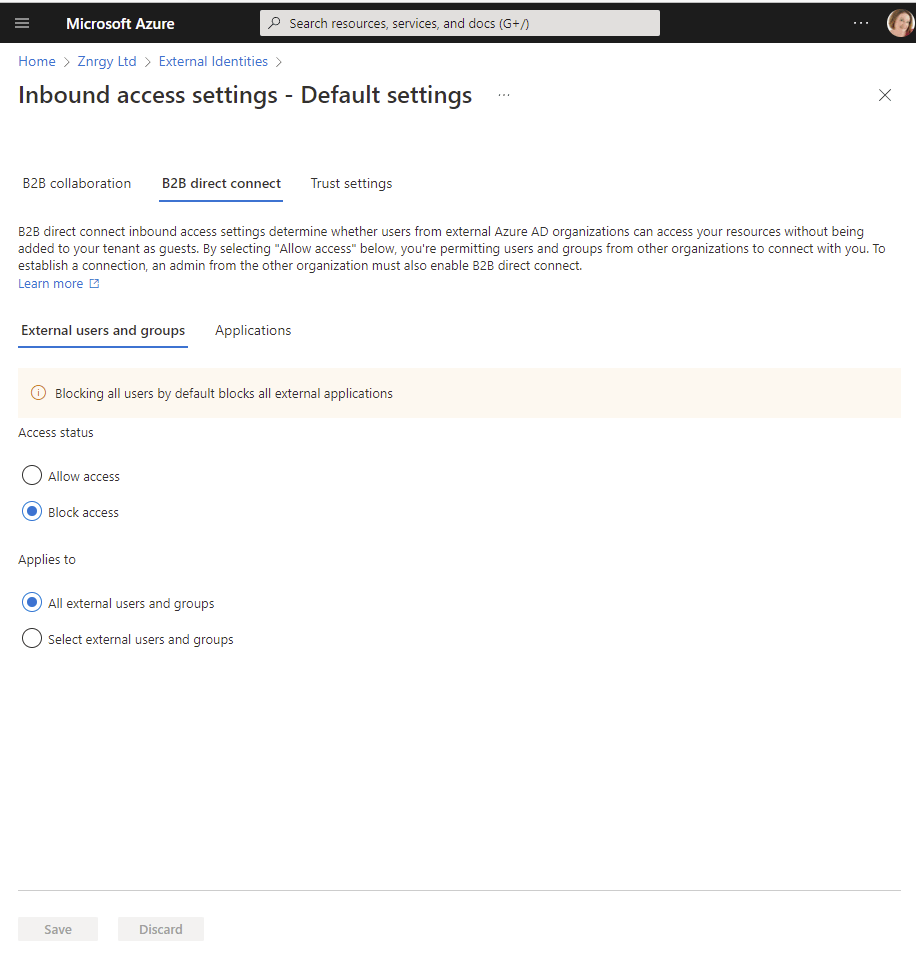
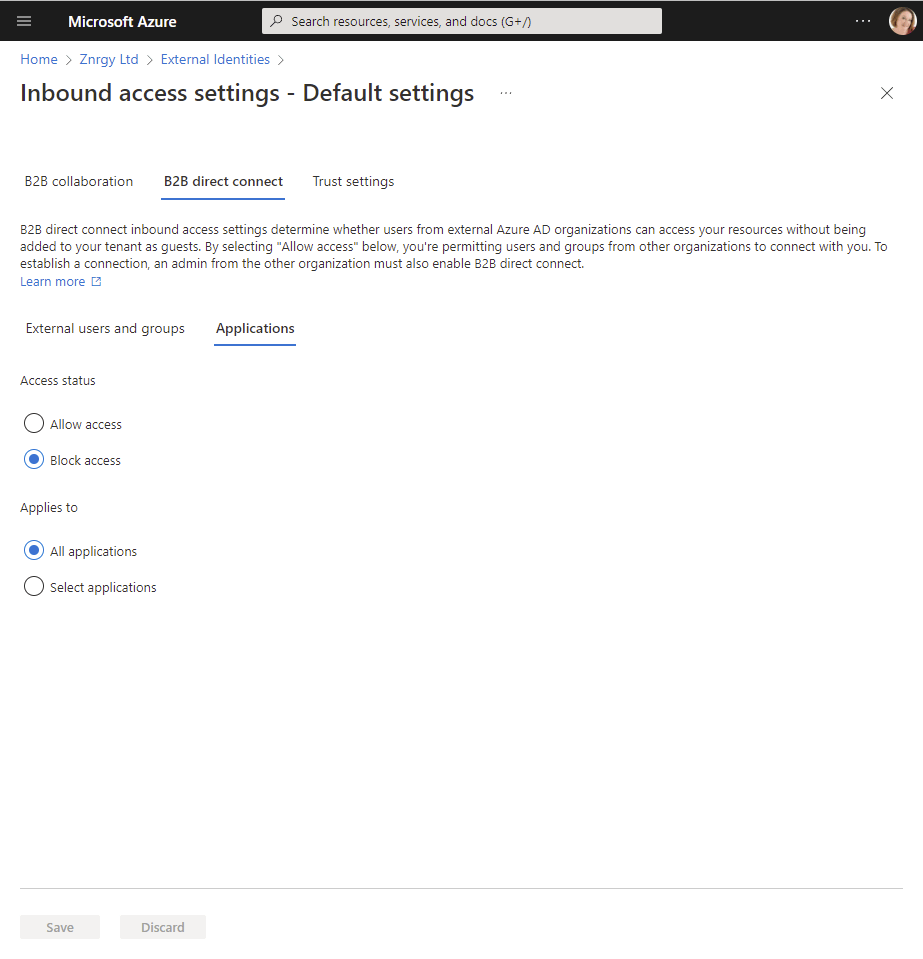
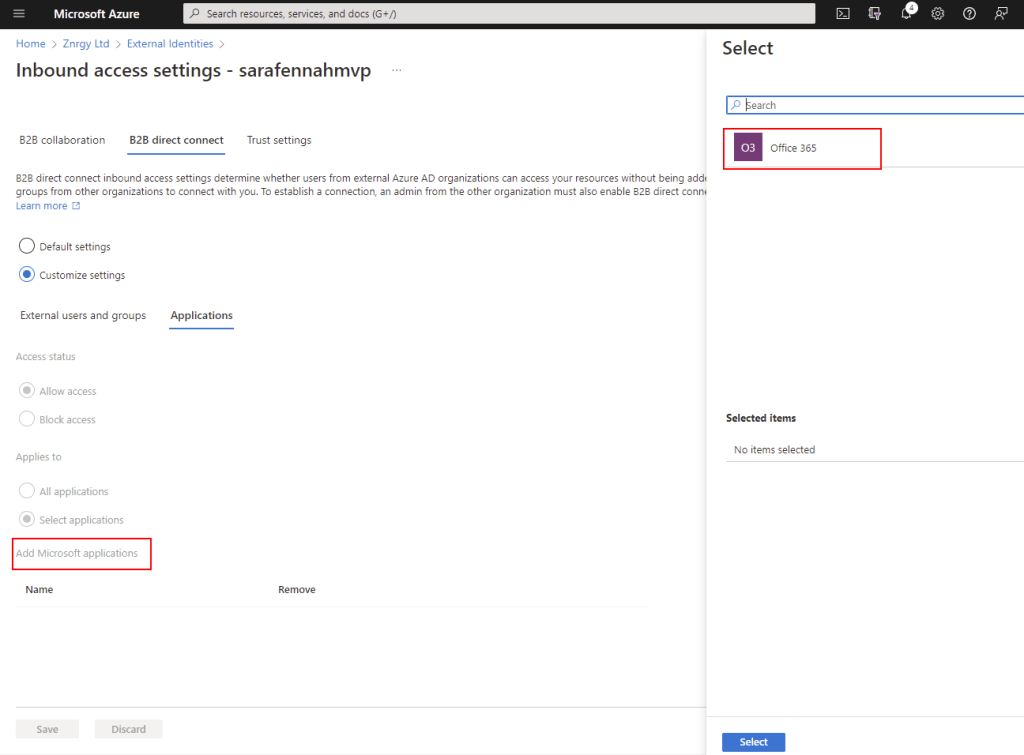
Under B2B direct connect for both External users and groups and Applications select Customize settings and choose Allow access on both for either All users or selected users/apps. For Teams Shared Channels, if you choose selected applications you will need to add Office 365
Verify Trust settings. I would recommend enabling Trust multi-factor authentication from Azure AD tenant as a minimum to reduce sign in and authorization friction for external users in shared channels.
NOTES:
There is no need to enable outgoing settings to HOST a shared channel, but for many organisations this is a two way collaboration so you may prefer to enable Outbound B2B direct connect settings too.
B2B collaboration is the ‘standard’ external sharing we are used to and is switched ON by default. These settings are outside the scope of this article, so for configuring Shared Channels, we recommend leaving those settings as the default.
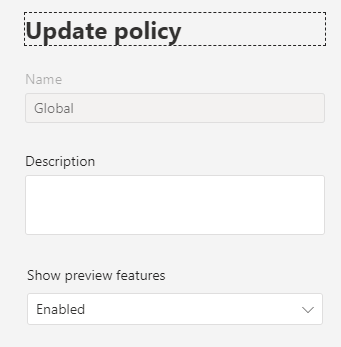
Step 2 – Teams Update Policy
To use Shared Channels during preview, users will need to be allowed to use Teams Public Preview. In our example all users in the tenant are to be permitted to use the preview features. The Teams Administrator in SaraFennahMVP sets the Global Teams update policy to enable preview features to allow this.
For more details about enabling and using public preview see this article on Microsoft Docs.
Step 3 – Teams Policy for Channel Settings
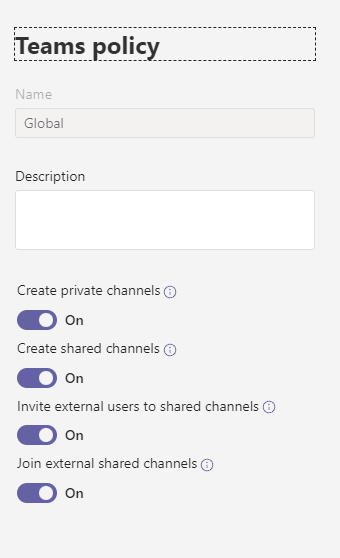
The Teams policy is used to control Private and Shared Channel features for your users. In our scenario the owners of the Viva Explorers channel will need to be assigned a policy which has the Create Shared Channels and Invite external users to shared channels settings enabled. In SaraFennahMVP all users are to be given the ability to create and join Shared Channel with organisations for whom we have configured B2B direct connect, so the Teams Administrator has updated the Global Teams policy.
You will then need to assign the policies to appropriate users. For details on the various methods of assigning Teams policies to users, please refer to this article on Microsoft Docs. In our scenario as the Global policy has been updated there is no need to assign the policy to anyone.
Step 4 – Create Channel
We now need to create the Shared Channel.
The owner of the team first switched to public preview and then creates the channel, picking the privacy of Shared Channel.
To create a shared channel in a team, from the … menu on the team choose Add channel
Step 5 – Invite Users to the channel
Before the host organisation can invite the external collaborators the collaborator organisation needs to complete their set up steps. The final step for the collaborator is to provide details of the users and/or teams in their organisation to be added to the shared channel.
Once our team owner receives these details they can add users to the shared channel by selecting Share channel from the … menu on the channel.
Setting up to Join a Shared Channel
Step 1 – Configure Cross Tenant Sharing for a Specific Domain
In our scenario the Global Administrator for Contoso needs to configure external collaboration to allow users in Contoso to access shared channels hosted by SaraFennahMVP.
To allow this the Global Administrators in Contoso needs to:
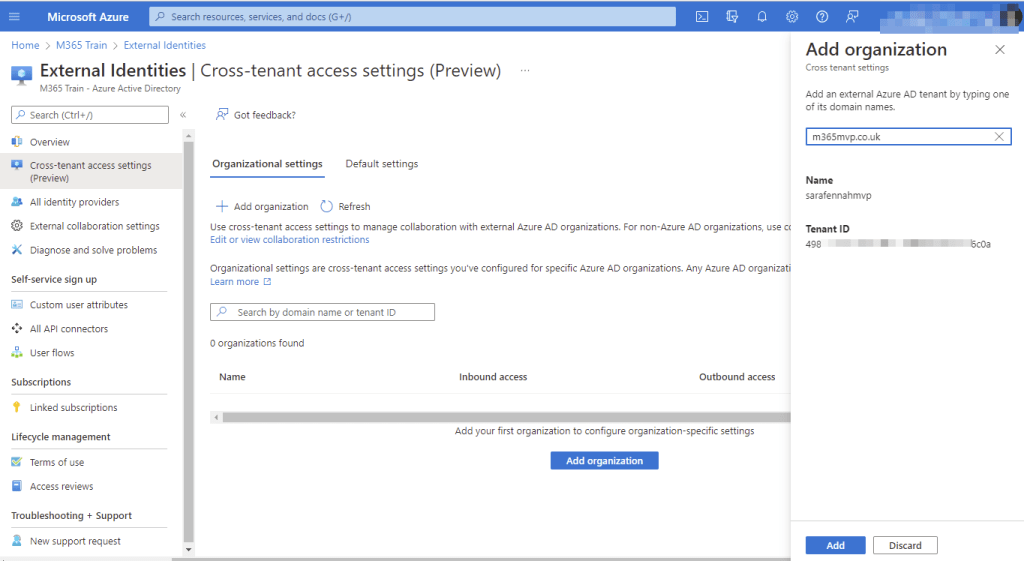
Search for the organization using domain name, this is case m365mvp.co.uk. Our global administrator has shared the tenant ID with the administrator at Contoso, so they can check they have found the correct tenant.
Select Add
The new tenant will be added with both inbound and outbound settings inherited from default settings.
To enable users to be invited to shared channels hosted by SaraFennahMVP customise the outbound settings by clicking Inherited from default link
Under B2B direct connect for both External users and groups and Applications select Customize settings and choose Allow access on both for either All users or selected users/apps. For Teams Shared Channels, if you choose selected applications you will need to add Office 365
Verify Trust settings. I would recommend enabling Trust multi-factor authentication from Azure AD tenant as a minimum to reduce sign in and authorization friction for external users in shared channels.
Click Save
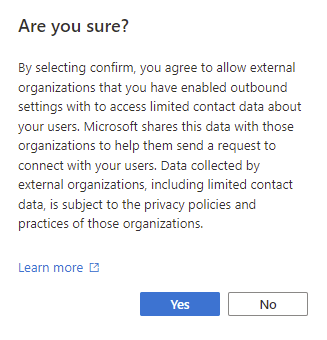
Confirm that SaraFennahMVP users will be able to search for users and teams in your organisation
NOTES:
There is no need to enable inbound settings to JOIN a shared channel, but for many organisations this is a two way collaboration so you may prefer to enable inbound B2B direct connect settings too.
B2B collaboration is the ‘standard’ external sharing we are used to and is switched ON by default. These settings are outside the scope of this article, so for configuring Shared Channels, we recommend leaving those settings as the default.
Step 2 – Teams Update Policy
To use Shared Channels during preview, users will need to be allowed to use Teams Public Preview. In our example all users in the tenant are to be permitted to use the preview features. The Teams Administrator in Contoso sets the Global Teams update policy to enable preview features to allow this.
For details about enabling and using public preview see this article on Microsoft Docs.
Step 3 – Teams Policy for Channel Settings
The Teams policy is used to control Private and Shared Channel features for your users. In our scenario those who are to join the Viva Explorers channel will need to be assigned a policy which has the Join external shared channels setting enabled. In Contoso all users are to be given the ability to create and join Shared Channel with organisations for whom we have configured B2B direct connect, so the Teams Administrator has updated the Global Teams policy to allow all shared channel features.
You will then need to assign the policies to appropriate users. For details on the various methods of assigning Teams policies to users, please refer to this article on Microsoft Docs. In our scenario as the Global policy has been updated there is no need to assign the policy to anyone.
Step 4 – Provide Contact Details to Shared Channel Owner
In order to invite external people to the team, the team owner needs the email address of the people to be invited. In order to invite a team the team owner needs to be first invited, again using the email address. So the contact at Contoso needs to send a list of the email addresses of individuals or email address of the Teams Owners of teams to be invited.
In this scenario only 3 individuals from Contoso are going to be added to the Viva Explorers Shared Channel, so the Viva Explorers lead at Contoso sends the Teams owner at SaraFennahMVP the 3 email addresses.
Step 5 – Joining the Shared Channel
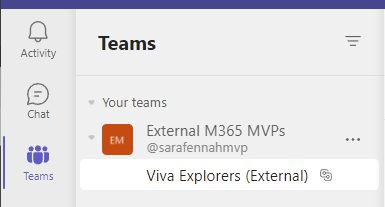
The users at Contoso will see a notification in Teams showing they have been added to the Shared Channel
The channel has also shown up alongside their normal teams.
When they first access the channel they will get a permissions pop up confirming connection to the SaraFennahMVP tenant.
Shared Channel References
Microsoft have published a series of resources about shared channels.
To celebrate the 5th Birthday of Microsoft Teams on March 14th 2022, I’m publishing this article help you rediscover one of the early features of Teams. After all, a birthday is a great opportunity to send Praise!
I’m often struck by how often people seem to think using the Praise feature in Teams is a bit of a gimmick. Maybe it’s partly due to the stereotypical British tendency to downplay achievements and adding a rainbow unicorn picture to a message to let someone know you appreciated them is not understated.
However, when you received that thank you message or congratulations on a job well done, didn’t it make you feel good? Now add the rainbow unicorn image to it and I challenge you not to smile.
Let’s share those smiles, send the praise and then look back to the history of praise received and sent and relive those smiles again 🙂
Here’s how!
From Chat & Channel Messages
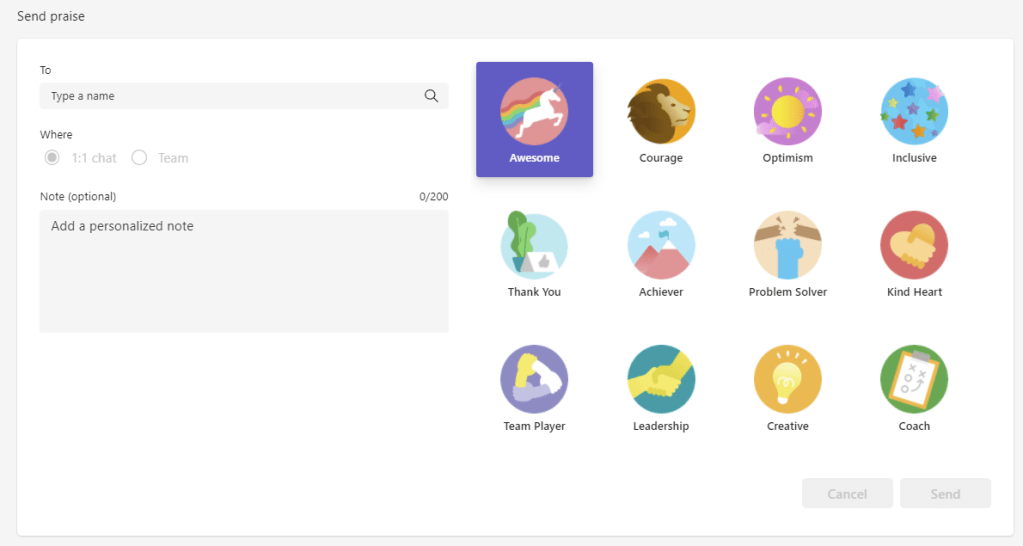
You can send praise with a Teams message in chat or in a channel using the Praise icon
Image of Teams Message compose box showing Praise icon highlighted
To compose your Praise message:
Use the Praise button to open compose box
Select badge
Enter Note (optional)
Choose Preview
Send
Image of a composed Praise message
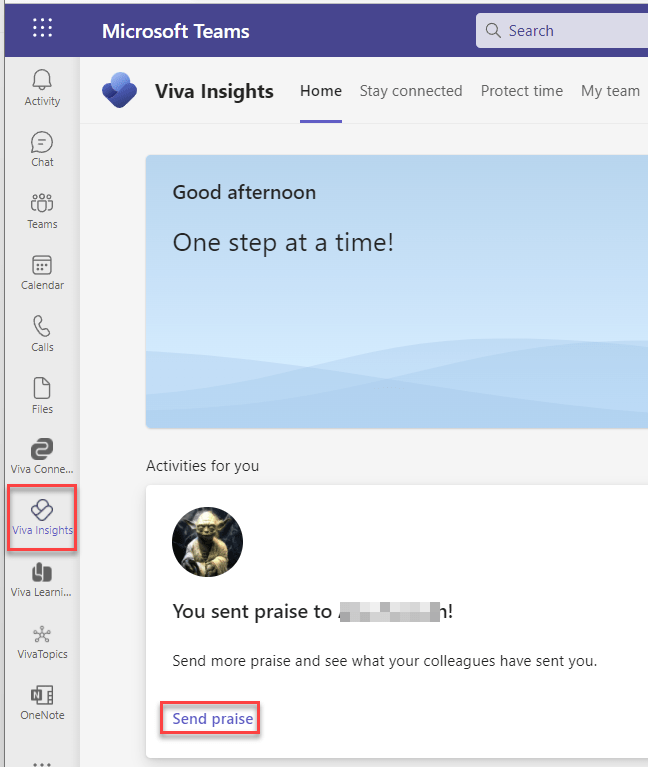
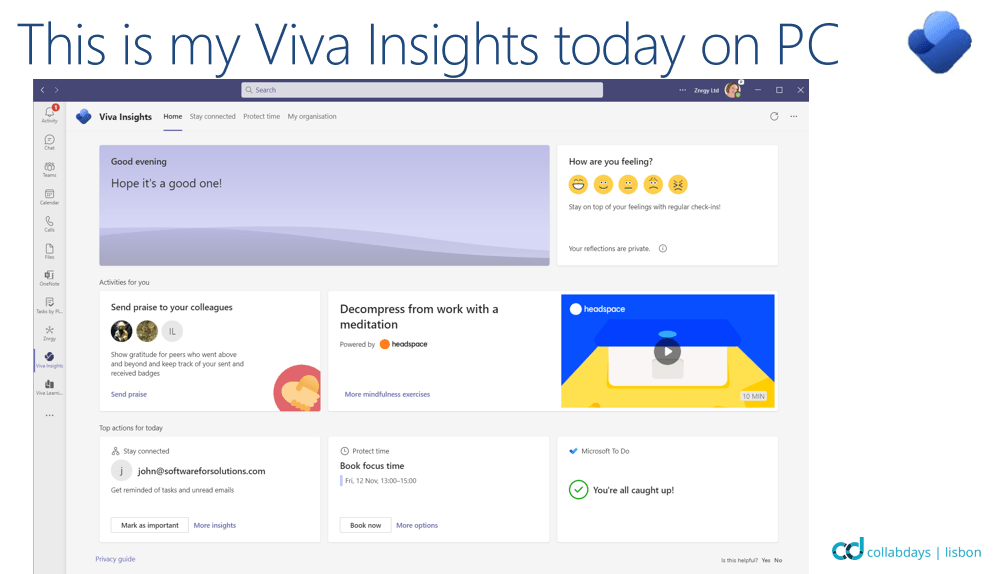
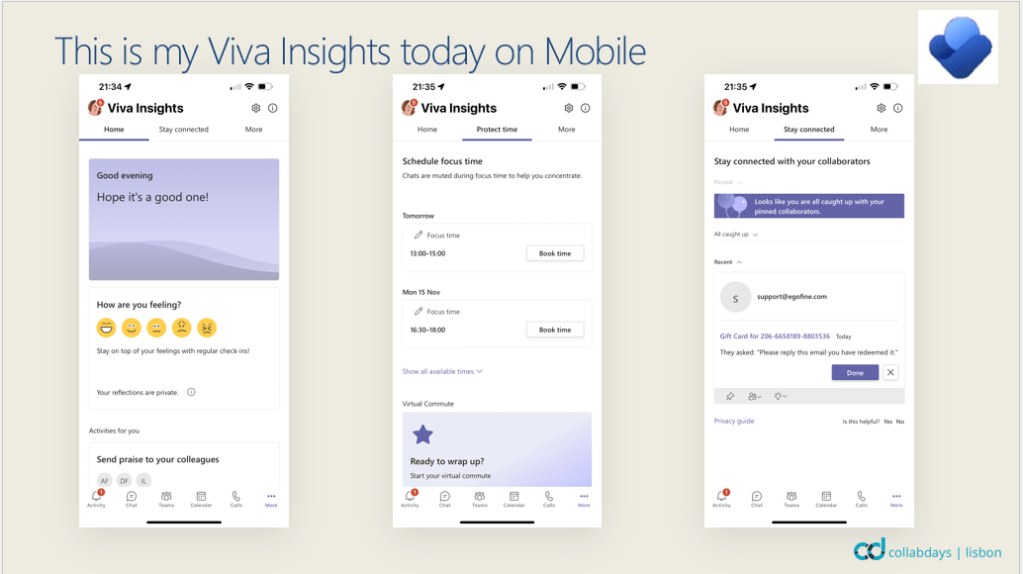
From Viva Insights
You can also send praise using Viva Insights in Microsoft Teams. On the Home tab of Viva Insights, you will see a card for Praise which includes a link to Send praise.
Image of Viva Insights App Home Tab with the Send Praise link highlighted on the Praise card under Activities for you heading
This gives you a similar compose praise experience as from the message compose box, but does also offer the choice of posting to 1:1 Chat or into a Team.
Image of Praise compose box where you can select badge, enter name, choose where to post and add an optional note
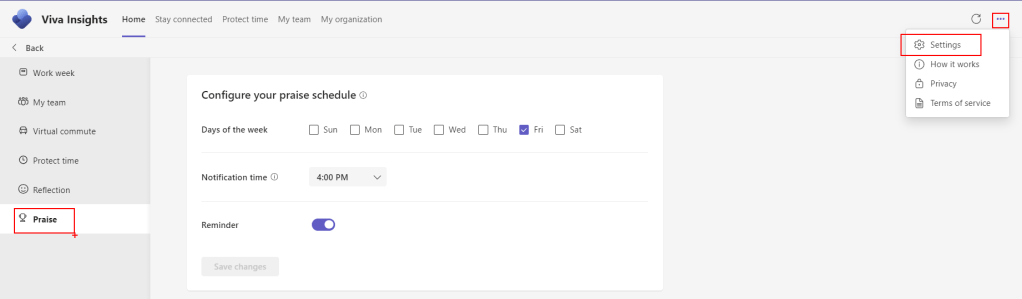
Scheduling Praise with Viva Insights
If you would like regular reminders to send Praise, perhaps at the end of each working week, Viva Insights includes a Praise shedule.
To see the praise schedule use the … menu at the top right of any Viva Insights screen and choose Settings then Praise to set the day(s) and time of day for the reminders.
Image of Viva Insights Settings screen with the menu highlighted and displaying weekday and time selector for Praise reminders
Praise History
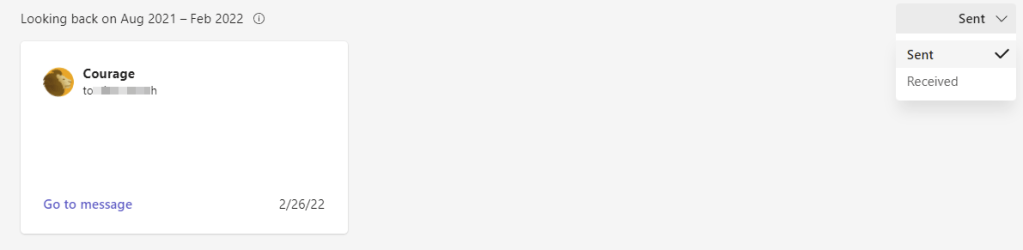
Whilst Praise has been with us from the early days of Microsoft Teams, Praise history is a new feature and links to Viva Insights.
You can access the Praise history in the Home tab of Viva Insights, using the link on the Home tab to Send praise. Below the compose praise screen is your praise history. With a selector at the top right to choose sent or received praise and a card for each message sent or received over the previous 6 months.
Image showing one sent Praise message in Praise history with sent/received selector open
Whilst we await the release of Shared Channels to Public Preview by end March 2022, there are a couple of things Administrators can be doing to prepare for, or indeed block, Shared Channels in Microsoft Teams.
DISCLAIMER: I am writing this article based on the information from the public announcements of Shared Channels (aka Teams Connect) and the settings discovered in my production tenant at the time of writing. It is possible that these features will change before and during public preview.
EDIT: For those who read this post on its original format, it has been updated. Cross Tenant access settings were not correct. B2B Direct Connect settings are the ones which control shared channels
Firstly, what are Shared Channels? Shared Channels were originally (and officially still are) called Teams Connect. They give you the ability to invite people to a channel in Teams, rather than the whole Team. They differ from Private Channels in that you do not need to be a member of the Team to be a member of a Shared Channel. Another big advantage of Shared Channels is that you will not need to switch tenants to see channels you are a member of regardless what organisation hosts the channel. Finally you will be able to invite whole Teams to a Shared Channel rather then just individuals and this includes Teams in other organisations.
The table below summarises the different features between the 3 types of channels in Teams
Standard Channel
Private Channel
Shared Channel
All Team Members are members of the channel
Only invited Team Members are members of the channel
Anyone can be invited to the channel without needing to be a member of the Team
Supports External members
Supports External Members
Supports External Members
Full range of Tabs
Limited range of Tabs (Notable exclusions are Planner & Channel Calendar)
(TBC, expected to mirror private channels) Limited range of Tabs (Notable exclusions are Planner & Channel Calendar)
Can invite Internal Teams, Internal Users, Guest Users with MSA & AAD
Can invite Internal Teams, Internal Users, Guest Users with MSA & AAD
Expected to support only B2B AAD users & Teams, both Internal & Guests, as relies on cross tenant access settings which do not include options other than for AAD.
Definitions
AAD = Azure Active Directory (Enterprise/Business/Education/Government)
B2B = Business to Business (refers to a relationship between two AAD tenants)
MSA = Microsoft Account (Personal/Family)
NOTES: I’ve kept these definitions purposefully simplistic. There are lots of nuances and details when working with identity (accounts) across organisations.
Whilst we expect the documentation on Shared Channels to be released with the public preview, there is already some useful information available on cross tenant access setting for Azure AD on Microsoft Docs. This feature will underpin collaboration between organisations, which Shared Channels will rely on.
In my production tenant, which is set to Targeted Release for Everyone, I do have these Cross Tenant Access Settings in the Azure AD Portal. In addition Shared Channel settings have appeared in the Teams Policies when working via PowerShell, though not in the Teams Admin Center.
If you wish to enable your users to use Shared Channels during the Public Preview, you will need to:
Configure Cross Tenant Sharing Settings
Allow access to the Public Preview in Teams via an Update Policy for Teams
Allow use of Shared Channels via the Teams Policy
If you wish to BLOCK Shared Channels for now, then you should disable B2B direct connect in Cross Tenant Sharing. This is the DEFAULT state tenants. You do not need to change the Teams policies for public preview and channel settings, however you may wish to use the Teams policies in place of disabling cross tenant sharing if you wish to allow selected users to test the features.
Disable Shared Channels
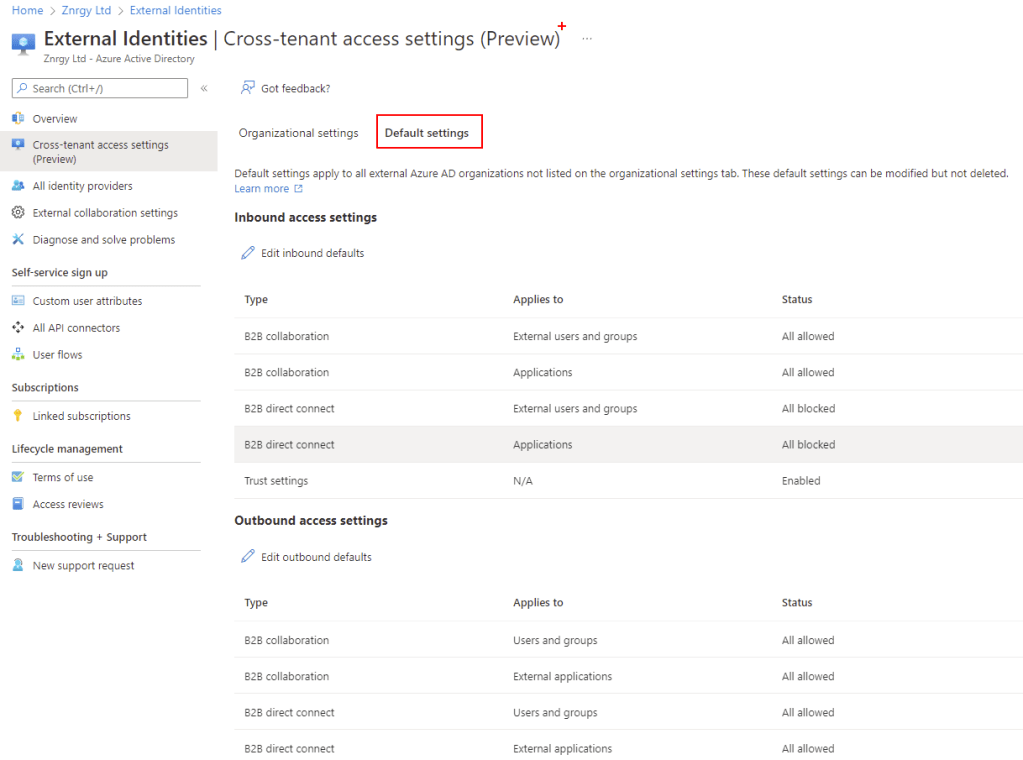
To Block all Shared Channel Features within your tenant and for users in your tenant, you need to configure default Cross Tenant Sharing to block all inbound and outbound collaboration. To do this:
Select Edit inbound defaults then select Block Access for B2B direct connect for All External users and groups
Select Applications and choose Block Access
Save your changes
Under Trust settings ensure all boxes are unticked and Save changes
Choose Edit outbound defaults then B2B direct connect
Block access for both Users & groups and External Applications
Save your changes
The Default settings should now look like this:
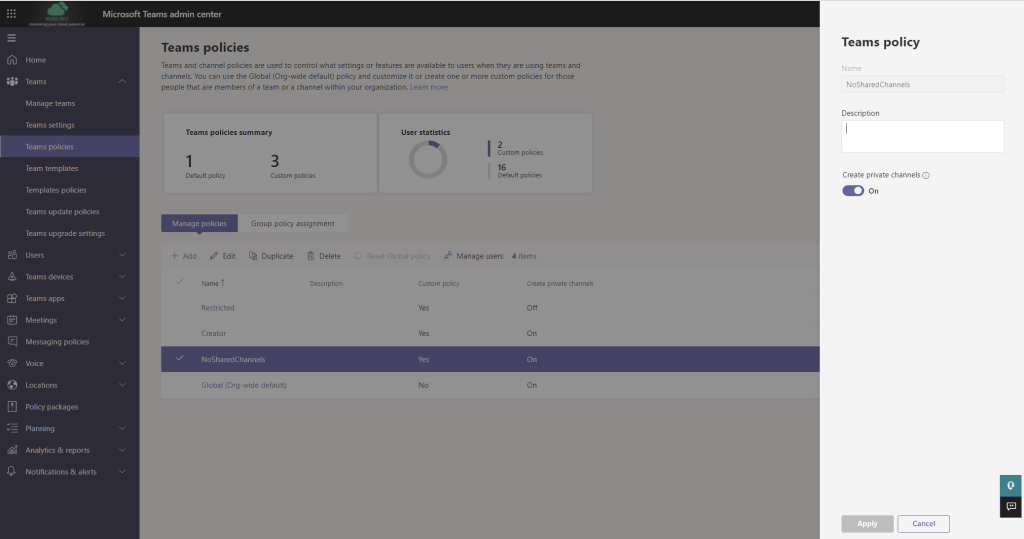
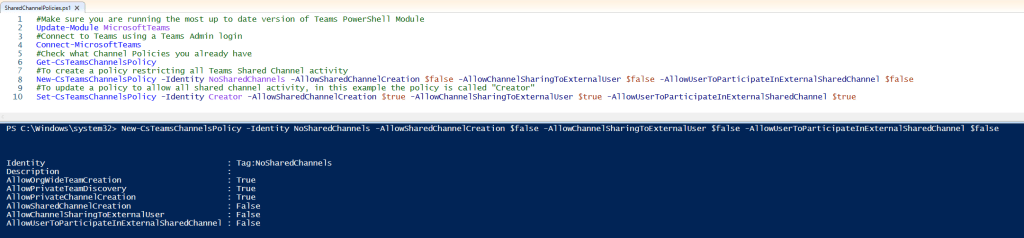
For the avoidance of confusion amongst users it is probably advisable to block all shared Channel activity in Teams too. Currently you need to modify policies using Powershell. This example would create a new Teams policy to block all Shared Channels called “No Shared Channels”:
NOTE: In the Teams Admin Center the Shared Channel settings do not show in that policy for all.
To block all shared channel features in the Global Policy, you would use
Set-CsTeamsChannelsPolicy -Identity Global -AllowSharedChannelCreation $false -AllowChannelSharingToExternalUser $false -AllowUserToParticipateInExternalSharedChannel $false
Teams policies can be assigned to individual users or Groups using Teams Admin Center, as well as using Powershell. For details on the various methods of assigning Teams policies to users, please refer to this article on Microsoft Docs.
When the shared channels features show in the Teams Admin Center the features can be configured as follows to block shared channels.
Allowing Shared Channels
To Permit Shared Channels with Specific Organisations is a 3 step process:
Step 1 – Configure Cross Tenant Sharing
Step 2 – Teams Update Policy
Step 3 – Teams Policy for Channel Settings
These instructions, assume you want to open communication with a specific organization, whilst it is possible to open communication with any organization, the recommended approach is to configure access per organization as shown here.
Step 1 – Configure Cross Tenant Sharing for a Specific Domain
Search for the organization using domain name. Please remember that many organisations have multiple domain names registered. To avoid confusion, it is best to check with a Microsoft 365 administrator at the partner organisation for the domain. This will also allow you to verify tenant ID before opening up collaboration to ensure you are opening your doors to the correct organization!
Select Add
The new tenant will be added with both inbound and outbound settings inherited from default settings.
To customise the inbound settings click Inherited from default link
Under B2B collaboration for both External users and groups and Applications select Customize settings and choose Allow access on both for either All users or selected users/apps.
Under B2B direct connect for both External users and groups and Applications select Customize settings and choose Allow access on both for either All users or selected users/apps. For Teams Shared Channels, if you choose selected applications you will need to add Office 365
Verify Trust settings. The exact configuration is not specified for Shared Channels. In terms or barrier to usage, I would recommend enabling Trust multi-factor authentication from Azure AD tenant as a minimum to reduce sign in and authorization friction for external users in shared channels.
Step 2 – Teams Update Policy
To use Shared Channels curing preview, users will need to be allowed to use Teams Public Preview. For details about enabling and using public preview see this article on Microsoft Docs.
Step 3 – Teams Policy for Channel Settings
For testing purposes it is recommended that you create a new Teams Policy which can be assigned to selected users for testing. The following script will create a policy called Creator which permits the use of Shared Channels.
If you are using a test tenant, you may wish to set the default Global policy to allow Shared Channels using:
Set-CsTeamsChannelsPolicy -Identity Global -AllowSharedChannelCreation $true -AllowChannelSharingToExternalUser $true -AllowUserToParticipateInExternalSharedChannel $true
You will then need to assign the policies to appropriate users. For details on the various methods of assigning Teams policies to users, please refer to this article on Microsoft Docs.
Once the settings appear in the Teams Admin Center, to permit shared channels the policy should be configured as follows:
Below is a screen shot of the script file I used preparing this article which you can download below.
For a while now we have seen many marketing and briefing images showing Viva Topics in Microsoft Teams, but there has not been an app, we can switch on.
“Transform your Topic Center into an app in Teams, by using your Topic Center URL by using a simple script available at https://aka.ms/TopicsApp“
The link takes you to the download for the original Viva Connections app install script. This means you are actually using the PowerShell Script from the first release of Viva Connections to create a Topics app in Teams. For anyone who ran the PowerShell script to create the v1 Viva Connections app, this process will be familiar. However this time you will be providing details for your topic center.
This is actually a nice easy way to deploy a web page as a Teams App. As the script provided by Microsoft, generates a full app manifest which includes recognising the user signed in to the Teams application.
Prepare
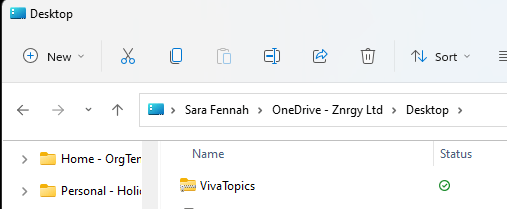
Extract the downloaded zip file to access the PowerShell script and also the ReadMe & License file.
When you run the script, you will be asked for the following information, so gather it ready:
Name – The name of your app, as it should appear in Teams app bar
App short description – A short description for your app which will appear in Teams app catalogue (max 80 characters)
App long description – A long description for your app which will appear in Teams app catalogue (max 4000 characters)
Privacy policy – The URL of the privacy policy for custom Teams apps in your company. Can be left blank (press enter to move on) and the default SharePoint privacy policy from Microsoft will be used.
Terms of use – The URL of the terms of use for custom Teams apps in your company. Can be left blank (press enter to move on) and the default SharePoint privacy policy from Microsoft will be used.
Organization name – Your organization name. This will be visible on the app page in Teams app catalogue under “Created By”.
Organization website – URL of Your organization’s public website. This will be linked to your company’s app name on the app page in in Teams app catalogue in “Created By” section.
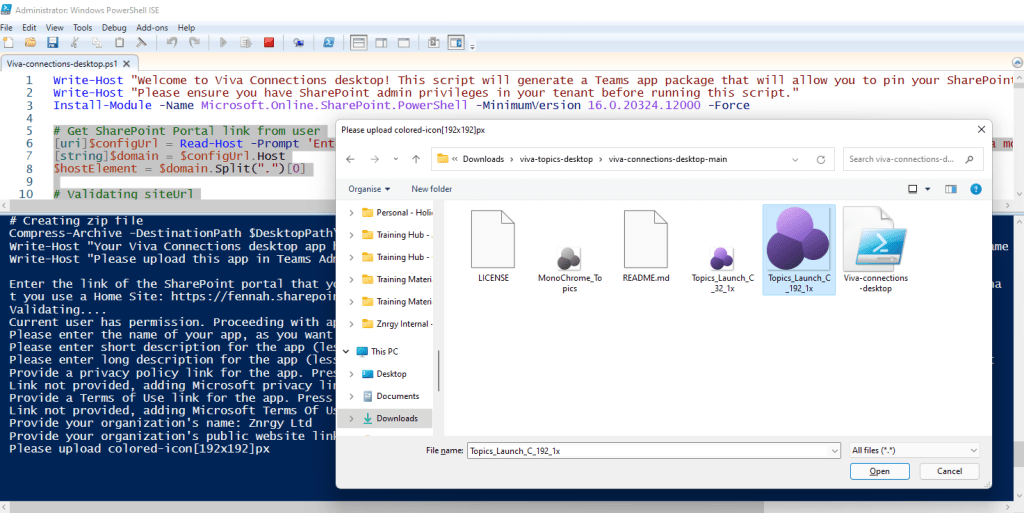
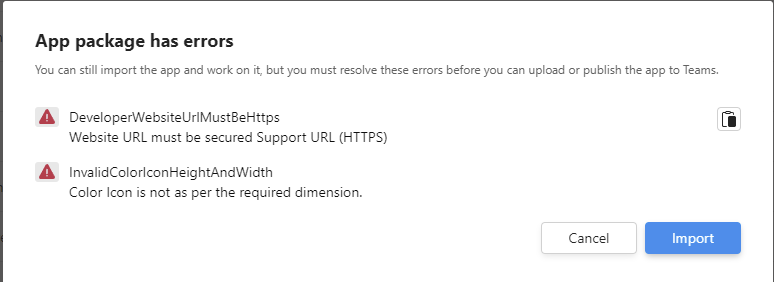
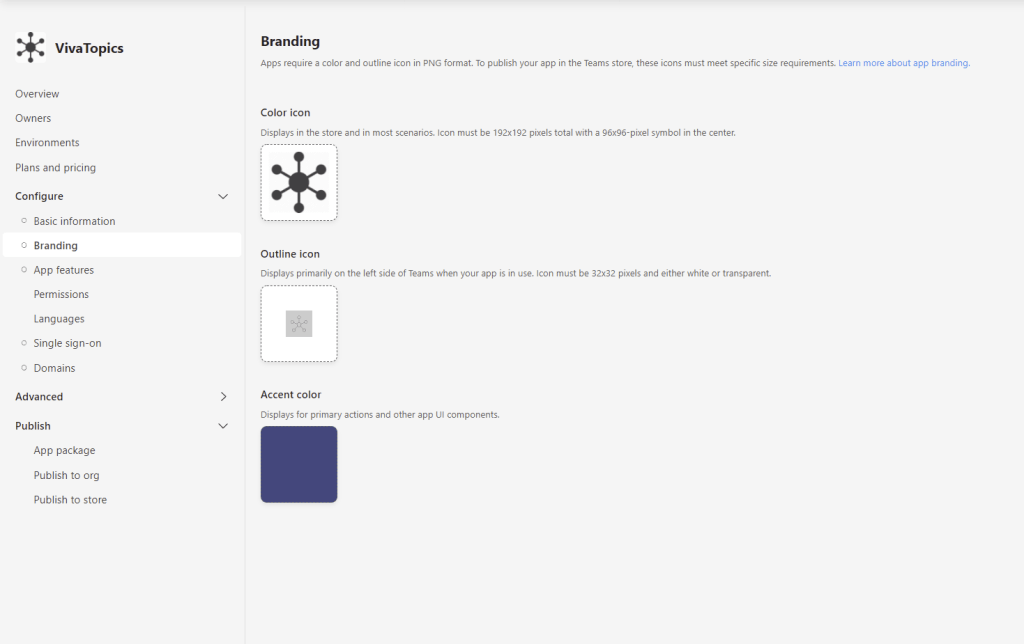
Icons – You will need to upload two PNG icons which will be for the app icon in Teams; a 192X192 pixel coloured icon for Teams app catalogue and a 32X32 pixel monochrome icon for Teams app bar.
Running the Script
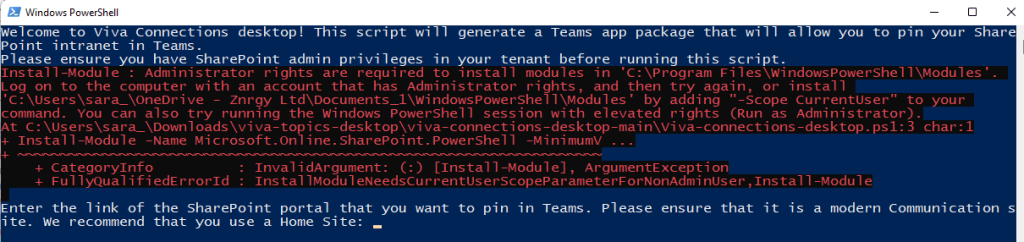
You can also run the script directly from Windows Explorer, from the right click menu.
This will run without admin rights on the computer, so you will see an error installing the PowerShell module. If the SharePoint Online module is already installed you can simply continue and ignore the error.
As I am running the script in PowerPoint ISE, I ran line 3 first then highlighted the remainder of the script to run that.
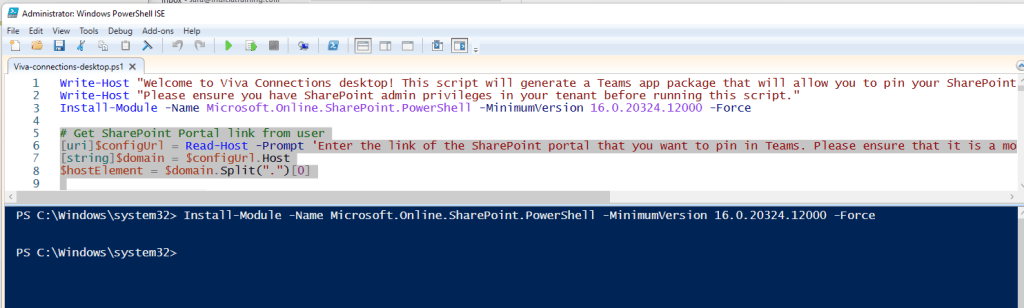
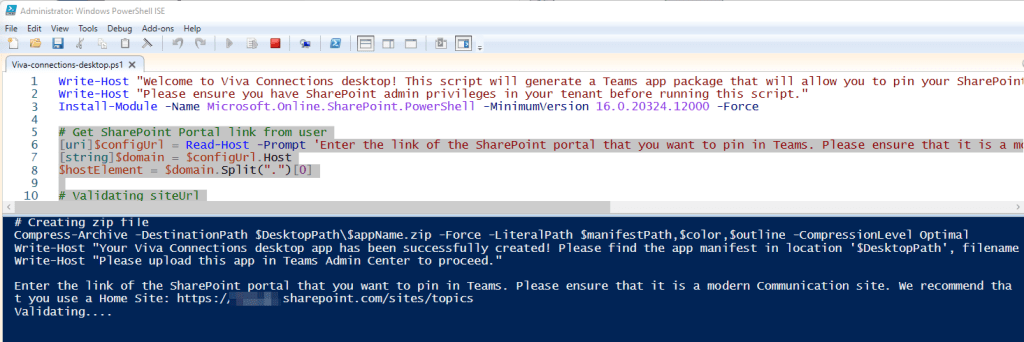
Prompt 1 is for the URL of the site. The script does ask for the home site, but as we are using it for Viva Topics, you should enter the URL of your Topic Center here.
Press Enter to continue and log in when prompted. You will need an account with SharePoint admin rights, as the PowerShell you are running needs those permissions.
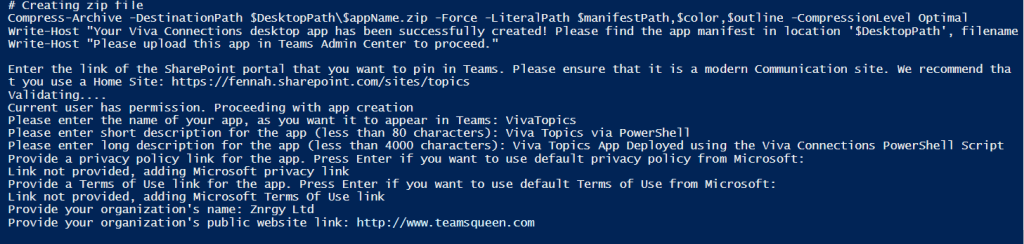
Next enter the name of your app and press enter. Spaces are fine, but I decided to go without, so that if we get an official app in future, this one is subtly different.
Next enter your short description for your app. This needs to be under 80 characters including spaces. This will be the description in the Teams app store.
Next enter your long description for your app. This needs to be under 4000 characters including spaces. This will be the displayed in the Teams app store.
You now need to provide the URL for a privacy policy in relation to this app. If you leave it blank and press enter the default Microsoft provided policy will be used
You can do the same for the Terms of Use. Here you can see both were left blank and the Microsoft provided policies were used.
Enter your company name for Organization. Again this is a good way to differentiate if we get an official app in future.
You MUST provide a publicly available website in this next step. I’ve used this blog in this example
Finally you can upload the icons. The colour icon will be used in the Teams App Store. I’ve used the Viva Topics logo here, but would suggest you use a custom logo to avoid confusion with any future official app. It is also easier to create the MonoChrome version.
Here I’ve used a greyscale version of the logo reduced to 32×32 pixels. However, ideally you want white outline. If you do not have graphic designers available the symbols in Microsoft Office make great icons!
The final step will let you know where the app manifest zip file has been created. Make a note of this before closing the PowerShell window
Deploying the App in Teams Admin Center
To add the app for your users, you need to upload. You can add apps in a number of ways, but to make available for all your organisations users, you should upload via the Teams Admin Center. Top deploy the new app, go to Manage Apps and choose Upload
Select Upload on the next dialog
Locate the package and select Open
In the New app added box follow the link (text is this link) to view the properties for the app you have just added
Ensure the app is set to Allowed
Now your users can add the app themselves or you can add the new app into an App Setup policy and deploy to your users by default. In the appropriate app set up policy you will need to install and pin the app for it to appear by default.
When users nest open teams they will see a message informing them of the changes to their apps
They can then locate and use the new app you have deployed.
Teams Developer Portal
An alternative method to deploying in the Teams admin center directly, which also allow you to make any additional edits to the app is to load the app manifest package into the Teams Developer portal at https://dev.teams.microsoft.com/
Select Apps
Choose Import app
Located your app package and choose Open
If there are any errors with your app you will be shown these errors, but you can still Import and then fix before deploying.
The app properties will load and can be edited
For example here you can see that I have elected to change my app icons. To do this I also needed to update the version number shown in the image above on the Basic Information page
Then select Publish and choose to Publish to your org
Choose Submit an app update
Once it has published you will need to approve the update from the Teams Admin Center, so locate your app in Manage apps and open the app page by clicking on the name
Select Publish update to push out to your users
Confirm by clicking Publish
When your users next start Teams they will have the new app.
Teams Panels are designed as meeting room companion devices to show when meeting rooms are booked, what meeting they are booked for and to allow for ad-hoc bookings. After the family complained that my existing busy light solutions didn’t let them know what I was working on to decide if they could interrupt, I decided to see if the panel might work.
My Conclusion
Teams Panel showing current meeting, current date and time with username
It’s a neat solution to display your schedule outside the room BUT it doesn’t respond to status changes, so not the whole answer.
A Bit More Detail
Let’s look at how you can set up a Teams Panel as a personal device and then consider the pros and cons.
I purchased and am using the Yealink RoomPanel (details here)
Step 1: Admin Preparation
Before you even have a device you can configure the device configuration profile in the Teams Admin Center. This is not essential. If you do not configure a profile the default settings will be used or the settings can be configured on the device itself. No additional licenses are needed to use the device as a personal device.
General and Device Settings Sections in Teams Panel Configuration Profile in Teams Admin CenterNetwork Settings Section in Teams Panel Configuration Profile in Teams Admin Center
Step 2: Unpack and Power Up
Using the supplied power adapter, plug in the device and power on. It’s best at this point to also connect an wired internet connection. If your ethernet cable is PoE (Power Over Ethernet) you can dispense with the power supply. I wanted my panel to use WiFi after set up, so I started with both power and ethernet.
Team Panel powering on showing Yealink logo
Step 3: Device Set Up and Login
The device has a series of screens to set up. Choose the language and then time zone.
Teams Panel showing Language Setting OptionsTeams Panel showing time zone options
I really like the way you can search for the time zone.
Searching for London time zone by typing “lon” on the time zone options screen
Then you need to sign in. You can sign in on the device or wait for the code to come up on screen and use the device log in on a different device via the website https://microsoft.com/devicelogin
Teams Panel showing device login screenDevice login portal in the web browser showing entry box for device code
Here you can sign in with a personal account, the same as you use with Microsoft Teams on any other device. No additional licenses are needed to use the device with your account. Once signed in wait for the login process to complete and your calendar will load.
Teams Panel showing Company Portal screen whilst signing in. In this image the configuration is checking for security requirements
Step 4: Custom Configuration
As an administrator you can sign in to the Team Admin Center, and assign a configuration profile to the device as soon as it shows in the Panels section of Devices.
If you are not assigning device configuration you can configure settings on the device. There are some settings such as LED Brightness for the status light which can only be configured on device and not in the configuration profile.
To assign a configuration in the Teams Admin Center:
Navigate to Devices and Panels
Select the panel to apply the configuration to
Select the Assign configuration button
Search for the require configuration and Apply
Teams Panel with settings cog in the bottom right hand corner of the display highlighted
To edit the settings on the device:
Tap settings cog
Navigate the menu to find the chosen settings
For example under Basic you will find the LED brightness settings or you can choose the link WiFi options to switch to WiFi. For both you will need the device admin password, which is one setting you can set with the configuration profile.
Teams Display showing Basic options including LED brightnessTeams Panel Panel app settings screen
You can also connect a device via the panel app settings. This may solve my issue with the light not changing with status in Teams app, but I do have issues with this for some reason with my account and haven’t yet managed to get the panel to find my computer.
Using the Device Day to Day
Sitting outside my home office the device now shows my calendar and even allows people to reserve the current slot in my diary, by tapping Reserve
Teams Panel with Reserve option
Choosing the required end time, then tap Reserve again
Teams Panel showing end time selection
Which then pops into my calendar and turns the LED on the panel to red.
Appointment in Teams Calendar
Wish List
Two things would makes this the ultimate home office or executive office busy light
If the LED responded to my Teams status
If the panel could be used to book times in advance with ability to edit the name of the meeting. Though I guess we could use the Teams app on a mobile device to create a meeting invite whilst stood outside the office.
As at January 27th 2022 the hide my camera option is rolling out in public preview, so if you don’t have the feature yet, it will be coming soon to a Microsoft Teams app near you. This is going to be a great tool to help avoid distractions in meetings and virtual training events, especially when combined with the Focus on Content view.
Distractions in virtual/hybrid meetings and training courses are a big pain point, so make the most of these tools to help you get the most of the event. These features are in both Microsoft Teams meetings and webinars, not Live Events.
Hide Your Own Video
The purpose of the Hide My Camera feature is prevent you needing to have you own video visible and potentially blocking shared content too.
To hide you camera either click the … button on your video thumbnail or right click in your video thumbnail and choose Hide for me
Video thumbnail context menu with Hide for me option highlighted
Once hidden your video will minimised to show only the very top portion of your video. It’s not completely hidden so you do not forget you are sharing your video.
Minimised video. Has up arrow icon to expand
Focus on what you want to see
But it’s not just your own camera that is distracting. It is also the other meeting participants. You can pin the presenter(s) using the Pin for me feature, and then hide all other attendee cameras using the Focus on content view.
To pin a meeting participant either click the … button on their video thumbnail or right click in their video thumbnail and choose Pin for me
Participant video thumbnail context menu with Pin for me highlighted
Then with the videos you wish to see pinned, choose Focus on Content from the view switcher in the top right of the meeting window. You will then see only the pinned participants and any the shared content.
View Switcher menu with Focus on content option highlighted
You do not have to pin a participant to use Focus on content if you prefer to just show the shared content.
But also, …
Don’t forget that you can select anyone’s video or the shared content and make it the main image for just yourself. Simply click the video feed you wish to focus on. When you want to change to a different focus perhaps back to shared content, click that video instead. Just a simple single click on the thumbnail of what you want to see full screen.
Teams meeting showing participant video in main stage (main part of the screen). Click any of the video thumbnails to bring into the main stage.
And there is also the Spotlight feature which bring the chosen video to the main stage for everyone.
Participant video thumbnail context menu with Spotlight for everyone highlighted
For Trainers/Presenters
If you are a trainer or a presenter, I’ve put together a slide to use at the start of your event showing participants how to use these features. Download below⬇️
There is a new feature rolling out to Teams to allow you to mute most Teams notifications when you are in a meeting or on a call.
You can either switch it on for all meetings on on a meeting by meeting basis.
To mute for all meetings and calls go to Settings, choose Notifications then click the Edit button next to Meetings and Calls, you will then see the screen below where you need to switch the toggle to on for Mute notifications during meetings and calls
Meeting and Calls notifications screen showing the toggle to mute notifications
To mute notifications in a single meeting, open the menu from the … on the meeting toolbar and choose Mute notifications.
Meeting menu with Mute notifications option highlighted
As I regularly work as a guest in different tenants, and when training mostly need meeting notifications on, I have found the per meeting option the best for me.
All notification settings are per organisation, so if you do find yourself switching tenants (organisations) a lot you should either use the per meeting setting or change the notification settings in each organisation.
Another tactic to consider is muting individual chats. This can be especially helpful when in a large meeting with an active meeting chat. To mute the one chat, go to the Chat app in Teams and locate the meeting chat then click the … on that conversation and choose Mute from the chat menu, as shown below.
Showing the chat menu with Mute option highlighted
If you haven’t already had a look at the notification settings in Teams, please do. Especially if you are downing in notifications a few simple changes could make them a lot more useful.
Start with the main settings menu from the … on the Teams app title bar and then choose Notifications.
Teams Settings dialog on the notifications screen
Next consider customising notifications in channels within each Team. For example, you could change the settings so that you receive notification from important channels for all activity and on busy channels for only items where you are mentioned.
To edit notification settings for a single channel, from the … menu for the channel choose channel notifications and Customised then edit the settings. Or instead of Customised you could choose All Activity (for notifications of all activity) or Off (for no notification except direct replies and mentions using your name)
Showing channel … menu with Channel notifications selected to display sub menu options of All Activity, Off and CustomisedCustomised channel notifications dialog box showing options to switch on or off all notifications for all new posts, plus tick box to include replies. Second setting in this box is Channel mentions with options to notify via banner and feed selected.
For accessibility, I have included descriptive image captions in this article, rather than alt text. I hope to make the image descriptors available to all in this way. However I do not use a screen reader. If you do, please let me know if this works well or not.
As we approach 2 years of intensive virtual meetings, the debate about cameras on or cameras off still rages on. This is especially true with virtual training and I’ve had numerous debates about requiring cameras for attendees.
As a trainer, I can give a better delivery if I can ‘feed’ off those attending the course. This includes questions and debates but also facial expressions and body language. One of the most challenging things in the virtual training world is training a group of “circles” where everyone had their cameras off, as you loose that visual feedback.
Yet, when you look at it from the other perspective, it can be even more draining to be on camera all day, especially when you have to look at yourself too and are aware that the other course attendees are watching you too. Plus those other attendees can be very distracting when you want to focus on the presenter.
Fortunately Microsoft Teams has several new features coming which will help improve the situation for all parties.
Hide your own camera
Unless you enjoy looking at yourself, seeing your own camera feed in meetings can be very draining and distracting. This update, due Jan, will allow you to hide your video. The only issue may be that you forget you are on camera, so look out for the visual indicator (a cropped part of your own video image) which will show that your camera is on which will roll out with this new feature.
Manage what attendees see
This update is due January 2022 and, although full details are to be confirmed, should allow us to limit attendees to viewing specified presenters and shared content. Hopefully presenters will still be able to see anyone who is allowed to share their camera.
I am concerned this feature will not go far enough and I would like the ability to set meeting options to hide all attendee cameras but not disable them. Hence I added this feedback item
Virtual Reality Meeting and Avatars
Microsoft Mesh will bring virtual reality meetings and avatars to Microsoft Teams. You can read more about it in this article.
I think the avatars, especially, will be very helpful in the virtual training space. For the days when you do not want to be camera ready, your avatar will mimic your movements and facial expressions. Whilst this wont give the same visual feedback as a proper video it is better than no faces and will help remove some of the pressure and anxiety being on camera continuously can cause.
If you are an iPad or iPhone user, try out the Memoji video messages to get an idea of how avatars can reflect a person’s reactions and expressions. More info on Memojis is in this help guide.
As of 8th December 2021 update the Teams Display supports portrait mode for Meetings and calls, as shown in the extract from Message Center post below.
Message Center post 302457 stating Teams Displays support Portrait mode in Calling & Meeting Screens
You will note that this is only for Calling and Meeting screens. I’ve been eagerly awaiting this release, so I thought I needed to try this out, as the camera position in the Teams Display is a weak point for me. Even though it is situated on a shelf on my desk, the camera is till a little low.
As my display does not support screen shots, I’ve used photos of the device. I’m not a photographer.
Conclusion: Nearly solves the limitations of the smaller Teams Display device, but really needs to be for all areas, not just meeting & calling.
After doing the update you will notice that most screens do not work in portrait mode, this includes the calendar, home screen, chat, teams.
Device in portrait orientation with calendar screen displaying in landscape mode
However as soon as you join or start a meeting/call with the device in portrait orientation, the device detects the orientation and rotates the screen automatically. Portrait mode is not really supported on the join screen, but it is still useable in either orientation.
Once in the meeting both Landscape & Portrait mode work well.
A little while ago people kept saying to me “I still can’t see your presence”. For some reason my Teams online presence was not showing for people outside my organisation, no matter how many time I reset it, whilst it was still visible to my colleagues. I then did a bit of testing and discovered that no user in my tenant was sharing their presence externally.
To find out if this was the cause of my problem (and indeed if those Skype commands were still available), I used Get-CSPrivacyConfiguration to obtain the privacy settings in my tenant.
And there was the issue. The Privacy Mode was enabled, which Terence’s article indicated would block presence for external users when we were communicating in Teams.
Now to verify if setting it to False (turning off Privacy Mode) made the presence of users in my tenant reappear for our external partners.
Then a bit more testing was in order, however before I could up pops the message: “You fixed it, I can see if you are online now”. Success!
But now I always need to remember to change my presence. I can highly recommend using the Duration setting to change your presence manually for a fixed period so you do not forget to set it back either
The other finding from this is that enabling Privacy mode does hide presence from external contacts as per Terence’s article
The set up is done from https://workplaceanalytics.office.com/en-us/AnalystSettings/Onboarding, however mine took 2-3 days to activate before the page was available, so I’ll come back to this later. Officially the guidance is that “Licenses can take from 24 up to 72 hours to activate after you purchase licenses. Until licenses are provisioned, unlicensed users will get a 500 error when opening Workplace Analytics”
PREPARATION: Whilst you are awaiting for the onboarding page to activate you may want to read the docs guide on getting set up Workplace Analytics setup | Microsoft Docs. I would recommend reading the user roles guide User roles in Workplace Analytics | Microsoft Docs and deciding upon the user who will need roles assigning. Once you have reviewed the role guidance and decided on the roles required for users, you can assign these in advance of the licence activation.
Assign Roles
Working as a Privileged Role Administrator, sign in to the AAD admin center.
Navigate to Enterprise Applications
Choose All Applications in the Application Type box
Search for Viva Insights (currently I can only find Workplace Analytics, not Viva Insights as the transition takes place, so check for both if you have issues)
On the Overview page under Getting Started, choose Assign users and groups
Choose Add user/group
Select a user or group by clicking the None Selected link under users and groups, then search for the required user(s) and/or group(s)
Then select the role. I recommend you start with the Administrator. You need at least 1 Administrator and 1 Analyst. Whilst you can assign the same user multiple roles, they need to be added as separate assignments
Whilst you can assign the same user multiple roles, they need to be added as separate assignments. If you do assign multiple roles to the same users you will see something like the following:
Users assigned roles will received an email informing them. This is the Administrator Email
It is important to include ALL licensed users, but you can include unlicensed users as well.
Your organisational data MUST include the following columns:
PersonID (the log on email of the user)
EffectiveDate (start date for the information about the user contained in this file)
Organization (the internal organisation the user belongs to)
ManagerID (the log on email of the user’s manager)
The file format is important, so be sure to pick the correct CSV file format.
Once your licences have activated you will find the Onboarding page at https://workplaceanalytics.office.com/. You should see the number of Analysts and Program Managers you assigned permissions to.
Confirm the correct number of roles are recognised by ticking the box and clicking Next
Next set your system defaults. These will apply to ALL users.
Before clicking Next expand the Exclusions section to add any required exclusions. Also note the minimum group size can be increased to help preserve the anonymity of users within your organisation. 5 is the smallest group for metrics.
A warning will appear to confirm you cannot change these settings until after the first data load has been completed. However once the Organisational data has been processed then you will be able to adjust the settings, as required.
Next you will upload your org data file prepared earlier. There is also an opportunity to download a template at this point, which is shown below. I prepared my file earlier based on the Docs article
Upload your file, name and describe it, then click Next. The name and description will be useful as time goes on and you need to adjust or add to your organisational data.
You will then be asked to confirm the column matching to expected fields to ensure the analytics tool has correctly identified the columns in your organisational data file.
Your file will be uploaded and validated, with the following progress dialog box being displayed whilst this happens
Finally you’ll see the confirmation page that your organisational data file was validated and that the set up is in progress.
And now you must wait again. The notifications appear to indicate this is processed over the weekend.
With my set up, I experienced an error.
Though after a day, it switched back to progressing. Though this was as far as I got with 1 license in the organisation.
It’s a learning curve. It turned out that with a single license the process could not completed. A minimum of 5 licensed users is needed in the tenant and those 5 need to be included in your organisation data upload too.
Once that issue was resolved in my demo tenant and the weekend update had taken place, we had success! The admin received email notification of such
And the https://workplaceanalytics.office.com/ page now shows the success message. On that page you now need to click Exit to homepage link to continue.
A First Look
The workplace analytics home page shows the key insights that have been discovered for the licensed users. Note that my users are light on activity and hence the majority of insights are empty. Indeed with only 5 licensed users we will fall below the minimum group size for many metrics.
You should also now see the My Organisation and My Team appear in the Viva Insights app in Teams.
If these do not appear, be sure to check permissions required and also verify the minimum group sizes are being met in the Leader & Manager Settings.
The organisation insights in Viva Insights have a series of different sections and provides a PowerPoint download option too.
The PowerPoint file includes sections which match the structure in the Viva Insights app.
One of the challenges with Private Channels in Microsoft Teams since they first launched has been retention. Now with the general availability of retention policies in for private channels, this is now in the past.
Before we look into the retention policies in more detail, let’s talk about what a private channel is and why it presented retention challenges.
A Microsoft Teams team is comprised of channels. Every team has at least one channel, General, and you can add others to suit for different work streams, project phases, task types, etc etc. All members of the team have equal access to all channels. Private channels offer the opportunity to create a channel where only a subset of the Team members have access.
To facilitate this private channels use separate storage locations than the main team. The messages are not stored in the group mailbox but in the mailboxes of the members of the private channel.
Retention policies covering mailboxes and Teams channel messages do not include these private channel messages. But now they have their own policies.
To create a retention policy for private channels:
In Locations, choose Teams private channel messages
Select users to includes or exclude from the policy Note: when choose items to include or exclude, the options are only users, as private channel messages are held in the mailboxes of the members of the private channel, so you choose which users you wish to retain private channel messages for, NOT which channels.
Click Next
On the Retention settings page choose the time messages should be retained for. These options are the same as for standard channel messages.
Click Next
Review the summary of the setting you have chosen on the Review and finish page then click Submit
Wait for the submission to complete. NOTE: As shown on the submitting screen below, the policy can take up to 24hrs to come into effect.
Once the policy has been created and saved click Done on the confirmation screen. The submission process can take several minutes, so be patient!
This blog post accompanies the session delivered at Collabdays Lisbon on 13th November 2021.
Agenda
What is Viva & how does it fit with what we already have?
Licensing the Viva tools
Getting Started – Deploying the Viva tools
Recent Updates Announced
What is Viva
Microsoft launched Viva as a product to enhance the employee experience, but what does that actually mean without the marketing speak? In overview, Viva is a brand name that pulls together tools whose aim is to make it easier to be productive and maximise the investments we have already made in Microsoft 365, delivery in the tools we use everyday, primarily Teams. The aim is that pulling together the apps, content & communication you reduce the amount of jumping between applications needed to do the job.
Each Viva module does have its own focus and is based upon existing or previously announced features, with the normal feature development and continuous change that is part of the cloud.
The Microsoft Viva platform is made up of 4 modules (currently)
Viva Connections bring the SharePoint intranet into Teams and makes it accessible to mobile users too. It also surfaces Yammer content and can be extended to help provide access to custom tools as as well as standard tools such as Approvals & Shifts. The key word there was Amplify. Connections makes it easier to interact with the (SharePoint Online) intranet you already have.
Viva Insights builds on the analytics and reminders that My Analytics and Cortana emails were already bringing us. But with additional features to help balance work/life and productivity. For me, I find the some features more useful than others. I personally use love the Stay Connected reminders about tasks/requests I may have missed.
Viva Topics is about making the most of the information stored in Microsoft 365. Capturing the knowledge locked away in all those documents and making it useful, but letting the AI do the heavy lifting.
Viva Learning is aiming to bring continuous learning into the daily flow of work. If you work with the cloud you are familiar with continuous change and continuous learning, Most workers struggle with this and how to even find the learning opportunities and that is where Viva Learning comes in.
How does Viva integrate with Microsoft 365?
Microsoft Viva tools are built on the email, appointments, chat, meetings and files already in Microsoft 365 and integrate with those tools. With Topics & Insights there are some integrations which are not yet rolled out, such as being able to see topic cards from message and document content and delay chat message based on recipients working hours, but these are on the way.
Does this replace SharePoint?
First, let’s be clear, all Microsoft 365 file storage is based on SharePoint which turned 20 this year (27th March 2021) – see SharePoint twenty 20 years young SharePoint’s twentieth birthday 20th (microsoft.com) So no, this does not replace SharePoint, though it may mean your users spend less time navigating to SharePoint pages in their browser and use Viva Connections instead.
Viva Insights
Today
The virtual commute feature helps close out the working day. Personally I find it a bit much every day, but on busy days it is helpful.
Stay Connected is the same information as the Cortana daily email and My Analytics Trend pane (both now rebranded Microsoft Viva).
Protect time allows you to book focus time to avoid your colleagues filling your diary.
Getting Started
For the free version of Viva Insights, simply turn on the features from the Microsoft 365 Admin Center. In https://admin.microsoft.com/ choose Settings then Org Settings followed by Services and Microsoft Viva Insights (formerly My Analytics). Tick on the required features and click Save.
Adding a license for Viva Insights bring in the Workplace Analytics features. I’ll be posting a blog on the set up experience separately to this one detailing onboarding with Viva Insights per user licenses. With the per user license you add extra features.
Connections bring your SharePoint based Intranet into Teams and with use of the SharePoint Global Nav Bar, can bring the whole of your SharePoint into Teams and simplify the navigation process for users. With the use of the cards you can bring other apps and tools into Teams too, such as tasks, holiday booking apps, etc, etc.
Deploy the Viva Connections App into Teams for your users (via Teams Admin Center)
What you get out of Viva Connections depends upon the use made of SharePoint intranet and Yammer. To bring Yammer into Viva Connections we use the Viva Connections Feed or Yammer web parts on your SharePoint Home Site. For details on creating a Home Site for use with Viva Connections see this article.
Getting More from Viva Connections
To get the most from Viva Connections you should
Add a dashboard as that’s where your mobile users land. Include at least a website card pointing to the intranet here.
Add the Dashboard webpart to your Home Site, so desktop users get the advantage of the dashboard cards too.
Add the Viva Connections feed web part to your home site to bring News and Yammer Conversations in. This could replace the News webpart.
Consider mobile users. Always check the mobile experience and make sure your mobile only users have easy access to the required tools.
Viva Topics
Topics itself is not very exciting looking a site. But that’s NOT the main benefit. Topics is there to help your organisation make more of the knowledge trapped inside your Microsoft 365 environment.
Viva Topics is not suitable for all organisations, there is a minimum amount of data and activity that you need before it can work as designed. However any organisation that meets these can benefit. My tenant has one main user (though 5 in total) and topics is still benefiting me, saving me a lot of searching and rewriting. This will only improve with the items on the roadmap (such as managed metadata integration plus messaging & content links to topics).
Very simple to set up, but it does take 3 days to 2 weeks before topics really start to appear. You then need to review and publish your topics before the links in content start to work. Currently only SharePoint pages will surface the topic links, so be sure to test there first.
Viva Learning
Today
Viva Learning is all about collaborative learning, it isn’t a LMS, but many of the tools that can surface learning their learning materials via Viva Learning have their own LMS built in.
With the free license you only get integration with
Microsoft Learn
LinkedIn Learning Free or Enterprise Subscriptions
Microsoft 365 Training
Your Own SharePoint based Content
Currently the paid license adds (with * indicating some content shown without subscription to that service):
Some of the features of each module are included in Microsoft 365 licenses, except Viva Topics. You can license the modules separately or (announced at Ignite on 2nd November 2021) via a suite license. Currently the suite license is discounted from £12 to £6.80.
All prices quoted are UK cloud direct pricing. Please check with your licensing organisation for exact pricing.
Coming Soon
All Viva module updates are detailed on the Microsoft 365 Roadmap. This link directs you to the roadmap filtered for only Microsoft Viva updates.
One thing that is missing is the Viva Topics App in Teams, which keeps showing up in many marketing images, hopefully that will come when Teams supports showing topics cards from messaging content.
Another key announcement from Ignite which was trailed when the deal to purchase Ally.io was signed is that Ally will be the 5th Viva module.
Ally is a Targets and Goal management tool to help align organisation objectives & mission with individuals targets and key performance indicators. See announcement of purchase for more info on the tool.
eDiscovery is used to conduct content investigations in Microsoft 365. There are 3 eDiscovery solutions with slightly features. All 3 can be used to discover Teams data, though not ALL Teams data is discoverable.
Discoverable Teams information and where it is stored for compliance purposes such as eDiscovery is shown in the table below.
Content
Stored in
Notes
Chat Messages
User Mailbox
This includes emojis, gifs, stickers and inline images as well as content displayed in ‘cards’
Files Shared in Chat Messages
OneDrive
It is also possible to set retention so the version of the file shared is discoverable (see Ignite 2021 updates in Further reading)
Teams Channel Messages
Group Mailbox
This includes emojis, gifs, stickers and inline images as well as content displayed in ‘cards’
Files shared in channel chat messages
SharePoint
It is also possible to set retention so the version of the file shared is discoverable (see Ignite 2021 updates in Further reading)
Edited Chat & Channel Messages
User/Group Mailbox
For users/groups on hold, then the previous version of the messages are also available to eDiscovery
Meeting Chat (Private Meetings)
User Mailbox
Files shared in Meeting Chat (Private Meetings)
OneDrive
It is also possible to set retention so the version of the file shared is discoverable (see Ignite 2021 updates in Further reading)
Meeting Chat (Channel Meetings)
Group Mailbox
Files shared in Channel Meeting Chat
SharePoint
It is also possible to set retention so the version of the file shared is discoverable (see Ignite 2021 updates in Further reading)
Meeting & Call Metadata
User Mailbox
This includes start/end time of meeting & join/leave time for each participant
Stored in OneDrive of user who starts the recording/transcript. Recordings can only be
The following content is NOT discoverable using eDiscovery:
Audio recordings
Code snippets
Channel name
Reactions
Feed notifications
The storage location shown above is important for two reasons:
To help choose locations to include in the eDiscovery search
To understand where the data show up when exporting the results. Anything stored in a mailbox will be exported into a pst file, while OneDrive & SharePoint content is exported in file folders.
In the walk through we are going to use the Content Search functionality as we are focusing on the search and export functionality. Core eDiscovery and Advanced eDiscovery can both be used to find the Teams information and have different additional functionality to the Core Search.
The features of the different eDiscovery solutions are summarised in the following table which is sourced from the Microsoft Docs article on eDiscovery (see further reading at the end of this article)
Content Search
Core eDiscovery (additional to Content Search)
Advanced eDiscovery (additional to Core)
Search for data/content Keyword queries and search conditions Export search results Role based permissions to use
Case management Legal hold
Custodian Management Legal hold notifications Advanced indexing Review sets incl filtering OCR Conversation Threading Collection Statistics & Reporting Tagging Analytics Predictive coding models Error Remediation Computed document metadata Transparency of long running jobs Export to Azure storage location
Content Search Walk Through for Teams Data
In this walk through we are conducting a search to check for content related to a new project. This content has been spread across multiple Teams, including private channels and in direct 1:1 chat with files having been created and saved in various locations.
Navigate to the compliance center https://compliance.microsoft.com and choose Content Search. Although Content Search is an eDiscovery function it is not included in the eDiscovery sub menu.
Click New search, then complete the Name and Description for the search you want to perform.
Click Next then choose the locations to be searched. To cover all Teams locations you will need to include mailboxes for all Teams users including guests and all SharePoint sites for the Teams.
There are potential issues with the example here, in that we have included all mailboxes and all SharePoint sites. The results will include all discoverable Teams content but also emails and files in other SharePoint sites. This may not be detrimental but you should be aware that the result will include more than Teams data.
Click Next and then create your search using combination of keywords and conditions such as creation date, sender, etc.
Click Next and review the summary of the setting you have specified before clicking Submit to start the search.
Next you will see confirmation that the search has been created and is in progress. Click Done. How long it take till the results are available will depend on the volume of content being searched.
When you click Done you will return to the Content Search page and will be able to see the status of your new search
Note that an alert has been sent to all Global Admins that an eDiscovery Search has been started. This is the default behavior.
Once the search is showing as completed, click onto the search name to load the results.
You can see the search statistics, showing how many items have been found.
Click Review sample to check the information which has been found to verify your search worked as expected.
You can then export the results or a report on the results from the Actions menu.
If you choose to export the results then you will be presented with options of how you want to export the discovered data.
Don’t forget to scroll before clicking the Export button as there are further options, which never seem to fit on the one screen.
Your export will be prepared and once ready will be found under Export on the main Content Search screen. Click on the name of the search you want to export data from.
You will need the Export Key, so be sure to copy it! Click Download results to start the download of the exported results.
You should see a pop up asking to open the file. This is the specific tool used for eDiscovery, called the eDiscovery Export Tool.
Install the application.
The next prompt will ask for that Export key and the location you want to save the exported pst and file folders to.
Once extracted you will be able to open the file folder and add the PST files to Outlook to review. Remember teams messages will be in the PST files in Teams Chat folder.
Once your organisation has given you have access to Viva Learning, you will find it on the app under the … on the side rail and searching for Viva Learning.
On first run, you will see tips on Home, My Learning and Settings links, as shown below.
The … menu will allow you to run these tool tips again using Show me around
On the home page you see featured content, which is controlled by Microsoft, followed by a guide to help get you started.
Below that you can browse all available learning content grouped by your Interests, the Providers, or course Duration.
On the My Learning page you can view learning you have Bookmarked, which has been Recommended to you by colleagues or your manager/employer, those you have Recently viewed and also those you have previously Completed.
Personalise Your Viva Learning
It is recommended that you start by picking your interests
Next make sure you are getting all the content you are entitled to by checking sign in/permissions for your available content sources from the … menu and choosing Settings.
Please note that the LinkedIn Learning premium option only works with LinkedIn Learning organisational accounts but not personal premium LinkedIn accounts.
Under Permissions you can check that you have access to the SharePoint site which populates the list of resources from your own organisation.
Clicking the Check access button will open the SharePoint list which is used to publish the information into Viva Learning. You will most likely have read only access to this. If you do not have the required permissions you will see a Request Access page when you click on the Check access button.
You are now ready to get started using Viva Learning.
Finding and Bookmarking Content
To find learning content you can use the Browse courses section of the home page or use the search box to search for specific terms.
When you click onto the learning topic, from search or browse, you can see a summary of the content plus you have the ability to Bookmark the content to find it again more quickly from the My Learning page.
You can also bookmark directly from the browse courses page.
Share Content with Colleagues
Both the course detail and browse courses pages, also include the ability to share learning content with colleagues via Teams Message or by copying the link to share in a different messaging tool, such as email.
The process for setting up the free version of Viva Learning for your organisation starts in the Microsoft 365 Admin Center https://admin.microsoft.com/
Navigate to Settings then choose Org Settings and Services where you will find Viva Learning
In the Viva Learning blade, check the items you want to make available to your users, including inputting the address of the SharePoint site which will host the Learning App Content. (more on this in a little bit), then click Save.
If you add any number of Viva Learning paid licenses to your tenant, you will see additional options within the settings screen, but they do require their own subscriptions, as does LinkedIn Learning premium.
Whilst this is a new system and we all need to build up expertise, it appears best at this time to create a new site for this. This should simplify permissions and support for Multi-Geo organisations. You can only have one nominated site per organisation and all Viva Learning users will need read access to the list, though you can modify item permissions if needed to limit visibility. If users do not have access to the linked resources they will stillsee the folder & what files (learning resources) are in it, but not access those files.
The site used can be changed but you will need to recreate the list if you do change sites. Please do read the guidance before picking & setting your site.
In this walk through I created a new site and gave everyone in the organisation read only access to the site.
Once declared as the site for Viva Learning the Learning App Content Repository list is added to the site which will hold the list of other folders/libraries in SharePoint that contain learning materials.
Content is added to Viva Learning by creating an entry in the list to the folder containing the learning content. Remember that everyone who has access to the site will see the folders you add, including file details but only be able to access content they have permissions to. Newly added folders take up to 24hrs to appear in Viva Learning.
To add a filer or folder to the list of resources, locate the file/folder and choose copy link from the …
Be sure the link is for people with existing access
And copy the link then paste into a new entry in the Learning App Content Repository list
Teams Admin Center
To make the app available in Teams for your users you need to set up the Viva Learning App in Teams Admin Center https://admin.teams.microsoft.com/
First under Manage Apps in Teams apps section, locate the Viva Learning app
Ensure the app is set as Allowed
Next ensure the users are allowed to use the app in the App permission policies. Depending on your Apps permission policy settings you may need to enable Viva Learning in each policy. Viva Learning is a Microsoft app, so will automatically be available for your user if you allow all apps in that section.
To add to the side rail for all users automatically you need to install the app using one or more app set up policies. To add the app, click Add apps under the Pinned apps section
Search for Viva Learning and click Add
Save the policy and navigate to Teams to check if it is available. This may take a little time and you will need to restart Teams desktop app or log in fresh to Teams web app to check availability.
Recently I was asked if I knew of any busy lights for Mcirosoft Teams. Remember those days when you would walk down the office to see a colleague rather then check their Teams presence? With hybrid working the presence indicator in Teams is still important but its needs extending into our physical spaces too.
Personally I am still working from home full time and still using the manual Do Not Disturb light I created in my blog Using Flic and Hue to build a Do Not Disturb light – Sara Fennah’s Blog (m365train.co.uk) Though I now control it from my Stream Deck most of the time. I have buttons on my Stream deck that sets all my lighting, with different settings for attending or delivering and bright/dark environments. If I’m attending a course/meeting I set my Do Not Disturb light to yellow and my streaming lights low whilst for a training delivery the Do Not Disturb light goes to red and my streaming lights are brighter. If its dark then I also switch on the room lights which are also using Hue bulbs.
But my personal solution doesn’t work for the hybrid office scenario, plus for a largescale roll out, we want quick and simple. After a bit of research I decided to give the plenom Omega and Alpha busy lights a go and was fortunate enough to secure a sample of each to try. These are not new products and there was confusion around how they worked with Teams, and many vendor sites being unclear if you needed additional hardware etc.
Well, I can report that they work perfectly. I tested both lights with Windows and Mac and both were just as simple:
Plug light into a USB port on your computer
Download the driver
Change your status in Teams to watch the light change
My phone was not great for photographing the light, but I did manage to capture a video of the light changing with Teams.
With just the driver software you still a fair amount of customisation:
You can also control the way the light behaves and set additional features using the kuandoHUB software. If you do I can STRONGLY recommend first backing up your priorities before customising.
Troubleshooting
If you use the Duration option in Teams to set your status for a period then revert to automatic, I have had the light get stuck on the manual status once, but a quick reboot of Teams fixed that.
If your light does not pick up Teams status but another app, check that Teams is set to your default chat app. If its still not working then you need the kuandoHUB software to change the priorities and sources.
One of my biggest challenges working from home is that my office is downstairs and anyone coming to the house walks past the window I am sat next to, so they often try to engage me or even bang on the window. I can’t exactly jump up in the middle of a course delivery and answer them, it’s just not very professional. So I now have the perfect use for one of my busy lights:
Whilst the other has been adopted by my teenage son using the kuandoHUB software to indicate if his parents are allowed into his room! The light is pure red, the two tone effect is only in the photo
With background effects coming to Teams for the web, providing your users with organisation standardised backgrounds is going to be even more useful. If like me you’ve been looking in vain for the organisation wide backgrounds in Microsoft Teams, then you too have probably been looking in the wrong place.
The articles I read all said to go to Meeting Policies and add your images, so I have been looking in the actual policies, but could see nowhere to add background images. Then today I spotted the Customize Meeting Images button on the top right of the screen!
Organisation wide background images require users to be assigned the Advanced Communications licence to benefit to view and apply.
To add images for use by your organisation, in the Teams Admin Center, expand Meetings and choose Meeting Policies, then at the top right click Customize Meeting Images button.
You now need to turn On the custom backgrounds and add your images
You can add up to 50 images in the Managing Backgrounds space. Images can be in JPG or PNG format and must be between 360x360px and 3840x2160px.
It can take up to 24 hours for them to appear, but your users will be able to use the organisational background just the same as any others, better yet, they appear at the top of the list of available backgrounds.
PowerShell is very powerful (no pun intended) but if you don’t know what you are doing it can be dangerous, making big changes to your environment without prompting for confirmation. If you run ANY PowerShell scripts against your Office 365 tenant you alone are fully responsible for the actions undertaken, so please ensure you are fully confident in the source of your information.
If you are looking at scripts for Microsoft Teams from a blog (like this one) I would recommend checking them against MicrosoftTeamsPowerShell Module | Microsoft Docs. This helps you learn more about the scripts but also lets you check the cmdlets (commands) you intend to use are still valid.
ALWAYS close your PowerShell Windows when you are not actively using them. This closes the connection and logs you out, helping to keep your environment secure. Or even better disconnect then close the window.
Finally remember that Teams runs on Microsoft 365 groups, includes SharePoint features and shares some configuration with Skype for Business Online. This means you may also need to use PowerShell cmdlets for Azure AD Power, Exchange Online, SharePoint and Skype for Business too, though the Skype for Business Online cmdlets are included in the Teams PowerShell module, they are still referenced separately in Docs.
This blog series is designed to support those studying for the MS-700 exam to appreciate how to do many of the tasks in the course using PowerShell. As such I have divided it down into the course modules, which also help other trainers when they are delivering.
In this blog I have used <aaa> to indicate where you should change parts of the script to apply to your requirements. Replace the <> as well as the words, but not any ” ” so <email> would become someone@email.com and “<email>” would become “someone@email.com”
REMEMBER: Any scripts here are run at your own risk, though I have tested them, I offer no guarantees or warrantees.
Import the newly installed module into the open PowerShell window
Import-Module MicrosoftTeams
Log in to Microsoft Teams
Connect-MicrosoftTeams
You are now ready to manage Teams using PowerShell
When you are installing PowerShell Modules, you will always be prompted to confirm download from the repository, as shown below. You should only confirm one repository at a time using Y response.
Once set up you can then log in future by:
Open Powershell in Windows with Admin – right click on your start button and choose Windows PowerShell (Admin)
Import the Teams module into the open PowerShell window
Import-Module MicrosoftTeams
Log in to Microsoft Teams
Connect-MicrosoftTeams
To Update Teams Powershell
Open Powershell in Windows with Admin – right click on your start button and choose Windows PowerShell (Admin)
Run the Update Script
Update-Module MicrosoftTeams
Import the Teams module into the open PowerShell window
Import-Module MicrosoftTeams
Log in to Microsoft Teams
Connect-MicrosoftTeams
Learn more about the Teams PowerShell Module
The commands in this section are not needed for the MS-700, but they do help to understand the Teams PowerShell module.
List Available Versions of Teams PowerShell Module
Get help about with the New-Team PowerShell cmdlet
Get-Help New-Team
You can replace the New-Team cmdlet in this script with any cmdlet. However this returns the help in the PowerShell window so you may prefer to open the help file in a separate window or even online using:
Get-Help New-Team -ShowWindow
Or
Get-Help New-Team -Online
Disconnect
You do not need to disconnect from Teams in PowerShell but it is a good idea to do so before closing your PowerShell window using:
This script creates a new private team, sets the owner of the team and disables the ability for members to create or update channels. It then goes on to add a user to the team and create a new channel.
Here is a text file with all the above scripts in that I used for testing purposes in preparing this blog. As always, please check before running as the responsibility is yours.
Group chats in Teams can now include external people. It’s as simple as creating any group chat in Teams. First, just make sure you can message the external people to be included in the group. In other words send them a Teams chat message. Then simply create a new group or add them to an existing group.
Start a New Chat
Click the new chat icon.
Enter the name of the person. To send a message to someone in a different organisation use their full email address rather than just their name.
Compose your message
Click Send
Start a New Group Chat
Click the new chat icon
Enter the name of the first person, enter names of other people
Compose your message, use
to send a longer message.
Click Send
Add People to Chat
In the chat, click
Enter the name or email of person to be added
Choose the amount of chat history to be shared with new members
Add the number of participants, by clicking the + Participants button and change the scroll to the number of people to have and click the Add button.
I added 10 here and you can see them all along the bottom of my image.
I can now drag the participants around my scene and position the placeholders. You can also resize the placeholders, align them and adjust the x/y position in the image, which can be useful to align participant placeholders with others in the scene.
Given my meeting organiser deserves pride of place in my scene, I decided to reserve one placeholder for the organiser by assigning the image.
As you work, it’s probably a good idea to Save. Before you save you need to input a scene name.
If you click on participants you can add/remove participant placeholders
To try it out click the View in Teams button
Review the information and click Preview in Teams
Allow Teams to Open and then click Add to add your new app
To Test create a meeting and invite enough attendees to test your scene. Once they join, switch to together mode and change the scene
Select your scene and click Apply. I think I may need to adjust the image sizes in my scene, but it works for me and others in the same meeting, EVEN external people joining the meeting via the web.
New options for call handling when a user is busy are availalbe and can be set now using PowerShell. The option will eventually also be availalbe via the Teams Admin Center in Calling Policy.
Call handling when a user is already in a call is called Busy on Busy and by default is off in the Global Calling policy.
Previously we could set this to on or off. When on callers got a busy signal and when off, the call just rang. Going forward we also have an Unanswered option which means when the user is busy the setting for unanswered calls is used.
Users configure their unanswered call handling themselves from Settings within Teams.
Users have the option to direct their unanswered calls including to their voicemail or alternative contact, including their own mobile phone if stored in their profile.
To set busy on busy option in the Global calling policy to use the users unanswered calls setting run this script
Set-CsTeamsCallingPolicy -Identity Global -BusyOnBusyEnabledType "Unanswered"
Note that the Teams Admin Center will currently show busy on busy as off once you have done this until the updated control is available.
As with all PowerShell scripts, you run them at your own risk. So I’d always recommedn checking the official documentation before running any script you get from a blog (like this one). The cmdlet used here is Set-CsTeamsCallingPolicy (SkypeForBusiness) | Microsoft Docs
OK, so Microsoft don’t call them Stretchy Meetings. Officially they are meetings with view-only attendees but a meeting that can grow to accommodate more users to my mind is stretchy. But that’s enough about the title of this blog.
In two recent message center posts Microsoft announced the rollout of webinars and view only attendees in Teams Meetings when the meeting exceeds 300 attendees (aka stretchy Meetings). Both are included at the end of this article for reference.
As they offer two solutions to larger meetings, I wanted to address how you can enable these for your users.
Both posts include guidance for admins on configuring the features using the meeting policy. At the time of writing this article the settings are not available in the meeting policy via Teams Admin Center but is available to set via PowerShell.
You should note that by default view-only attendee mode is disabled. Webinars are on and though the documentation says default is Everyone can register but in my test tenants the default was to allow only people in your organisation to register. So its worth checking.
As both of these features are policy controlled you can configure different settings for each meeting policy. In the examples here I’ve shown managing both settings in the global policy.
To check/change other policies replace the word Global in these scripts with the name of the policy you want to change/look at.
Steps 6 to 10 give you options on the different settings, you should run the step(s) for the settings you wish to change from the default.
Open Powershell in Windows with Admin – right click on your start button and choose Windows PowerShell (Admin)
Import the Teams module into the open PowerShell window Import-Module MicrosoftTeams
Log in to Microsoft Teams Connect-MicrosoftTeams
Confirm the features are available in your tenant by loading the current settings of the Global meeting policy and verifying that -StreamingAttendeeMode and -WhoCanRegister are available Get-CsTeamsMeetingPolicy -Identity Global
Check the default settings for these two features. You are looking for StreamingAttendeeMode for the view-only attendee options and AllowMeetingRegistration plus WhoCanRegister for the webinars. You should also check the setting for AllowEngagementReport if you want to see attendee data from webinars.
To allow view-only attendees when a meeting exceeds 300 attendees run Set-CsTeamsMeetingPolicy -Identity Global -StreamingAttendeeMode "Enabled"
To disable view-only attendees and limit meetings to 300 active participants Set-CsTeamsMeetingPolicy -Identity Global -StreamingAttendeeMode "Disabled"
To disable webinars Set-CsTeamsMeetingPolicy -Identity Global -AllowMeetingRegistration $False
To enable webinars for internal attendees only Set-CsTeamsMeetingPolicy -Identity Global -AllowMeetingRegistration $True -WhoCanRegister "EveryoneInCompany" -AllowEngagementReport "Enabled"
To enable webinars for external attendees Set-CsTeamsMeetingPolicy -Identity Global -AllowMeetingRegistration $True -WhoCanRegister "Everyone" -AllowEngagementReport "Enabled" You will also need to ensure AnonymousJoin is enabled to allow external users to join your webinars. This is a tenant wide setting which applies to ALL meetings not just webinars and can be set from the Team Admin Center under Meeting Settings or with this script Set-CsTeamsMeetingConfiguration -DisableAnonymousJoin $false -Identity Global
Picture for each step
Step 1: Open PowerShellStep 2: Import Teams ModuleStep 3: Connect & Sign InStep 3/4: Signed in Confirmation & running script to get current settingsStep 5: Check current setting on Global policyStep 6: allow view only attendeesStep 7: Block view only attendeesStep 8: Disable WebinarsStep 9: Enable Webinars with Internal Only AttendeesStep 10 Part 1: Allow Webinars with External AttendeesStep 10 Part 2: Allow Anonymous Users to Connect to Meetings & Webinars
Message Center Posts
Microsoft Teams: webinars plus new meeting registration options
MC250958
Plan for change
Published date: April 16, 2021
Affected services
Microsoft Teams
Tag
MAJOR UPDATE
ADMIN IMPACT
NEW FEATURE
USER IMPACT
We are excited to announce the forthcoming availability of Teams webinar capabilities, beginning rollout at the end of April 2021, completing in May 2021.
Associated features that apply to webinars and meetings, include:
Registration page creation with email confirmation for registrants.
Reporting for registration and attendance.
These capabilities will be available to users with the following licenses: Office 365 or Microsoft 365 E3/E5/A3/A5/Business Standard/Business Premium. For the rest of 2021, we are offering temporary availability to Teams users to try the features with their existing commercial subscription.
Note: We will honor any existing meeting settings enabled within your organization.
Control type: user control / admin control / admin UI
Action: review and assess
How this will affect your organization
When scheduling a meeting, your users will see the Webinar option on the Calendar drop down menu in Teams (desktop/web).
Additionally, users will be able to add registrations for meetings and webinars for people in your organization and outside of your organization.
The registration feature will be on by default For everyone. In order to view who attended the webinars, we recommended setting the “AllowEngagementReport” policy to true.
Note: We will honor any existing meeting policies enabled within your organization:
If allow scheduling private meetings is turned off, then users will not be able to schedule webinars.
When anonymous join is disabled for the tenant, users can schedule a public webinar but it will fail on join.
By default, all users within your tenant will be able to schedule webinars unless current policy configuration prohibits it.
Should you wish to restrict who who can host a webinar that requires registration for everyone, change the WhoCanRegister policy accessed in the Teams admin center.
You can disable this policy tenant-wide
You can enable this policy for specific users
You can manage the registration feature in the Teams admin center or with PowerShell commands. There are three options for admin management.
Turn off registration for the entire tenant
Turn off registration for external attendees, the For everyone option
Give select users the ability to create a registration page that supports external attendees. All other users would be able create a registration page for people inside the tenant.
Create a new Teams meeting policy by using the New-CsTeamsMeetingPolicy cmdlet and assign it to users.
You might want to notify your users about this new capability and update your training and documentation as appropriate.
Teams meetings to support view-only attendees
MC250956
Stay informed
Published date: April 16, 2021
Affected services
Microsoft Teams
Tag
ADMIN IMPACT
NEW FEATURE
USER IMPACT
We originally communicated this in MC240169 (Feb ’21). Currently, Teams meetings are limited to 300 users. If someone tries to join a meeting after it reaches capacity, they are unable to do so. With this update, meeting organizers who are assigned an appropriate license will be able to host a Teams meeting that has overflow capacity.
Up to 20,000 view-only attendees may join a meeting from late February through the end of June in order to accommodate heightened remote work scenarios. After July 1, 2021 we will support only 10,000 view only attendees.
Note: This capability will be available to users with the following licenses: Office 365 or Microsoft 365 E3/E5/A3/A5/Business Standard/Business Premium. For the rest of 2021, we are offering temporary availability to Teams users to try the features with their existing commercial subscription.
This message is associated with Microsoft 365 Roadmap ID: 65952.
When this will happen
We have started to roll this out and expect to complete by end of April.
How this will affect your organization
When a tenant enables this overflow feature:
After a meeting reaches capacity (300 users), people will be able to join as view-only attendees, with the maximum number limited by the phase.
Organizers cannot remove view-only attendees from a meeting.
View-only attendees will not impact the normal interaction available for regular attendees (those who joined before the meeting reached capacity).
Once the view-only attendee limit is reached, no additional view-only attendees will be able to join.
View-only attendees will follow all lobby and security policy mechanisms.
View-only attendees will have limited access to meeting features. For example, view-only attendees will be able to listen to all audio and view a screen or window shared during the meeting. However, they will be unable to share audio or video, and they will be unable to see chat or other applications that are shared during the meeting.
Meeting organizers will not see view-only participants in attendee counts or reports; this feature does not support the e-discovery of data
What you need to do to prepare
This feature is OFF by default for your users.
You may use PowerShell to enable this feature for your entire tenant while you prepare to assign the licenses.
Set-CsTeamsMeetingPolicy -Identity Global -StreamingAttendeeMode Enabled
Note: The view-only attendance feature is provided using Teams streaming services.
PowerShell is very powerful (no pun intended) but if you don’t know what you are doing it can be dangerous, making big changes to your environment without prompting for confirmation. If you run ANY PowerShell scripts against your Office 365 tenant you alone are fully responsible for the actions undertaken, so please ensure you are fully confident in the source of your information.
If you are looking at scripts for Microsoft Teams from a blog (like this one) I would recommend checking them against MicrosoftTeamsPowerShell Module | Microsoft Docs. This helps you learn more about the scripts but also lets you check the cmdlets (commands) you intend to use are still valid.
Finally, ALWAYS close your PowerShell Windows when you are not actively using them. This closes the connection and logs you out, helping to keep your environment secure.
That said, here is how I would recommend setting up Teams PowerShell. Note I do not use a variable for the credential as the official blog suggests but wait for the log in prompt instead. In my opinion this works better with MFA.
Open Powershell in Windows with Admin – right click on your start button and choose Windows PowerShell (Admin)
Import the newly installed module into the open PowerShell window
Import-Module MicrosoftTeams
Log in to Microsoft Teams
Connect-MicrosoftTeams
You are now ready to manage Teams using PowerShell
When you are installing PowerShell Modules, you will always be prompted to confirm download from the repository, as shown below. You should only confirm one repository at a time using Y response.
Once set up you can then log in future by:
Open Powershell in Windows with Admin – right click on your start button and choose Windows PowerShell (Admin)
Import the Teams module into the open PowerShell window
Import-Module MicrosoftTeams
Log in to Microsoft Teams
Connect-MicrosoftTeams
To Update Teams Powershell
Open Powershell in Windows with Admin – right click on your start button and choose Windows PowerShell (Admin)
Run the Update Script
Update-Module MicrosoftTeams
Import the Teams module into the open PowerShell window
It is possible to capture screen images from a Teams phone using a web browser page. Please note you do need the phone admin login to use this.
Firstly you need to ensure that the device configuration permits screen capture. To create and assign a device configuration profile, go to the Teams Admin Center and under Devices > IP phone choose Configuration profiles.
The setting you need to switch on is the Screen Capture setting
Once the config has been assigned you need the IP Address of the phone and put it into the link https://PhoneIP/screencapture
But how do you get the IP? Well you can get it from the phone itself. These screenshots are taken from Yealink TP55A.
Tap the profile picture on the home screen
Choose Settings
Select Device Settings
Choose About
Note the Device IP
Open your web browser and navigate to: https://PhoneIP/screencapture, replacing the words PhoneIP with the IP address of the phone. You may need to use the advanced options to continue to the page, depending on your network configuration.
Sign in using the device Admin account. The defaults are different by device and the password is controlled by the device configuration policy. For my phone the username is admin (all lower case)
Once signed in use your preferred screen clipping tool to take screen shots from the web browser
Following on from the post for end users on transcriptions in Teams meetings, here is the extra you need to know as a Super User.
Privacy Concerns
Both close captions and transcripts can display the name of the speaker, though there is a setting to control this for privacy purposes if required. This is a per user setting and is found in the Teams settings on both desktop and web apps and travels with the user wherever they sign into Teams.
As with meeting recordings agreement from attendees should always be sought. Often, I will advise participants who do not want to be recorded or transcribed to use the meeting chat and keep their cameras off. Those messages can be read/summarised for the recording/transcription if needed.
When Can I Use Transcription?
Transcription is disabled by default and so organisations need to enable it. This setting is a policy setting and as such can be set on/off for different users or groups of users.
The availability of transcripts in a meeting depends on the meeting policy settings assigned to the user who set up the meeting. The transcription can be started by any user in the same tenant as the meeting organiser, if they too have transcription features enabled in the meeting policy they are assigned. Once started any meeting attendee can view the meeting if they too have transcription features enabled in the meeting policy they are assigned, including external users.
Prior to the release of the meeting Transcript in March 2021, the transcription setting only controlled whether meeting recordings would have live captions available on them, now this controls the transcript feature as well.
Transcription features are not available in Meet Now meetings at the time of writing, but it is a new feature so this may follow.
Transcription is a meeting only feature and not available for calls.
If your organisation uses a compliance call recording third party tool, then that tool may have different functionality. This article relates only to the standard Teams Meeting transcription features.
Downloading and Reviewing the Transcript
If you’ve used the transcript generated in classic Stream from meeting recordings, the actual transcript file will look very similar regardless of whether you download it in vtt or Word format.
If you view the transcript via the Recording &Transcript tab in the meeting entry via the Teams calendar after the meeting you see the transcript in the same format as during the meeting, with user pictures and timestamps showing as time of day not meeting duration time.
If there is more than one transcript, e.g. if the transcription is stopped and restarted during the meeting, then you will see multiple transcripts.
There are two ways of displaying in text format what is said during a Microsoft Teams Meeting; Live Captions and Transcript.
Live captions are shown on screen (usually at the bottom of the meeting screen) and disappear as new captions are generated. Live captions are visible only to users who switch them on. Live Captions can also be switched on when watching recordings, but only if transcription was enabled for the meeting organiser.
The transcript appears in the side pane (same as meeting chat) which users can scroll during the meeting and is saved for download after the meeting. Transcripts are visible to all meeting participants, including guests using the Teams app on PC or Mac. If accessing a meeting from the Teams web app you will only be able see the transcript after the meeting via the chat or meeting details.
Your Teams administrator can control if these features are available for you, so not everyone will have this functionality. If you do not have these options and you need them, please discuss with your Teams administrator.
To start the transcript, from the … Menu choose Start transcription
You will see the banner confirming transcription has started.
Other participants will also get a notification.
The transcript is visible in the side box
and can be displayed, hidden or stopped from the … menu
If you then choose to record the meeting for sound & video as well as transcribe the meeting, the banner notification includes both transcript and recording information. Here the recording was started after the transcript
And you can still access the meeting recording from the chat, as normal.
When stopping a recording yet still running the transcript you see the normal stop recording message
Followed by the banner indicating the meeting is still being transcribed
And this banner shows the transcription has stopped but the recording continues.
Once you stop transcribing the meeting you see a banner confirmation that it has stopped.
After the meeting is over, the recording and transcript are available from the meeting details in the Teams calendar
and also under the Recordings & Transcripts tab
where you can also download the transcript, as a Word document or video text transcript (vtt) file.
Using Transcripts with People from Other Organisations
If people have transcripts feature enabled then you can use transcripts with users from other organisations too. On the left in this image, you see the view for the meeting organiser and on the right the attendee from another organisation. Only people from the same organisation as the person who set up the meeting can start the transcript but people from other organisations can view it, both during and after the meeting.
Teams meeting options are how you can control who can do what in your meeting. In the Education sphere this control is essential but they are also very useful in many other scenarios.
Once you are into the meetings option screen let’s look at what the settings mean and which you should choose.
Lobby
The lobby settings allow you to protect your meeting from uninvited guests. The Invited Users setting is probably the best in most scenarios, however at the time of writing this option is rolling out and not available to everyone yet, so the second best is people in my organisation or Just Me. After all you don’t want any ‘Zoom bombers’ invading your Teams meeting.
Callers are people who join via a phone call, if that feature is available to you, and you can also choose to put these dial-in users into the lobby too.
Presenters
Before diving into these options you do need to consider the 3 roles in a Teams Meeting (see https://bit.ly/3qgQ5Yj for full details). To simplify, when you create a meeting you are the organiser and have full control of the meeting and all features, presenters can share content, their video and mute/unmute while attendees only have the ability to unmute if the organiser allows.
Capability
Organizer
Presenter
Attendee
Speak and share video
Y
Y
Y
Participate in meeting chat
Y
Y
Y
Share content
Y
Y
N
Privately view a PowerPoint file shared by someone else
Y
Y
Y
Take control of someone else’s PowerPoint presentation
Y
Y
N
Mute other participants
Y
Y
N
Prevent attendees from unmuting themselves
Y
Y
N
Remove participants
Y
Y
N
Admit people from the lobby
Y
Y
N
Change the roles of other participants
Y
Y
N
Start or stop recording
Y
Y
N
Set Meeting Options
Y
N
N
View Attendance Report During Meeting
Y
N
N
Control Breakout Rooms
Y
N
N
Mute
Often attendees join with a lot of background noise. If you are running a training or briefing style meeting this can be very disruptive, so it may be appropriate to mute attendees and block them from unmuting. This option is also one that is often changed during a meeting.
Chat
Meeting chat is a useful addition to a meeting, but when it continues after a meeting or is abused by attendees then it can become a distractor. Like the allow to unmute setting, this can be changed during a meeting at need. Only allowing chat during the meeting, does not mean the chat disappears after the meeting, but that it becomes read only once the meeting ends.
Reactions
Reactions are visible feedback which show on screen and can be used to engage with the presenter.
Coming Soon – Video Availability settings to block attendees switching on their video is due to start rolling out in April 2021 (see Microsoft 365 Roadmap | Microsoft 365)
To access the meeting options before the meeting use option 1 or 2 below. To access the meeting options during the meeting I prefer option 4 below as you don’t leave the meeting, but option 3 will take you to the same page as options 1 & 2, if you prefer.
I’ve called my new blog Teams Queen, after friends in the community started calling me their “Teams Queen” in recognition of the help I’ve given them with Microsoft Teams.
With today being the day of the 2021 Scottish Summit, a great example of what the community can do and next week it’s Microsoft Ignite where we will be celebrating certificated professionals. It seemed a great time to put out launch my new blog with this post about the Microsoft Certified Trainer community.
I LOVE being an MCT and wanted to share with you all why if you are an MCT I strongly believe you should engage with the community. So this blog shares what being involved in the community has given me personally and professionally.
I am an independent trainer and have been working as a full time freelance professional since 2005, focussing mainly on training and more recently consultancy too. I’ve been in training and education in some form or other since gaining my PGCE in 1996 and have been an MCT since 2008, though I was a MOUS Master Instructor for nearly 2 years before I became an MCT, as in those days Office certifications had their own instructor program before it was merged with the MCT program.
Having left teaching after a fixed term contract and fallen into IT training by accident in 1998/9, the Office certifications and the ECDL were a gateway to knowledge and skills in my new profession and at the time were a HUGE step for me. Computers were not really my friend at this point, but by working for these certifications I learnt and was soon hooked on IT. But I passed the exams, applied to and was accepted into the MOUS Master Instructor program and my IT Training career was born.
Fast forward to 2017 and I was starting to wonder why I kept renewing my MCT. It was starting to feel like a useless badge. If I’m honest, I kept renewing mainly for pride but it wasn’t really worth the cost and if I’m honest, I didn’t see any other benefits being an MCT. Especially once the Office 365 licence benefit was withdrawn.
Then in 2017, I got an email from one of the UK regional leads about an event they were holding at the Microsoft Campus in Reading in the October. Now I didn’t even know such things happened and hadn’t ever received such a message before so had no idea what a regional lead was, let alone that there was a whole community of MCTs. I mainly went as I was interested in seeing the Reading offices and learning a bit more about this Azure thing that seemed to somehow link the Office 365 which I was now mainly training on. Oh how naïve I was!
I’d been training Office365 since about 2013 (Aug 2013 was the first course I have delivered focused on Office 365 as a whole) , but it was that event in 2017 when I first became aware of the MCT community and realised just how much was going on and what other trainers were doing, as well as how little I actually knew about some parts of 365 and cloud, but also how much I knew about others areas. That event was a catalyst for me to drive to the next level. I wanted to be a certified 365 administrator and train the official courses. I felt I was so close, though having no technical background it was a struggle.
After that UK event in 2017, and another in 2018 then the MCT Global Summit in Germany in Oct 2018 I gained the motivation (and confidence) to try for the Office 365 certifications. It took me a few more months after that to get my first Microsoft 365 certification, mainly as I ended up waiting for the role based certifications early in 2019.
By the time the European MCT Summit rolled around in September 2019, I had friends in the MCT community and even got up the courage to speak at the event to try and encourage others to follow in my footsteps. Now, no-one’s first conference speech is an amazing success, but mine was well received, plus I got a lot of helpful comments and constructive feedback. My biggest gain at that event though was that I really now understood what was going on.
After those two international events as well as friends in the community I had I had also gained a network of people who encouraged me, helped when I asked and referred work to me too. In the space of 18 months I’d gone from being disillusioned with being an MCT to gaining professionally and personally from being a part of a community I had been missing out on.
As a result of getting involved in the MCT community I’ve been to more community events and conferences (not just those for MCTs), gained many more professional contacts, met more MCTs, am now delivering the MOC courses, helped others get started with their MCT benefits and generally got more involved in the MCT Community. But the biggest thing this community has given me from a professional perspective was the support and motivation to take the steps I wanted to enhance my career. Without that one email in 2017 and that one event, none of that would have been possible.
A couple of days ago I posted a blog on my using a green screen, OBS Studio and Microsoft Teams. In it I mentioned Stream deck from Elgato as a possible alternative to needing 3 screen to use full screen projection in OBS Studio. The paragraph went
You could also use a scene switching piece of hardware for controlling the scenes. I tend to also open the meeting chat in the browser version of Teams on my control screen, though you could do that from a mobile phone or tablet rather than 3rd screen, if you went with the hardware based solution. Something for me to consider as a next step if the virtual training keeps going.
Well it seems there is a software version which comes in much more cost effective.
Stream Deck Mobile is a mobile app that does the same thing as the hardware. Having found this I decided to test it out and this blog is what I found out and how you too can set it up. There is a subscription cost for the app but you can pay for 5+ years subscription for less than the physical device and you get the first month free to test it out. Or use both if you want to.
Getting Set up
Install the app on your mobile device – search or app store or go to https://www.elgato.com/en/gaming/stream-deck-mobile on your mobile device and follow the links. You will need to sign up for a subscription which will give you a one month trial.
The mobile app will prompt for a QR code, but you when activated, which you get from the desktop app, so you also need to install desktop software from https://www.elgato.com/en/gaming/downloads
Once installed, open Stream Deck on your PC & Phone and connect using a QR code. Follow the steps in the images below.
On the PC , pick Add Mobile Device… to display QR codeSwitch to mobile device when you see the codeScan QR code displayed in your PC from this screen. If the QR scan screen is not showing see next image to continue
IF QR scan code is not showing, tap the gear icon (bottom right)
Then tap Add Connection. You can also use Add Connection to connect to a different device.
You can now start customising the buttons on your deck. To do this find the item in the action list and drag to a button position. Rotate your phone to landscape to use otherwise the layout between PC and phone doesn’t line up!
The first thing I added was a scene from OBS Studio. I decided to keep the scenes in the same order I had them in OBS Studio and keep the same names. Enter the title, then adjust display and font options on the title from the T buttonChoose the scene you requireTo customise the icon, you can upload an image or click Create New File to open the Key Creator website.Create your own button using a web based tool by adding icons, text, images and then, click save key to download the compiled image. I recommend that you save the images in a folder just for these icons so they are all in the same place. This will make for easier backup/alteration etc.
Repeat until all the required scenes or other buttons are added to your Stream Deck.
Another great feature is the ability to launch a website or application on your PC from the deck. I regularly open the same set of web pages during training courses, so I created multi action button to open multiple web pages.
Add a multi action button, give it a name, then drag the required actions into the action.Set the properties on each action in the group
First click on More Actions button at the bottom of the list of actions, search for and install Hue connectionsI then created a muti action button which let me switch on and set the colour on my dedicated Do not Disturb light.
My Strem Deck as it stands, but I think it will evolve as I start using it.
I did leave the Welcome key in place for now, to access the welcome blog again if needed. The blog is:
Its April 2020 and due to Covid-19 a lot of us are working from home, trying to find quiet nooks to hold conference calls without inappropriate interruption from family members.
There are some great articles out there on building your own automated “Do not Disturb” lights and also some great products, but I decided that I needed one that was a little more manual, but still a bit geeky.
Why?
I like technology so it needed to be a little geeky
I’m not a developer – firmly no code here if I can possibly get away with it
I’m working across 5 different Microsoft Teams Logins as a member of teams in 11 organisations – so which log in would I automate from? (One of the downsides to being a consultant)
We have multiple people in the same house who need to indicate their Do Not Disturb Status and not all of that is triggered by Teams
The solution I chose was to program a Flic button for each of us and set up a Hue light near the entrance to each persons work are to let each other know if we were available or not.
Our system now works like this. We are lucky enough to be able to each use a different room to work in, so we close the door to the room to indicate we are working and then set the light to red/green to indicate if we can be disturbed.
Closed door & red light = Do not enter, send me a text if its urgent
Closed door & green light = Busy, but you can come in
Open door (regardless of light status) = I’m happy to see you 🙂
Each Flic is programmed the same and we have them linked to a Flic hub, so they work even if our phones are out of range/off. (See https://flic.io/) The flic buttons are programmed from the mobile app. You also need a Philips Hue hub and colour change light. But Flic does integrate with other smart bulbs and IFTTT too, so there are quite a few options to recreate this. These are the steps assuming you already have a Philips Hue bridge and lights but are new to Flic.
Buy your button
Download the app
Follow the instructions in the app to add your hub and/or button.
Give the button a name once you have added it
Tap the + beside the action and pick Philips Hue
Follow the instructions to connect your Philips Hue bridge – you’ll need to be close to the bridge to do this as you’ll have to press the button on the top of the bridge.
Pick the light and setting you require. Below is my button and the ‘Click’ setting to switch on the red light:
Are you a member of a Team across more than 1 organisation/Office 365 Tenant? I use Channel Notifications to help me keep on top of the less well used teams.
NOTE: A Tenant used to refer to the part of the whole of Microsoft365 which you as an organisation rent. Many organisations have only 1 tenant but larger or more complex organisations may have more than one.
Switching Tenants – Teams Desktop App
Currently (April 2020) the experience of being a member of a Team in another companies tenant can be challenging, especially if you are a member of quite a few teams across multiple organisations. Switching between tenants is much smoother than it used to be but can still be a challenge.
Keeping on top of what is going on can be a challenge. The are:
Have the other tenant open in different web browser profiles
Use a different device for each tenant (not practical/feasible for most people)
Use Notifications
In this blog I’ll concentrate on using notifications.
First – in you main tenant, check your general notification settings. If you have a very busy Teams environment make sure you are not going to be inundated with notifications with the settings you choose. My main tenant is quite light in Teams usage but any posts where I am tagged typically need my attention quickly, hence the once every 10 minutes setting on missed activity emails.
Teams Desktop Notifications
Secondly – if you use Teams on a mobile check those notification settings too. But remember the notification settings here are per device not per organisation.
Thirdly – In the tenants you dont normally work in check the tenant wide settings for notifications as per step 1.
Finally – In the tenant/org you are not normally working in, go to the important channel(s) and click …. next to channel name then choose channel notifications. Set it as appropriate for you.
At this time the world is struggling to cope with COVID-19 and the movement restrictions needed to fight the rapid spread of the virus. As more organisations turn to Microsoft Teams to help keep business and education going we all need to ensure we can see what is happening across our teams.
Yet when we go back to normal, these skills will still be useful. Just remember, you are an individual. What works for you may not work for others – if the settings I suggest don’t work for you, pick different ones, but at least now you know where to find them.
Do you or your organisation deliver training via Teams? Do you record those sessions? Does the trainer (or meeting organiser) have Microsoft 365 Copilot license? If you answered ‘yes’ to these questions then this idea is for you!
Learning is most effective when we are exposed to new information is in different ways, via different mediums and at different times, so lets use the power of Copilot to add another layer to the learning.
Create a custom meeting recap tailored to recap the training session which you can share with attendees a short time (1-2 days) after the session. This not only serves as a reminder of the session, but helps to reinforce the learning and recommended follow up actions and give a helpful way for them to find the information again and again.
I’m trying out the following custom summary and I really like the output.
Create a summary for learners attending this training session.
Write in British English using clear explanations and technical terms only as necessary but predominately simple language suitable for people learning the topic discussed in the meeting.
Start with an Overview including the title of the event, date, start time, main speakers (session presenters) and 1 sentence overview of the topic.
Include
- the key learning points discussed
- follow up actions recommended
- any details of reference materials or sources recommended
- any reference links shared in the chat during the session by the presenters
- summary of questions asked and answers given
Share this summary via email with attendees, add in a link to the session recording and/or an audio overview of any training materials and you’ve given your trainees multiple, easily accessible ways to recap and reinforce their learning!
Next, I’m off to try this prompt with Facilitator Agent in a meeting so it immediately shows in the chat for all attendees too. Though I much prefer the share via email for longevity of reference.
Have you ever tried to send a file to someone outside your organisation in a Teams chat, only to realise you couldn’t attach it directly? Good news: that’s changing! (If your admin enables it)
A long time source of confusion in Microsoft Teams has been the fact that “attaching” a file in a chat with an external user including a group chat or meeting chat did not work. This new feature means that attachments in chats including external users will see (almost) the same behaviour as chats with only internal users.
It is important to note that this feature is DISABLED by default and when enabled honours all file sharing settings, as it sends a link to the file, not a traditional attachment.
This feature started rolling out on 24th July 2025 and is the subject of Message Center Message ID MC1102790 and Roadmap item 492625.
Note: in place of AltText on the images, this blog describes what can be seen in the images in the standard text. If using a screen reader, do not expect additional image descriptions.
User Experience
Once enabled the Attach file option will be available under the + button in chats with external users. This experience is shown below. Prior to this change the Attach file option was not available.
NOTE: If you don’t see the “Attach file” option, your admin has not enabled the feature.
When you attach a file the default permissions are set to People in this chat with the link can view. As shown below, this file share experience looks no different than the file share experience in chats with internal people, with the file link showing a buttom shoing the file name and file type icon.
Tapping the permission option when writing the message to share the file, presents the options available based on the setting which apply to the file based in its location. In the image below the file is stored in a user’s OneDrive which is allowed to generate anonymous links and as such the user can choose Anyone (anonymous link), People in my organisation, people in this chat, people with existing access and people they choose (Specific people), as well as additional options such as view/edit and expiration date.
As always when sharing a file:
Be mindful of what you share: Avoid sending sensitive or confidential files unless you’re sure it’s safe and allowed.
Double-check access: Always tap the permissions information to make sure the link you are sharing gives the permissions you want, don’t blindly trust the defaults.
Remember:
The way a file behaves when shared depends on where it’s stored and who owns it.
This means:
If you share a file from your organisation’s OneDrive or SharePoint, the sharing settings follow your organisation’s rules.
If someone else shares a file from their organisation, it follows their organisation’s rules.
If someone can’t open a file, it is almost certainly because of the file’s permissions rather than a Teams issue. To check the permissions on the file after sending open the file and choose Share > Manage Permissions > Links
Chat particpants from a different organisation to the person sharing the file will see the file has an EXTERNAL tag on it, as shown in the image below, while internal participants in the chat will see the file without the external tag as normal.
Enable the Feature – Teams Administrator
To enable this feature the Teams Administrator needs to run the PowerShell command to which updates the Files policy to allow file sharing in chats including external people. The official documentation on the PowerShell cmdlet to be used in available on Microsoft Learn.
The following command will enable file sharing in chats for everyone assigned the default files policy. Note the message centre post refers to setting the value to True where as the value is actually Enabled.
THESE STEPS ARE PROVIDED WITHOUT WARRANTY. Always research any PowerShell commands you use before running them as errors can damage your Microsoft 365 environment. The steps below include reference links to help you verify them including checking to see if anything has changed since this article was written.
If you are new to Microsoft Teams PowerShell , please start with the Microsoft Learn guidance on using Teams PowerShell. Once you have your PowerShell application installed and open with admin rights, the process is:
Install the Microsoft Teams PowerShell module using the command Install-Module -Name MicrosoftTeams -Force -AllowClobber
Connect to the Module and sign in to Microsoft Teams with a Teams admin account run Import-Module MicrosoftTeams then Connect-MicrosoftTeams Sign in using the login dialog with your account that has Teams Admin rights
Check the current configuration of the Files Policies in your environment using Get-CSTeamsFilesPolicy
Assuming you do now need to enable the external file sharing in the global policy set the value as follows. If you need to change a different policy change the policy name in “” before running this command Set-CSTeamsFilesPolicy -Identity “Global” -FileSharingInChatswithExternalUsers Enabled
A new feature is rolling out to Microsoft Teams which brings the threaded conversation layout we are familiar with from group chats to Teams channels.
Microsoft have made comprehensive documentation available from the Adoption site, so I’d recommend you read those from the links below. But here are the key points you need to know today.
Here’s a visual comparison of the two layouts side by side. On the left the new Threads view and on the right the current Posts view. Things to note:
The messages tab is named Posts when using the posts view and Conversation when using the threads view
In this comparison in Posts view I have newest messages at the top, whilst threads view, shows the newest thread at the bottom of the list in the Conversations tab.
Create a new thread by typing a new message
The reply to a thread button show up on the message mini toolbar when you hover over or right click on a message.
When you reply to a thread you are automatically following it. Whilst viewing a single thread in the side pane you can use the … menu to unfollow the thread, amoungst other actions.
Followed threads can also be seen in your quick links at the top of the combined Chat & Channels list.
You can see all threads in the channel using the Open threads button.
A thread is defined as a message which has at least one reply, so though, in the image above, you see what might be regarded as 2 threads, but the second message doesn’t have a reply on, so it not considered a thread.
You can also choose to follow/unfollow a thread, without opening the full thread
You can enable this new view when creating a channel or changing the settings of an exisitng channel.
When adding a new channel select the desired layout as you create the channel.
To change the view of an existing channel, navigate to Manage channel for the individual channel and click Edit button.
Then choose the required layout and Save
The Post/Threads view applies to all members of the channel. If some channel members are not able to view threads view there are issues with message ordering, so the recommendation would be to return to posts view until all have the updated exerpeince.
You can find out more on the Microsoft Adoption site, which includes three documents
With New Teams multi-tenant, multi-account support Teams gained the ability to switch to the correct account automatically when joining a meeting. For those of us who use mutliple accounts and attend meetings in partner organisation tenants, this support is invaluable.
However, there has been a change and whilst the main sign in account is still chosen automatically to match the account invited to the meeting, if you have a guest account in the host tenant that is no longer selected automatically. If you are an attending NDA meetings with Microsoft they now require you to join with your guest account and this change does seem to be causing some issues for people attending such meetings.
To join with a guest account the process is now as follows:
Do NOT tenant switch to your guest account before joining the meeting
When joining the meeting the account will be shown at the top of the meeting join screen click the Change button, next to the sign in account which is shown at the top of the meeting join screen (highlighted by red box in the screen shot below)
In the Change account or org box choose the required guest account rather than the main account. In the example below this needed to be Microsoft (highlighted by the blue box in the screenshot below)
Once you have selected your desired account, the Change account or org box will close and your meeting join window will reload.
When you choose a guest account within the same sign in account, the account displayed at the top of the meeting join screen will not update, it remains as the sign in account. However you should notice the tenant you are a guest in shows at the top right of the meeting join window, next to your user icon.
You can now select your chosen camera and audio settings as normal and join the meeting.
Meeting Set Up Tip: Always check the meeting options when setting up your meetings to ensure your meeting lobby is configured as desired and remember that meeting participants who have presenter role can admit users from the lobby by default. If you are configuring meetings where users need to join with a guest account in your tenant, you may need to configure the meetings to ensure the appropriate people have presenter rights so that you limit who can admit people from the lobby.
Microsoft Teams has had / commands before via the search bar. For example these screen shots are from October 2020 and show using the search bar in classic Teams with / and @ commands.
In New Teams the / list is shorter but still contains the ability to start a chat or call, as well as set your status and the @ command still allows me to find people and communicate with them directly.
Current / commands in the Search box in New Teams
Now in May 2024 and announced as part of the Build 2024 news for Microsoft Teams is the inclusion of / commands in the message compose box which brings new options including starting the recording of a video message.
The new / commands in the the message compose box in New Teams
I also really like the integration of the shortcuts reference into this set of commands and this defaults to showing the shortcuts for the message compose bar, afterall that is where we opened it from.
Microsoft Teams Premium is an add-on to Microsoft 365 and brings additional features. In this blog series we’ll explore each of the 5 categories of features:
Meeting Customisation
Meeting Protection
Meeting AI Features
Webinars
Virtual Appointments
I’ve also written an overview of Teams Premium and who needs it and a first steps guide for the public preview or all my Teams Premium articles on one place. The official getting started with Teams Premium guide for Teams Administrators can be found on Microsoft Learn.
NOTE: As this is a long article it has also been published as individual feature blogs for Watermarks, Encryption, Sensitivity labels and Meeting templates.
The Meeting Protection features of Teams Premium include adding a watermark to videos and content shared during a meeting to help protect sensitive information and applying sensitivity labels to meeting to restrict or enforce features available in the meeting such as apply watermarking, limiting lobby bypass, restricting recording, preventing copy & paste from chat. End to End encryption for meetings is also unlocked with a Teams Premium license and can be enforced with a sensitivity label.
With more and more settings becoming available via Meeting Options, it can be challenging for users to pick the best combination options for different meeting types. This is where meeting templates help. As an organization you can set up meeting templates for use in creating meetings by users licensed with Teams Premium to simplify the creating of different types of meetings with the appropriate meeting options pre-selected.
Licensing for the features in this category typically follow the rule that the features are applied to the meeting when it is created/organized by a user licensed for Team Premium.
The watermarking feature and end to end encryption are both available in meetings organized by a user licensed with Teams Premium via the meeting options and applies to all attendees in the meeting regardless of their licenses.
Sensitivity labels require both Teams Premium and Microsoft 365 E5 licenses be assigned to the meeting organizer. The meeting options are then set for the meeting and impact all meeting attendees regardless of their licenses.
This is quite a long article, so here are the sections if you want to jump around:
As the features under discussion in this article mainly relate to meeting options, before looking at the meeting protection feature, let’s look at where you can access meeting options.
Applying Meeting Options
When creating or editing meetings via the Teams client incl desktop, web and mobile
When creating or editing meeting via Outlook web or desktop client
From the meeting invite
During a meeting, from the meeting menu you can show/hide meeting options in the side pane
The Teams Premium Difference
The Meeting Options with Teams Premium License looks like this for a private scheduled meeting ( a standard Teams Meeting)
And for a meeting organised by a user without Teams Premium it looks like this
The meeting created by the user with Teams Premium has additional features available in the Meeting Options screen specifically:
Apply Sensitivity Labels
Manage What Attendees Can See
Enable Green Room
Who can record
Apply a watermark to shared content
Apply a watermark to everyone’s video feed
Meeting Theme
Enabled end-to-end Encryption
In this article is it is the Sensitivity Labels, watermarks and end-to-end encryption that we will focus on, plus the use of meeting templates to control these.
Watermarking is intended to be used as a deterrent to stop attendees taking and sharing screenshot of meetings and people in the meeting by overlaying their email address onto the incoming video and shared content. This does not block screenshots, but ensures that if screenshots are shared then the source can be easily traced. This is especially useful when using a Teams meeting to share sensitive content or in situations where attendees images should not be shared, such as in education settings.
When watermarks are enabled for either shared content or video feeds the meeting can not be recorded. It appears logical to assume that this is due to challenges determining what watermark should appear on the recording. It will be interesting to see where Microsoft go with this challenge, as I can easily see a situation where you will need both recordings and watermarks.
This is not the only restriction on meeting functionality which comes about from enabling the watermark feature.
When applying a watermark to everyone’s video feed the following features are not available:
Meeting recording
Together Mode
Large gallery view
When applying a watermark to shared content the following features are not available:
Apply Sensitivity Labels
Manage What Attendees Can See
Enable Green Room
Who can record
Apply a watermark to shared content
Apply a watermark to everyone’s video feed
Meeting Theme
Enabled end-to-end Encryption
One final limitation is that when users join from a scenario which does not support displaying watermarks, such as web, and VDI, where participant is anonymous or when meeting attendees are in streaming only mode they will have an audio only experience. In the web experience a message is displayed for the user.
Apply a Watermark to a Meeting
To use watermarking, enable the option in Meeting Options before the meeting starts, the setting can be applied during a meeting but seems to only be applied as people join. Note that recording options are now greyed out.
Once others join the meeting they will see the watermark overlayed on content being shared and others video feeds but not their own. A user sharing their screen will not see the watermark over the content they are sharing. So to test this I need to join from two devices and hence I’m looking in two directions at once in the image below which is taken from the user not sharing the content.
Also note the message displayed at the top of the screen, letting them know the watermark feature is being applied.
Licensing
Only the meeting organiser needs the Teams Premium licence applied for the watermark feature to be applied to the meeting.
Platforms
Watermarks are supported on Teams desktop (Windows & Mac), Teams mobile, Microsoft Teams Rooms on Windows, and Microsoft Teams Rooms on Surface Hub. Watermarks are not supported on Microsoft Teams Rooms on Android, Teams on the Web, VDI or Cloud Video Interop.
Admin and Set up
To ensure the feature is available for users to apply via meeting options it must be enabled in the appropriate Meeting policy/policies.
Watermarks can be set manually by the meeting organiser or by an admin in meeting templates and sensitivity labels.
End-to-end encryption for meetings provides an additional layer of security with encryption applied at the start of data transmission and decrypted at the end. Audio, video and screen sharing are all encrypted. Whilst standard Teams meeting encryption involves encrypting data in transit, end-to-end encryption allows users to verify the connection is encrypted along the whole transmission chain.
Not all meeting features are available in an end-to-end encrypted meeting. The following features are not available in encrypted meetings:
Meeting recording
Live Transcriptions
Together mode
Large gallery view
Companion Mode
Breakout Rooms
Encrypting a Meeting
To use end-to-end encryption, enable the option in Meeting Options before the meeting starts. Note that recording options are now greyed out.
When joining an encrypted meeting you will see a message confirming that the meeting encryption is active.
There is also a secure logo in the top left corner of the meeting window.
Meeting participants can verify that end-to-end encryption is active by verifying they can see the same number
Licensing
Only the meeting organiser needs the Teams Premium licence applied for the encryption feature to be applied to the meeting.
Platforms
End-to-end encrypted meetings are supported when the parties are on Teams desktop (Windows & Mac), Teams mobile and Microsoft Teams Rooms on Windows.
Admin and Set up
To ensure the feature is available for users to apply via meeting options it must be enabled in the appropriate Enhanced encryption policy/policies.
Sensitivity labels can now be assigned to meetings. This provides the ability to limit access to the meeting invite and responses in Outlook and Teams as well as the meeting and chat in Teams as well as enforce meeting options for the meeting. Sensitivity Labels will be best used in conjunction with meeting templates for the majority of users, whilst advanced users may wish to manually set the label on the meeting with or without meeting templates. More on meeting templates to follow.
The Sensitivity Label is visible on the meeting in Teams, though not currently in the position shown in the documentation, but rather under the … menu on the meeting edit screen.
In the official documentation, and presumably coming soon this should be showing next to the join button
If the label includes item encryption the meeting invite is encrypted. This encryption works in the same way as email encryption. Meaning that recipients using a mail client which can decrypt the message (such as Outlook) will be able to see the message whilst those using other clients will need to use Outlook on the Web or the encryption portal to access the invite.
There are some practical limitations to consider as well. They key ones:
Sensitivity labels cannot be applied to instant meetings (Meet Now), Webinars or Live Events
Automatic labelling is not supported
Mobile clients cannot decrypt the meeting invite in calendar applications including Outlook mobile and as such a link to the encrypted content will be displayed
Copy chat restriction is currently not supported for external users, nor in all browsers when using Teams for Web
If the label is changed during a meeting, the changes will not apply unless the meeting ends & restarts
Labelling meeting using the graph API is not supported
As these limitations are very likely to change as the product evolves, please do review these here for up to date information.
Create a Meeting Sensitivity Label
Sensitivity labels are created from the Microsoft Purview Compliance Portal (https://compliance.microsoft.com/) under Information Protection > Labels. General instructions on creating sensitivity labels is available in the documentation on Microsoft Learn.
To create a label for a meeting, choose Create a Label
Enter an appropriate a Name and Display name. The reason for two names is so that the display name can be reused when an updated label is required with different settings (a new version of a label) but to the users it should look the same. For example Name = SensitiveMeetingV1 and Display name = Sensitive Meeting. Add appropriate description for users and include version detail in description for admins. Finally (optional) pick a label colour. Click Next on each screen to advance to the next.
For a meeting label choose a scope of Items and Include meetings. Click Next to advance to the next screen
In protection settings encryption is used to control who can access the meeting invite, content marking is used to put header/footer into the meeting invite and Protect Teams meeting and chats is used to configure the meeting options and protection for meeting chat.
Encrypting the meeting controls access to the meeting invite, meeting details and join link, which can help ensure your meeting join information is not shared further than those invited by the organizer of the meeting. Encryption and content marking settings are the same as for all other item sensitivity labels, so here we will focus on the new settings, those for meetings and chats. Click Next to advance to the next screen
These controls set the meeting options on meetings with the sensitivity label assigned to the values set in this screen and prevent the organizer from altering those settings. After the walk through of creating the label this article discusses these options in more detail. Click Next to advance to the next screen
Auto labelling is not supported for meeting labels, so leave this option off. Click Next to advance to the next screen
As groups were not selected in the scope at the start, the group options are greyed out. Click Next to advance to the next screen
Options for schematized data assets were not selected in the scope at the start, the group options are greyed out. Click Next to advance to the next screen
Review the summary of chosen settings. You can return to any step and edit the settings if they do not look right using the Edit link on each section or click Create label if all settings are correct to create and save your label.
Once the label has been created it needs to be published to be available to users. Publishing a label is no different for a meeting label as other labels. Assuming your organization already uses sensitivity labels and you wish to add this label to an existing policy this is covered later in this article. To learn about label policies and publishing sensitivity labels see the documentation on Microsoft Learn.
Meeting Options Controls for Meetings & Chats in a Sensitivity Label
The first setting is to set the meeting lobby controls for the meeting.
When selecting people who can bypass the lobby to Everyone in my org, trusted orgs and guests, you can also choose to allow dial in users to bypass the lobby
The label can also be used to set who can present in the meeting.
By default anyone from the same organization as the meeting organizer with presenter rights in a meeting can start the recording. The recording will then be stored in the OneDrive of the user who starts the recording with the meeting organizer having owner rights and ability to change permissions, expiry date and video settings. This can lead to confusion, so it can be preferable to limit recording to the meeting organizer and appointed co-organizers.
Automatic recording of meetings is helpful in some situations, such as when the organizer cannot join at the start of the meeting, or when it is important that no-one forgets to start the recording.
Of note on this control is that the wording changes when the toggle is switched. With the setting off the wording reads Don’t record automatically and with the setting off it reads Record automatically.
End-to-end encryption can be enforced from the sensitivity label. This toggle, as with the automatic recording toggle, changes wording as it is set. When off it reads Don’t apply end-to-end encryption.
When enables the setting reads Apply end-to-end encryption.Remember end-to-end encryption disables recording of the meeting and as such encryption must be off to set recording options in a sensitivity label and if recording is set to automatic within the label then encryption cannot be switched on.
Watermarking can also be set by the sensitivity label. Remember watermarks disable recording of the meeting and as such watermarks must be off to set recording options in a sensitivity label and if recording is set to automatic within the label then watermarks cannot be switched on.
Water mark settings also change their wording within the controls from Don’t apply … to Apply…
As in direct meeting option controls the sensitivity label can be used to limit availability of meeting chat. The chat can be set to be disabled for the meeting, available only during the meeting or Always which means from the time the meeting is created.
A control which is only available via the sensitivity label currently and not directly in meeting options is to prevent the copying of the meeting chat. Please note that this restriction is currently not supported for external users, nor in all browsers when using Teams for Web and it is recommended you read the learn who gets blocked link for more information: Prevent copying chat to the clipboard label setting
Publish a New Label Using an Existing Policy
To add your new label to an existing policy choose Label policies in the Information Protection page within the Microsoft Purview Compliance Portal. Select the label policy to be edited and choose Edit policy
To add a new label move to the Labels to publish page and choose Edit below list of labels
Search for and select the new label then click Add
Verify the list of labels is correct and click Next
Assuming you do not need to make any further changes to the policy at this point other than for meetings click Next until you reach the Default settings for meetings and calendar events, choose the default label to be applied or leave blank. If not all users in your organization will have Teams Premium and E5 licences it is likely to cause confusion setting a default as users without the licenses will not be able to see the sensitivity label assigned not change it, and therefore I would recommend not setting a default.
Review the settings and click Submit if all are correct.
Wait for confirmation that the policy has been updated before navigating away from the page.
Add Sensitivity Label for Channel Meetings
You will first need to create AND SAVE a label that applies to a meeting before choosing that label as a default for channel meetings.
If (and that’s a big if), you want create one sensitivity label to apply to items (incl meetings), groups and channel meetings, you would need to create the label with the scope set to items incl meetings plus groups. Once created you will then edit that same label and set the label itself as the default for channel meetings in a Team with the label applied.
Too muddled? Then just make it simple and don’t set multiple scopes within the same label.
For example to use sensitivity labels to restrict files, meetings, groups, teams and sites to internal use only, I would:
Create a label called Internal scoped to Items (excl meetings) and applying only encryption, with encryption limiting access to internal users. This label could also include marking with a watermark/header/footer, as required.
Create a label called Internal Meeting scoped to Items (incl meetings) with encryption enforced and limited to internal users plus meeting options with lobby bypass limited to only People in my organisation, along with any other meeting options you wished to apply. This will limit access to the meeting invite to internal users only and ensure anyone else who is given meeting join codes is sent to the meeting lobby.
Create a label called Internal Team scoped to Groups & sites with controls on Privacy and external user access settings which sets the group to a Private group and does not allow external users; External sharing and Conditional Access settings which sets sharing to Only people in your organization; and pick the Internal Meeting label as the default for channel meetings.
Publish the 3 labels to required users
Apply a Meeting Sensitivity Label to an Individual Meeting
To manually assign a sensitivity label to an individual meeting, open the meeting options before the meeting starts and choose a sensitivity label, then Save the changes.
Whilst you can change the sensitivity label from meeting options within the meeting the changes do not apply until the meeting ends. So if you need to change the label during meeting the organizer should make the change and then end the meeting, which will remove everyone from the meeting. When people rejoin the meeting, the updated meeting options will apply.
Licensing
Only the meeting organiser needs the Teams Premium licence applied to be able to set a sensitivity label on a meeting. However they also need to be assigned a Microsoft 365 E5/A5/G5 or Office 365 E5/A5 license.
Platforms
Applying, changing and viewing a sensitivity label on a meeting is supported in Teams for web, Windows and MacOS. You can also manage and view the label applied to a meeting from Outlook for web, Windows and MacOS. However note at time of writing no Outlook for Mac versions have been released with this support, see Requirements for details of supported version numbers.
Admin and Set up
To ensure the feature is available for users to apply via meeting options the labels need to be created and published by a Compliance Administrator. There is not additional set up for the Teams Administrator.
Meeting templates will help users create meetings with the correct settings in meeting options as the template applies those setting automatically. The meeting templates also help with governance as they enforce the meeting options set in the template. Templated meetings published to the user show up on the New Meeting button in the Teams client, which is what the Community Meeting option shown in the image below is.
Create a Meeting Template
To create a meeting template, in the Teams Admin Center choose Meetings > Meeting Templates and select Add
Add a name and description then select settings as desired, before saving the template. The normal restrictions on which options can be set in combination apply within the meeting template. e.g. Meetings using end-to-end encryption cannot be recorded.
As well as configuring the default settings for each option, the chosen setting can be locked so it cannot be edited by the meeting organiser.
Some settings can also be hidden, effectively making them unavailable for users
Whilst hiding an option may seem like a good thing to do and minimise the options available to users, it can lead to confusion with users familiar with the meeting options and a lack of clarity as to the features available in the meeting. When users are aware that settings have ben configured for specific security or governance reasons this avoids the belief that there is a bug or problem.
Options are grouped into categories:
Security
Audio and Video
Recording and Transcription
Roles
Meeting Engagement
Security Options
Applying a Sensitivity label to a meeting enforces settings for the other options and those options set by the label will be greyed out (unavailable to set, hidden or locked) in the meeting template.
Templates which apply sensitivity labels would be expected to lock the label in place, so it cannot be removed and the options altered, unless the label is a recommended setting. Sensitivity labels are created and managed in the Microsoft Purview Compliance Portal. Available labels will depend on the configuration of labels within your tenant. The sensitivity label option cannot be hidden, but can be locked once set.
Lobby options include all the settings for the lobby in standard meeting options. This option can be hidden and also locked once set.
The option to permit People calling in by phone from bypassing the lobby is controlled partly by the lobby bypass setting chosen. If this option is set from the lobby bypass it cannot be locked nor hidden, if it can be set manually then it can be locked and/or hidden.
Enable meeting end-to-end encryption, watermark for screenshare and watermark for video can all be locked and hidden.
Audio and Video Options
Both disable mic and camera for attendees can be locked and hidden in the template
Recording and Transcription Options
Recording and transcription options can both be locked or hidden.
Roles Options
The caller join notification option can be hidden and/or locked.
Meeting Engagement Options
Attendee chat option includes standard chat availability settings and can locked and/or hidden.
The remaining three options in the Meeting Engagement category, Reactions, Q&A and manage what attendees can see toggles, can all be hidden and/or locked.
Once the meeting template is saved it needs to be published.
Publishing a Meeting Template
To ensure the availability of a meeting template, in the Teams Admin Center go to Meetings > Meeting Template Policies. By default new templates are automatically added to Global meeting template policy.
Custom meeting template policies can be created and used to give different users different sets of templates.
To create a new meeting template policy select Add. Name the policy and include a description.
To hide a template from the policy, select the template and choose Hide
To move a policy from hidden templates to viewable templates select the template and choose Show
Save the policy and assign to users. Meeting template policies do not support assigning to a group.
New templates do take some time to populate through to users. As with some other policy driven settings this can be between 10 minutes or up to 24 hours.
Create a Meeting from a Meeting Template
To create a new meeting from a template, select the arrow nest to the New meeting button in the Teams calendar and choose the required template.
Create the meeting with title, invitees and other details as normal. In the image below you can see the Closed Customer Meeting template has applied a sensitivity label and is showing the options applied by the label in the options pane.
In this case the label is not enforced, so it can be removed and the settings changed.
Licensing
Meeting templates are only available to users who are assigned a Teams Premium license. Any user can join the meetings created with the template, subject to the meeting options defined in the template.
Platforms
Templates are supported across web, windows desktop and MacOS apps for Microsoft Teams, but not yet mobile apps
Admin and Set up
As a Teams admin, you will create templates and then publish them via a template policy to the users. This process is detailed above in this article. Templates including sensitivity labels will require the meeting organiser to also be assigned a Microsoft 365 E5 license, as part of the licensing requirements to use sensitivity labels in meetings.